ESPAÑOL
ENGLISH
PORTUGUES
MAGYAR
DEUTSCH
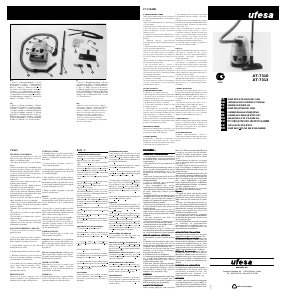
1. Desencaje la manguera de la entrada de
aspiración y abra el compartimento general
(Fig. 2).
2. Bascule el portabolsas hasta que pueda
extraer la bolsa (Fig. 3) y ciérrela tirando de la
pestaña central (Fig. 4).
3. Para colocar una nueva bolsa, doble hacia
atrás la pestaña (Fig.5A). Insérte la bolsa en
el portabolsas siguiendo la dirección de las
flechas-guía. Compruebe que ha llegado has-
ta el final de su alojamiento y se encuentra
correctamente encajada debajo de las cuatro
patillas de sujeción. (Fig.5)
4. Bascule el portabolsas hasta su posición y
cierre la tapa.
Importante:
• La tapa del compartimento general no po-
drá cerrarse cuando no haya bolsa. No fuerce
su cierre y compruebe la colocación de la
bolsa.
• Si después de haber cambiado la bolsa la
aspiración es irregular y el indicador de llena-
do permanece en color rojo, compruebe si
existe algún atasco en la manguera, tubo o
entrada de aire.
• No haga funcionar el aspirador sin bolsa ni
intente vaciar una bolsa llena y volver a utili-
zarla.
• Para garantizar el perfecto funcionamiento,
utilice exclusivamente bolsas originales de
Ufesa que encontrará en los establecimientos
autorizados.
SUSTITUCION DE LOS FILTROS
Se recomienda sustituirlos cuando se haya
cambiado cinco veces la bolsas de papel.
Filtro de protección del motor: Con el aspi-
rador sin bolsa extraiga el filtro y coloque uno
nuevo (Fig. 6). Haga coincidir las ranuras con
las patillas. Nunca utilice el aspirador sin
tener este filtro colocado.
Filtro de salida del aire: Retire el portafiltros,
extraiga el filtro y coloque uno nuevo. Haga
coincidir las ranuras con las patillas. Vuelva a
colocar la tapa del portafiltros en su lugar.
(Fig. 7)
MANTENIMIENTO Y LIMPIEZA
Los accesorios y el aspirador pueden limpiar-
se con un paño húmedo. Nunca debe sumer-
girse el aparato en agua. No utilice disolventes,
ni productos abrasivos para su limpieza.
TRANSPORTE
Para mayor comodidad puede transportar el
aspirador mediante el asa o la bandolera. Para
colocar la bandolera sujétela en los puntos
indicados. (Fig. 8)
IMPORTANT PRECAUTIONS
• Before plugging the appliance in, make sure
the mains voltage corresponds to that on the
maker’s specification plate
• Do not pull on the cord to unplug the
appliance.
• Unplug the vacuum from the mains when
not in use, and before changing the bag or
filters or cleaning.
• The vacuum should not be used without the
paper bag and the protective filter.
• This appliance is designed exclusively for
domestic use.
• Never use the vacuum to suck up hot ashes,
sharp objects or liquids.
• Do not leave the vacuum near hot ovens,
heaters or radiators.
• Do not use the vacuum if it has any passage
obstructed, since a reduction in air flow may
cause overheating and subsequent damage to
the appliance.
• Do not handle the vacuum nor the plug with
wet hands, nor immerse the appliance in water.
• Do not pull on either the cord or the suction
tube to move the vacuum. Use the carry handle.
• Do not let children handle the appliance.
• The appliance must not be used if the plug or
cord are damaged.
• When closing a door, make sure it does not
pinch the cable.
• Repairs and cable replacement must be
carried out exclusively by an Authorised
Service Technician.
USING THE VACUUM CLEANER
1. Check that the bag is in place.
2. Fit the tube to the suction hose, with the
brush or nozzle that is required and fit the hose
to the vacuum intake.
3. Pull the cord out and plug in to the mains
supply. Press the On/Off pedal.
4. Regulate the suction with the electronic
power regulator.
5. The intensity can be regulated from the
handle (Fig. 1). Opening the flap reduces
suction, while closing it increases suction.
6. When you have finished using the appliance
press the On/Off pedal. Disconnect the plug
from the mains and wind in the cord by
pressing the cord rewind pedal.
ACCESSORIES
To use the brush, fix on to the crevice nozzle.
Both can be stored separately in the rear of the
appliance.
CHANGING THE BAG
When the suction decreases considerably and
the bag full indicator shows red in the centre
of the window, this will indicate that the bag
is full. To change it, proceed as follows:
1. Detach the hose from the air intake and
open the general compartment (Fig. 2).
2. Move the bag box until you can take out the
dust (Fig. 3) and close it using the central
catch (Fig. 4).
3. To fit a new dust bag, fold the clip
backwards (Fig.5A). Insert the bag into the
bag holder by following the direction shown
on the guide-arrows. Check that it has reached
the end of its housing and that it is held
correctly under the four holding clips. (Fig.5)
4. Tilt the bag holder back into its position
and close the lid.
Important:
• The general compartment lid can not be
closed if there is no dust bag. Do not force it
closed; check the fitting of the bag.
• If after having changed the bag the suction is
irregular and the bag full indicator stays red,
check that there is no blockage in the hose,
tube or air intake.
• Never use the vacuum without a bag, nor try
to empty a full bag and reuse it.
• To guarantee perfect operation, only use
original Ufesa bags, which you will find in
authorised establishments.
REPLACING THE FILTERS
It is advisable to change these when the dust
bag has been changed five times.
Motor protection filter: Take the vacuum
cleaner without the dust bag, remove the filter
and replace with a new one (Fig. 6). Line up
the slots with the lugs.
Never use the vacuum without this filter fitted..
Air outlet filter: Take out the filter holder,
remove the filter and replace with a new one.
Line up the slots with the lugs. Replace the
filter holder in position. (Fig. 7)
MAINTENANCE AND CLEANING
The accessories and the vacuum may be
cleaned by using a damp cloth. Never immerse
the appliance in water. Do not use solvents
nor abrasive products for cleaning.
CARRYING
The vacuum may be carried comfortably by
using the handle or the carry strap. To fit the
carry strap fix on to the points indicated.
(Fig. 8)
ADVERTÊNCIAS IMPORTANTES
• Antes de ligar o aparelho na tomada, assegure-
se de que a tensão corresponde a indicada na
placa de características.
• Não desligue o fio da tomada puxando pelo
cabo.
• Desligue o aspirador da tomada quando o
estiver a utilizar e antes de proceder à sua
limpeza ou ao trocar o saco e filtros.
• Não se deve utilizar este aspirador sem saco
de papel ou filtro protector.
• Este aparelho está desenhado exclusiva-
mente para uso doméstico.
• Nunca aspire cinzas incandescentes, objectos
de ponta ou líquidos.
• Não deixe o aspirador ao lado de fornos,
estufas ou radiadores quentes.
• Não utilize o aspirador se tem alguma aber-
tura obstruída, já que se reduzir a passagem de
ar pode provocar um sobreaquecimento o que
poderia danificar o aparelho.
• Não segure o aspirador pela tomada com as
mãos molhadas. Não ponha o aparelho em
água.
• Não mova o aspirador puxando pelo cabo ou
tubo de aspiração. Utilize as pegas de trans-
porte.
• Evite que as crianças manipulem o aparelho.
• Não utilize o aparelho com o cabo ou a
tomada danificada.
• Quando fechar a porta, certifique-se de que
o cabo não fica preso.
• As reparações e trocas de cabo deverão ser
efectuadas exclusivamente por um Serviço
Técnico Autorizado.
COLOCAR O APARELHO EM
FUNCIONAMENTO
1. Comprove que o saco está colocado.
2. Ajuste a mangueira de aspiração do tubo
com a escova ou a boquilha que necessita e
encaixe a mangueira na entrada do aspirador.
3. Extraia o cabo e ligue à rede eléctrica.
Pressione o pedal de colocar em
funcionamento / paro.
4. Regule a potência com o regulador.
5. A intensidade pode ser regulada no punho
da mangueira (Fig. 1). Abrindo a janala é
menor a aspiração; fechando-a é superior.
6. Para desligar o aparelho pulse o pedal de
funcionamento / paro. Desligue a tomada da
rede eléctrica e recolha o cabo pressionando o
pedal de recolha automática.
ACESSÓRIOS
Para usar a escova, coloque-o na boquilha
para juntas. Ambos se guardam por separado
na parte traseira do aparelho.
TROCA DE BOLSA
Quando a aspiração desce consideravelmente
e o indicador de saco cheio aparecer com a cor
vermelha no centro da janela, indicará que a
bolsa estará cheia. Para sua troca, proceda da
seguinte maneira:
1. Desencaixe a mangueira da entrada de
aspiração e abra o compartimento geral
(Fig. 2).
2. Mexa o porta sacos até que possa extrair o
saco (Fig. 3) e fechá-lo tirando-o da pestana
central (Fig. 4).
3. Para colocar um saco novo, dobre para trás
a pestana (Fig. 5A). Coloque o saco no porta-
sacos seguindo a direcção das setas-guia.
Comprove que chegou até ao final do seu
alojamento e que está correctamente
encaixada por baixo das quatro patilhas de
sujeição. (Fig. 5)
4. Balance o porta-sacos até á sua posição e
feche a tampa.
Importante:
• A tampa do compartimento geral não poderá
fechar-se quando não tenha saco. Não force
o seu fecho e comprove se o saco está bem
colocado.
• Se depois de ter trocado o saco a aspiração
for irregular e o indicador de saco cheio per-
manece na cor vermelha, comprove se existe
algum impedimento na mangueira, tubo ou
entrada de ar.
• Não ponha o aspirador a trabalhar sem saco
nem tente esvaziar um saco cheio e voltar a
utilizá-lo.
• Para garantir o perfeito funcionamento, utilize
exclusivamente sacos originais de Ufesa que
encontrará nos estabelecimentos autorizados.
SUBSTITUIÇÃO DOS FILTROS
Aconselha-se substituir os filtros quando tiver
trocado cinco vezes os sacos de papel.
Filtro de protecção do motor: Com o aspi-
rador sem saco extraia o filtro e coloque um
novo (Fig. 6). Faça coincidir os encaixes com
as juntas. Nunca utilize o aspirador sem ter
este filtro colocado.
Filtro de saída do ar: Retire o porta filtros,
extraia o filtro e coloque um novo. Faça
coincidir os encaixes com as juntas. Volte a
colocar a tampa do porta filtros no seu lugar.
(Fig. 7)
MANUTENÇÃO E LIMPEZA
Os acessórios e o aspirador podem limpar-se
com um pano húmido. Nunca deve submergir-
se o aparelho em água. Não utilize dissolventes,
nem produtos abrasivos para sua limpeza.
TRANSPORTE
Para maior comodidade pode transportar o
aspirador com a asa ou com a correia tiracolo.
Para colocar a correia tiracolo segure-a nos
pontos indicados.
WICHTIGE HINWEISE
• Bevor Sie das Gerät am Stromnetz anschließen,
überprüfen Sie, daß die Spannung mit dem auf
dem Geräteschild angegebenen Wert
übereinstimmt.
• Trennen Sie das Gerät nie vom Stromnetz,
indem Sie am Kabel ziehen.
• Trennen Sie den Staubsauger vom Stromnetz,
wenn er nicht benutz wird und immer vor seiner
Reinigung sowie vor jedem Beutel- oder
Filterwechsel.
• Das Gerät sollte nie ohne Papierbeutel oder
Schutzfilter verwendet werden.
• Dieses Gerät ist ausschließlich für den häuslichen
Gebrauch vorgesehen.
• Saugen Sie mit dem Gerät nie glühende
Aschenreste, spitze Gegenstände oder
Flüssigkeiten auf.
• Lassen Sie den Staubsauger nie neben einem
Ofen, einem Heizlüfter oder einem heißem
Heizkörper stehen.
• Benutzen Sie den Staubsauger nie, wenn eine
seiner Öffnungen verstopft ist, denn eine
reduzierte Luftströmung kann zur Überhitzung
und somit zur Beschädigung des Geräts führen.
• Berühren Sie weder den Staubsauger noch den
Anschlußstecker mit nassen Händen. Tauchen
Sie das Gerät nie unter Wasser.
• Verschieben Sie den Staubsauger nicht, indem
Sie am Kabel oder am Saugschlauch ziehen.
Benutzen Sie den Traggriff.
• Vermeiden Sie, daß Kinder das Gerät
manipulieren.
• Benutzen Sie das Gerät nie mit beschädigtem
Kabel oder Stecker.
• Wenn Sie eine Tür schließen, vergewissern Sie
sich zuerst, daß das Kabel nicht eingeklemmt
wird.
• Alle Reparaturen und Kabelwechsel dürfen
ausschließlich von einem zugelassenen
Technischen Dienst ausgeführt werden.
INBETRIEBNAHME UND BETRIEB
1. Überprüfen Sie, daß sich ein Beutel im
Staubsauger befindet.
2. Bringen Sie das Rohr mit der Büste oder dem
Mundstück Ihrer Wahl am Saugschlauch an und
setzen Sie diesen am Staubsaugereingang ein.
3. Ziehen Sie das Kabel aus und schließen Sie es
am Stromnetz an. Drücken Sie nun auf das Pedal
für Ein- / Ausschalten.
4. Stellen Sie die gewünschte Saugleistung mit
dem Regler ein.
5. Die Saugintensität kann vom Handgriff aus
eingestellt werden. Je weiter der Schlitz geöffnet
wird, desto schwächer ist die Saugleistung und
umgekehrt (Abb. 1).
6. Wenn Sie die Arbeit mit dem Staubsauger
beendet haben, drücken Sie erneut auf das Pedal
für Ein- / Ausschalten. Ziehen Sie den Stecker
aus der Steckdose und ziehen Sie das Kabel ein,
indem Sie den automatischen Kabeleinzug
betätigen.
ZUBEHÖRTEILE
Um die Bürste zu benutzen, bringen Sie sie am
Mundstück für Fugen an. Beide werden getrennt
im Hinterteil des Geräts aufbewahrt.
BEUTELWECHSEL
Wenn die Saugleistung deutlich abnimmt und
der Anzeiger der Beutelkapazität in der Mitte der
Luke eine rote Farbe aufweist, bedeutet dies, daß
der Beutel voll ist. Um diesen auszuwechseln,
gehen Sie bitte wie folgt vor:
1. Nehmen Sie den Schlauch vom Saugeingang
ab und öffnen Sie das Hauptabteil (Abb. 2).
2. Schwenken Sie den Beutelhalter, bis Sie den
Beutel entnehmen können und schließen Sie ihn,
indem Sie an der mittleren Klappe ziehen (Abb.
3, 4).
3. Um einen neuen Staubsack einzusetzen,
drücken Sie den Falz bitte nach hinten (Abb. 5A).
Setzen Sie nun den Sack in die dafür vorgesehene
Halterung ein und zwar in Richtung der
ensprechenden Pfeile. Überprüfen Sie, daß er
richtig in seinem Sitz sitzt und unter den vier
Halterungsschenkeln eingerastet ist (Abb.5).
4. Schwenken Sie nun die Halterung des
Staubsackes in ihre Position und schließen Sie
den Deckel.
Wichtig:
• Der Deckel der Hauptbox läßt sich nicht
schließen, wenn kein Staubsack eingesetzt ist.
Versuchen Sie nie, den Deckel mit Gewalt zu
schließen und überprüfen Sie, daß der Sack
korrekt eingesetzt ist.
• Wenn nach dem Beutelwechsel die Saugstärke
unregelmäßig ist und der Anzeiger der
Beutelkapazität immer noch eine rote Farbe
aufweist, überprüfen Sie, ob der Schlauch, das
Rohr oder der Lufteingang verstopft ist.
• Nehmen Sie den Staubsauger nie ohne Beutel in
Betrieb und versuchen Sie auch nicht, einen
Beutel zu entleeren und wieder einzusetzen.
• Für einen garantiert tadellosen Betrieb benutzen
Sie ausschließlich die Originalbeutel von UFESA,
die Sie in jedem zugelassenen Fachgeschäft
finden.
AUSTAUSCH DER FILTER
Es wird empfohlen die Filter nach fünfmaligem
Beutelwechsel zu ersetzen.
Motorschutzfilter: Entnehmen Sie den Filter
beim Staubsauger ohne Beutel und setzen Sie
den neuen Filter ein, indem Sie die Rillen und die
Schenkel ineinanderpassen (Abb. 6). Benutzen
Sie den Staubsauger nie ohne diesen Filter.
Luftaustrittfilter: Entfernen Sie den Filterhalter,
entnehmen Sie den Filter und setzen Sie einen
neuen Filter ein, indem Sie die Rillen und die
Schenkel ineinanderpassen (Abb. 7). Setzen Sie
dann den Filter-halterdeckel wieder an seinem
Ort ein.
REINIGUNG UND WARTUNG
Die Zubehörteile und der Staubsauger können
mit einem feuchten Lappen gereinigt werden.
Das Gerät darf nie in Wasser getaucht werden.
Verwenden Sie keine Reinigungs- oder
Scheuermittel für die Reinigung Ihres
Staubsaugers.
TRANSPORT
Der Staubsauger kann auf bequeme Weise mit
dem Griff oder dem Schulterriemen transportiert
werden. Für das Anbringen des Schulterriemens,
befestigen Sie ihn an den angegebenen Stellen.
(Abb. 8)
ALKATRÉSZEK
A kényelmes szállítás érdekében használja a
fogantyút vagy a vállszíjat. A felszerelésnél
erősítse a vállszíjat a megjelölt pontokra.
A PORZSÁK CSERÉJE
Amikor a porszívó jóval kisebb erővel szív és
a telítettségjelző a piros térbe ér, azt mutatja,
hogy a porzsák megtelt. A porzsák cseréjénél
a következőképen járjon el:
1. Távolítsa el a rögzítő rugót és nyissa ki
porzsákkeretet (Ábra 2).
2. Rázza a porzsákkeretet addig amíg ki tudja
emelni a porzsákot és zárja le a központi zárat
alkalmazva (Ábra 3, 4).
3. Az új porzsák cseréjéhez húzza hátrafelé a
csatlakozótagok peremeit (Ábra 5A).
Helyezze a porzsákot a rekeszbe, követve a
jelzett nyilak irányát. Győző djön meg róla,
hogy a porzsák elérte a rekesz mélyét, és hogy
szilárdan rögzült a négy tartó perem alatt.
(Ábra 5)
4. Rázza meg a porzsákkeretet addig, amíg a
porzsák a helyére kerül és zárja le a fedelet.
Fontos:
• A rekesz fedele nem zárható, ha nincs
porzsák benne. Ne erőltesse a lezárást, és
ellenőrizze a porzsák elhelyezését.
• Ha az új porzsák behelyezése után sem szív
rendesen a porszívó és a telítettségjelző
továbbra is a piros térben marad, ellenőrizze,
hogy a porszívó csöve nemdugaszolódott-e el.
• Ne használja a porszívót a porzsák nélkül, és
a kiűrített porzsákot ne helyezze vissza a
készülékbe.
• A tökéletes működés érdekében használjon
eredeti UFESA porzsákot amelyet megtalál a
megbízott kereskedelmi üzletekben.
A SZŰRŐK ELHELYEZKEDÉSE
Ajánlatos a szűrők kicserélése, ha már
legalább ötször kicserélte a porzsákot.
A motort védő szűrő: Amikor a porszívóból
eltávolította a porzsákot vegye ki a szűrőt és
helyezzen be egy újat. Egyeztesse a réseket a
kiálló fülekkel (Ábra 6). Soha ne használja a
porszívót e nélkül a szűrő nélkül.
A kiáramló levegőt lezáró szűrő: Vegye ki
a szűrőtartót, emelje ki a szűrőt és helyezze be
az újat. Egyeztesse a réseket a kiálló fülekkel.
Hellyezze vissza a szűrőtartó tetejét.
KARBANTARTÁS ÉS TISZTITÁS
A porszívó részei egy vizes ruhával
tisztíthatók. Soha ne helyezze a készüléket
vízbe. Ne használjon a tisztításnál maró vagy
csiszoló anyagokat.
HORDOZÓ SZÍJ
A porszívó mozgatását megkonnyíti a
hordozó szíj használata. Használatához
rogzítse a képen látható helyre. (Ábra 8)
ADVERTENCIAS IMPORTANTES
• Antes de conectar el aparato a la red eléctri-
ca, asegúrese de que la tensión corresponde a
la indicada en la placa de características.
• No desconecte la clavija tirando del cable.
• Desconecte el aspirador de la red cuando no
se use y antes de proceder a su limpieza o al
cambio de bolsa y filtros.
• No se debe utilizar este aspirador sin la bolsa
de papel y el filtro protector.
• Este aparato está diseñado exclusivamente
para uso doméstico.
• Nunca aspire cenizas incandescentes, obje-
tos en punta o líquidos.
• No deje el aspirador al lado de hornos,
estufas o radiadores calientes.
• No utilice el aspirador si tiene alguna aber-
tura obstruida, ya que se reduciría el paso del
aire, provocando sobrecalentamientos que
pueden dañar el aparato.
• No coja el aspirador ni la clavija con las
manos mojadas. No sumerja el aparato en
agua.
• No desplazar el aspirador tirando del cable o
del tubo de aspiración. Utilice el asa de trans-
porte.
• Evite que los niños manipulen el aparato.
• No utilice el aparato con el cable o la clavija
dañada.
• Cuando cierre una puerta, cerciórese de que
ésta no pilla el cable.
• Las reparaciones y cambios de cable debe-
rán ser efectuadas exclusivamente por un
Servicio Técnico Autorizado.
PUESTA EN MARCHA Y
FUNCIONAMIENTO
1. Compruebe que la bolsa está colocada.
2. Ajuste a la manguera de aspiración el tubo
con el cepillo o boquilla que necesite y encaje
la manguera en la entrada del aspirador.
3. Extraiga el cable y conecte a la red. Presio-
ne el pedal de puesta en marcha / paro.
4. Regule la potencia con el regulador.
5. La intensidad puede ser regulada desde la
empuñadura (Fig. 1). Abriendo la pestaña es
menor la aspiración; cerrándola es superior.
6. Cuando haya terminado de utilizar el apa-
rato pulse el pedal de puesta en marcha / paro.
Desconecte la clavija de la red y recoja el
cable presionando el pedal de recogida auto-
mática.
ACCESORIOS
Para usar el cepillo, colóquelo en la boquilla
para juntas. Ambos se guardan por separado
en la parte trasera del aparato.
CAMBIO DE LA BOLSA
Cuando la aspiración descienda considera-
blemente y el indicador de llenado aparezca
en color rojo en el centro de la ventana,
indicará que la bolsa está llena. Para su cam-
bio, proceda de la siguiente manera:
FIGYELEMEZTETÉSEK
• A készülék használata előtt ellenőrizze az
adattáblán, hogy a készülék megadott
feszültsége megegyezik-e a hálózati
feszültséggel. Ajánlatos földelt konnektorok
használata.
• Soha ne húzza ki a csatlakozó dugót
rángatva és ne hagyja lógatott helyzetbe .
• Használat után , tisztítás előtt illetve a
porzsák cseréje előtt húzza ki a csatlakozó
dugót a konnektorból.
• Ne használja a készüléket a porzsák illetve
a védő szűrő nélkül.
• Ne használja a porszívót más célra, csak
háztartási célra tervezték.
• Soha ne porszívózzon forró hamut, hegyes
dolgokat illetve folyadékot.
• Soha ne hagyja a készüléket forró felületek
mellett.
• Soha ne használja a porszívót ha a szívófej
eltömődött, mert ez elősegíti a készülék
túlmelegedését és megrongálhatja azt.
• Ne érintse a porszívót illetve az elektromos
vezetéket vizes kézzel. Ne helyezze a
porszívót vízbe.
• Ne szállítsa a készüléket a vezeték
rángatásával. Használja a fogantyút illetve a
vállszíjat.
• Ügyeljen arra, hogy gyermekek ne
használják a készüléket.
• Soha ne használja a készüléket ha a vezeték
vagy a csatlakozó dugó megrongálódott
állapotban van.
• Ha bezár egy ajtót ügyeljen arra, hogy a
vezeték ne kerüljön becsípett helyzetbe.
• Ha a hálózati vezeték vagy maga a készülék
megrongálódik csak szakember javíthatja
meg; ezért forduljon ezekben az esetekben a
jótállási javításokkal megbízott szervízhez.
MŰKÖDTETÉS
1. Ellenőrizze, hogy a porzsák a helyén van-e.
2. Illessze össze a gegecsőt a csővel és azt a
kefét, amelyet használni akar. Helyezze be a
gegecsőt a porszívó kimenetelébe.
3. Húzza ki a vezetéket és csatlakoztassa az
elektromos hálózatra. Nyomja meg az
indítópedált.
4. Állítsa be a kívántnak megfelelő
teljesítményt.
5. A teljesítmény nagysága beállítható a
fogantyú segítségével. Ha kinyitja a rést a
szívás gyengébb, ha becsukja erősebb
(Ábra 1).
6. Ha befejezte a készülék használatát nyomja
meg ismételten az indítókapcsolót. Húzza ki
a vezetéket a konnektorból. Majd az
automatikus vezetékfeltekerő segítségével
tekerje fel a vezetéket.
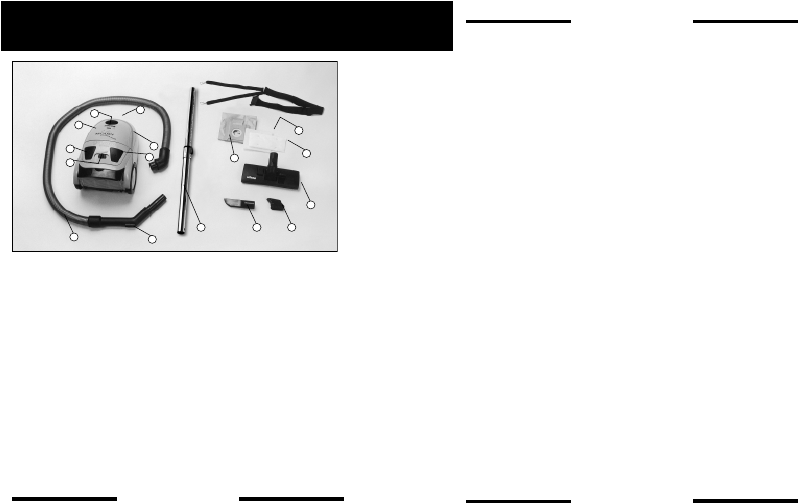
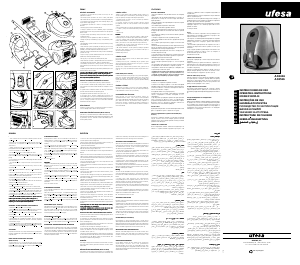
E
1. Cepillo • 2. Boquilla para juntas • 3. Cepillo
para muebles • 4. Tubo • 5. Control manual de
aspiración • 6. Manguera • 7. Cajetín portabolsa
8. Bolsa • 9. Filtro de protección del motor •
10. Filtro de expulsión del aire • 11. Compar-
timento general • 12. Pedal puesta en marcha
/ paro • 13. Regulador de potencia electrónico
14. Pedal recogecables • 15. Indicador de
llenado • 16. Asa • 17. Bandolera
GB
1. Brush• 2. Crevice nozzle • 3. Upholstery
brush • 4. Tube • 5. Manual control for suction
• 6. Hose • 7. Bag box • 8. Bag • 9. Motor
protection filter • 10. Air outlet filter •
11. General compartment • 12. On/Off pedal
• 13. Electronic power regulator • 14. Cord
rewind pedal • 15. Bag full indicator •
16. Handle • 17. Carry strap
F
1. Grande brosse • 2. Suceur pour les joints •
3. Brosse à meubles • 4. Tube • 5. Contrôle
manuel d’aspiration • 6. Tube flexible • 7.
Porte-sac • 8. Sac • 9. Filtre protection moteur
• 10. Filtre expulsion d’air • 11. Compartiment
général • 12. Touche marche /arrêt •
13. Régulateur de puissance électronique •
14. Touche enrouleur de cordon •
15. Indicateur sac plein • 16. Poignée • 17.
Bandoulière
MOD. AT-7313
1
2 34
5
6
7
8
10
9
11
12
13
14
15
16
FRANÇAIS
rouge, indiquant que le sac est plein. Pour le
remplacer, procéder comme suit:
1. Retirer le tube flexible de la bouche
d’aspiration et ouvrir le compartiment général
(Fig. 2).
2. Faire basculer le porte-sac afin de pouvoir
retirer le sac (Fig. 3) et le refermer en tirant du
cil central (Fig. 4).
3. Pour placer un nouveau sac, pliez en arrière
le rebord (Fig. 5 A). Insérez le sac dans le
porte-sac suivant les flèches-guides. Vérifiez
si le sac est bien arrivé au fond de son
logement et s’il est correctement encastré sous
les quatre supports d’attache (Fig. 5).
4. Faites basculer le porte-sac jusqu’à sa
position et fermez le couvercle.
Important:
• S’il n’y a pas de sac, on ne pourra pas fermer
le couvercle du compartiment général. Ne
forcez pas pour essayer de fermer et vérifier
la mise en place du sac.
• Si après avoir remplacé le sac l’aspiration est
irrégulière et l’indicateur sac plein continue
allumé en rouge, vérifier que le tube flexible,
tube principal ou bouche d’entrée d’air ne
soient pas obstrués.
• Ne pas faire fonctionner l’appareil sans sac
et ne jamais essayer de vider un sac plein pour
le réutiliser.
• Pour un parfait fonctionnement, utiliser
exclusivement des sacs originaux UFESA,
que vous trouverez dans les établissements
agréés.
CHANGEMENT DES FILTRES
Il est recommandé de les remplacer tous les
cinq changements de sac.
Filtre de protection du moteur: Retirer le
filtre et en placer un nouveau (Fig. 6). Faire
coïncider les rainures avec les pattes d’attache.
Remettre en place le couvercle du porte-filtre.
Ne jamais utiliser l'aspirateur sans filtre.
Filtre de sortie d'air: Enlever le porte-filtre,
retirer le filtre et en placer un nouveau. Faire
coincider les rainures avec les pattes d'attache.
(Fig. 7)
MAINTENANCE ET NETTOYAGE
Les accessoires et l’aspirateur peuvent être
nettoyés avec un chiffon humide. Ne jamais
plonger l’appareil dans l’eau. Ne pas utiliser
de dissolvants, ni de produits abrasifs.
TRANSPORT
Pour déplacer l’aspirateur plus facilement,
utiliser la poignée ou la bandoulière. Pour
placer la bandoulière, la fixer aux endroits
prévus à cet effet. (Fig. 8)
REMARQUES IMPORTANTES
• Avant de brancher l’appareil au réseau
électrique, s’assurer que la tension correspond
bien à celle indiquée sur la plaque signalétique.
• Ne jamais débrancher la prise en tirant sur le
cordon.
• Débrancher l’appareil du réseau électrique
lorsque vous ne l’utilisez pas et avant de
procéder à son nettoyage ou au changement
du sac ou des filtres.
• Ne jamais utiliser cet aspirateur sans le sac
papier et le filtre de protection.
• Cet appareil a été exclusivement conçu pour
une utilisation ménagère.
• Ne jamais aspirer de cendres incandescen-
tes, d’objets pointus ou des liquides.
• Ne pas laisser l’appareil à côté de fours,
poêles ou radiateurs chauds.
• Ne pas utiliser l’appareil avec une ouverture
obstruée. Cela réduirait le passage de l’air
provoquant des surchauffes qui risquent
d’endommager l’appareil.
• Ne pas toucher l’aspirateur ni la prise avec
les mains mouillées. Ne pas plonger l’appareil
dans l’eau.
• Ne pas déplacer l’appareil en tirant le cordon
ou le tube d’aspiration. Utiliser la poignée de
transport.
• Éviter que les enfants manipulent l’appareil.
• Ne pas utiliser l’appareil si le cordon ou la
prise sont endommagés.
• Veiller à ne pas coincer le cordon en fermant
les portes.
• Les réparations et remplacements de cordon
devront être exclusivement réalisés par un
Centre de Service Après-Vente agrée Ufesa.
MISE EN ROUTE ET
FONCTIONNEMENT
1. S’assurer que le sac est bien en place.
2. Fixer sur le tube d’aspiration le tube avec la
brosse ou le suceur souhaité et emboîter le
tube flexible sur la bouche de l’aspirateur.
3. Sortir le cordon et brancher l’appareil au
réseau électrique. Appuyer sur la touche mar-
che /arrêt.
4. Régler la puissance à l’aide du régulateur.
5. Le débit d'air peut être réglé à partir de la
poignée (Fig. 1). En ouvrant la languette,
l'aspiration est moindre; en la fermant,
l'aspiration est plus puissante.
6. Après avoir utilisé l'appareil, appuyer sur la
touche marche/arrêt. Débrancher la prise et
enrouler le cordon en appuyant sur la touche
de l’enrouleur automatique.
ACCESSOIRES
Pour utiliser la brosse, la placer sur le suceur
pour joints. Ces deux éléments peuvent être
rangés séparément dans la partie arrière de
l’appareil.
CHANGEMENT DU SAC PAPIER
Lorsque l’aspiration diminue considéra-
blement l’indicateur "sac plein" passera au
D
1. Bürste • 2. Mundstück für Fugen • 3. Bürste für
Möbel • 4. Rohr • 5. Manuelle Saugkontrolle • 6.
Schlauch • 7. Beutelhalterung • 8. Beutel • 9.
Motorschutzfilter • 10. Luftaustrittfilter • 11.
Hauptabteil • 12. Pedal für Ein- / Ausschalten • 13.
Elektronischer Leistungsregler • 14.
Kabeleinzugspedal • 15. Anzeige der Beutelkapazität •
16. Griff • 17. Schultertragriemen
P
1. Escova • 2. Boquilha para juntas • 3. Escova para
móveis • 4. Tubo • 5. Controle manual de aspiração • 6.
Mangueira • 7. Gaveta porta saco • 8. Saco • 9. Filtro de
protecção do motor •
10. Filtro de expulsão de ar • 11. Compartimento geral •
12. Pedal de ligar a desligar • 13. Regulador de potência
electrónico • 14. Dispositivo para enrolar o cabo • 15.
Indicador de cheio • 16. Asa • 17. Correia tiracolo
HU
1. Kefe • 2. Résszívó • 3. Kárpítszívó • 4. Cső • 5. A
porszívó kézi ellenőrzése • 6. Gégecső • 7. Porzsák
tartó • 8. Porzsák • 9. Motort védő szűrő • 10. A
levegő kiáramlást vedő szűrő • 11. Tároló szekrény
• 12. Kapcsolópedál • 13. Sebesség ellenőrző • 14.
Vezetékfeltekerő • 15. Telítettségjelző •16. Fogantyú
• 17. Vállszíj


Присоединиться к беседе по данному изделию
Здесь вы можете поделиться тем, что думаете о Ufesa AT7310 Пылесос. Если у вас есть вопросы, сначала внимательно прочтите инструкцию. Запросить руководство можно с помощью контактной формы.