Руководство Saturn ST-CH7408 Кухонная вытяжка

Вам нужно руководство для вашего Saturn ST-CH7408 Кухонная вытяжка? Ниже вы можете бесплатно просмотреть и скачать PDF-инструкцию на русском языке. В настоящее время этот продукт имеет 2 часто задаваемых вопроса, 0 комментариев и имеет 0 голосов. Если это не то руководство, которое вам нужно, свяжитесь с нами.

Ваше устройство неисправно, и в руководстве отсутствует решение? Перейдите в Repair Café для получения бесплатных ремонтных услуг.

Руководство

Loading…

4
II. Matters need attention for
installation
1. Insta ll su r roundin gs (shown in
figure 1)
Excessive windows and doors should
be avoided around it when the Kitchen
hood is Installed, because when there
are too many windows and doors, the
air convection is oversized, which
enable the lampblack rise to the
250mm effective attraction scope. The
efficiency of the kitchen hood comes
under the influence.
2. Idea l location for the
installation (shown in figure 2)
The kitchen hood is installed over the
cooker hood, the range between the
predestined affinity low end and the
stove surface should be at least 650
mm. Us scope is better to be in 650-
700mm.
3. Re quests for the installat ion of
smoke pipe (shown in figure 3)
(1) The distance from the exit of the
smoke pipe to the organism should
not be too long. Make the radius of
turn as large as possible. Make few
curves, or the effect will not be so
good.
(2) The exhaust duct should reach
outdoor of the common smoke pipe,
and the connector must be narrow.
Please don't discharge the waste gas
into hot flue.
4. Kee ping the org anism le vel
(shown in figure 4)
After the installment, watch out if it's
horizontal to avoid the spillover of the
oil, caused by the oil cup being
oblique.
1. The waste gas should not be
discharged into the hot flue, which is
used to discharged the smoke of
burning gas or other kinds of fuel.
2. When boring holes, avoid the power
cords inside the wall, so as not to get
an electric shock (shown in figure5).
3. The electric outlet must be earth
lead and the plug can't be changed
optionally (shown in figure 6).
4. Proper space (usually about 10mm)
should be left on both sides of the
organism when making the cabinet.
The boards that cover the organism
should be turnable, so as to be
convenient for maintenance and repair
(shown in figure 7).
5
III. Method of installation
1. Determining the location: install the
kitchen hood horizontally above the
stove. The bottom of the range hood
is about 650mm to 750mm high. The
size the with drawable boards we refer
to you is 430mm, which can be
adjusted according to actual situation.
The open holes must be vertical,
centered and horizontal to the
organism.
2. Installing the cladding: first bore
three holes in the dry wall, whose
diameters are 8mm and depths are
50mm to 60mm. Then put the
expansion tube into the holes. At last
use the lag wood screws of the size of
ST4х50 in the packing box to set the
cladding.
3. Adjusting the stretched tube (if
there is): pull out the stretched tube,
remove the protective layer, put it into
the gap between the decorated tube
and organism and adjust to the
appropriate height.
4. Installing the organism (in figure
8): press and slide the pothook on the
cladding into the holes at the back of
the organism. Rock the organism with
the hand to see, if it is fastened.
5. Fixing the exhaust duct: insert the
exhaust duct between the inside track
and the outside track of the air outlet,
set with ST3X6 bolt, and put the other
end outdoor.
6. Fixing the exhaust duct: insert the
exhaust duct into the inside track of
the check valve's air outlet, set with
ST3X6 tapping screw and connect the
other end outdoor (the air outlet is at
the top of the organism).
7. Fixing the other end of the exhaust
duct (reference)
(1) When the exhaust duct and the
charging floor are just against the
window: remove a pane of glass and
fix a veneer with a hole. You can also
make a hole on the glass.
(2) When the charging floor is not
near the window:
Choose the nearest charging floor and
the window, which can reach outdoor
to fix the exhaust duct by going
through the window; or choose the
nearest charging floor and bore a hole
in the wall, then make the exhaust
duct go through the wall.
(3) Bore a hole in the wall:
Measure and draw a circle on the wall
(the diameter is a little bigger, than
that of the exhaust duct), and bore a
hole with long drill, pay attention to
the structure and metal of the wall.
Don't destroy the wall surface bey ond
the hole. The diameter of the hole
should be close to the diameter of the
exhaust duct, or the smoke can not go
out smoothly. The noise will be too
much and the wind rate will also
reduce.
Загрузить руководство на русскийском (PDF, 1.21 MB)
(Помните о необходимости охраны окружающей среды и распечатывайте настоящее руководство только в том случае, если это действительно необходимо)

Loading…

Рейтинг

Сообщите нам, что вы думаете о Saturn ST-CH7408 Кухонная вытяжка, оставив оценку продукта. Хотите поделиться вашими впечатлениями от данного изделия или задать вопрос? Вы можете оставить комментарий в нижней части страницы.
Вы довольны Saturn ST-CH7408 Кухонная вытяжка?
Да Нет
Будьте первым, кто оценит это изделие
0 голоса

Присоединиться к беседе по данному изделию

Здесь вы можете поделиться тем, что думаете о Saturn ST-CH7408 Кухонная вытяжка. Если у вас есть вопросы, сначала внимательно прочтите инструкцию. Запросить руководство можно с помощью контактной формы.

Подробнее об этом руководстве

Мы понимаем, что приятно иметь бумажное руководство для вашего Saturn ST-CH7408 Кухонная вытяжка. Вы всегда можете скачать инструкцию с нашего сайта и распечатать самостоятельно. Если вы хотите получить оригинальное руководство, мы рекомендуем вам связаться с Saturn. Возможно, они смогут предоставить оригинальное руководство. Вы ищете руководство для вашего Saturn ST-CH7408 Кухонная вытяжка на другом языке? Выберите предпочитаемый язык на нашей домашней странице и найдите номер модели, чтобы узнать, есть ли она у нас в наличии.

Технические характеристики

Бренд Saturn
Модель ST-CH7408
Категория Кухонные вытяжки
Тип файла PDF
Размер файла 1.21 MB

Все инструкции для Saturn Кухонные вытяжки
Больше руководств Кухонные вытяжки

Часто задаваемые вопросы о Saturn ST-CH7408 Кухонная вытяжка

Наша служба поддержки выполняет поиск полезной информации по изделиям и отвечает на часто задаваемые вопросы. Если вы заметили неточность в наших часто задаваемых вопросах, сообщите нам об этом с помощью нашей контактной формы.

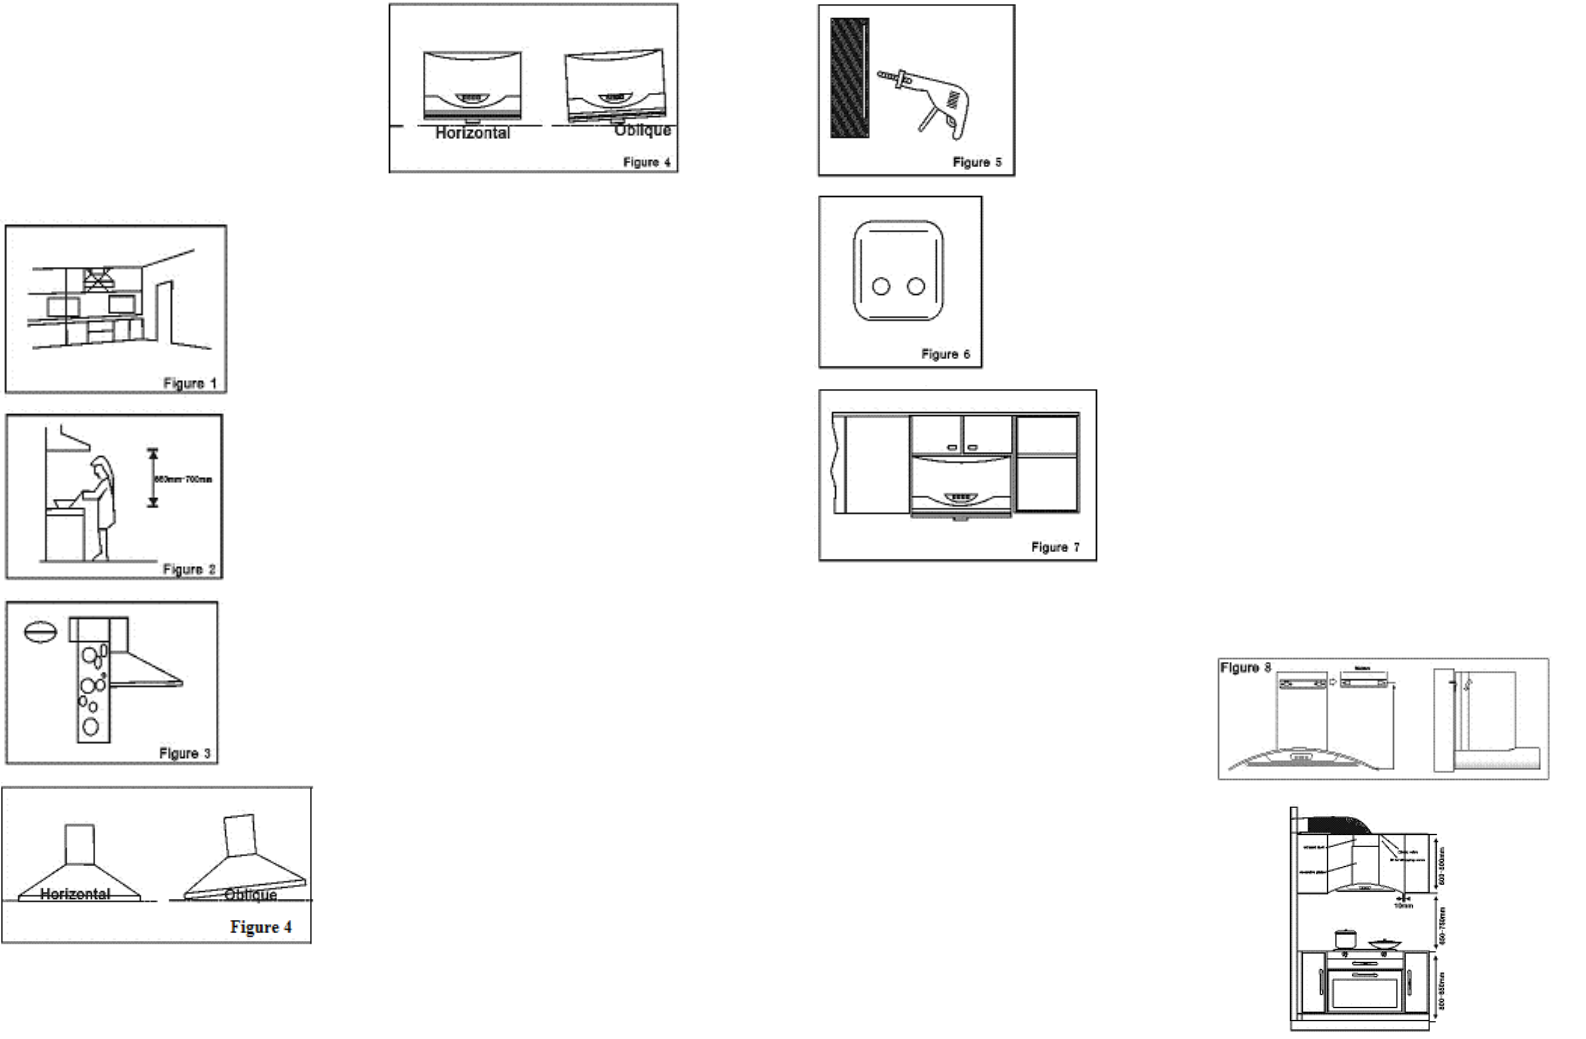
Какое расстояние должно быть между варочной панелью и вытяжкой? Проверенный

Зависит от производителя, но в целом вытяжка должна находиться как минимум на расстоянии 65 см над газовой плитой, и как минимум 50 см над электрической или индукционной. Это необходимо для соблюдения пожарной безопасности.

Это было полезно (1215) Читать далее

Нужна ли мне вытяжка с мотором или без? Проверенный

Вытяжки с двигателем предназначены для вытяжки воздуха наружу. Вытяжка без мотора предназначена для централизованной системы вентиляции. Никогда не подключайте вытяжку с двигателем к центральной системе вентиляции!

Это было полезно (635) Читать далее
Руководство Saturn ST-CH7408 Кухонная вытяжка

Сопутствующие товары

Связанные категории