
ENGLISH
Introduction
Congratulations on your purchase and welcome to Philips! To fully
benet from the support that Philips offers, register your product at
www.philips.com/welcome.
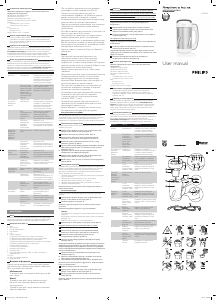
1 Handgrip
2 Motor unit
3 Overow sensor
4 Blade unit
5 Jug
6 Control panel
- A. Smooth soup program with light
- B. Chunky soup program with light
- C. Compote program with light
- D. Smoothie program with light
- E. Manual blending program with light
- F. Program selection button
- G. Start/stop button
7 Motor unit connector
8 Jug connector
9
Level indications (The MIN and MAX indication are on the inside of the jug.)
10 Handle
11 Mains cord socket
12 Mains cord
Important
Read this user manual carefully before you use the
appliance and save it for future reference.
- Never immerse the motor unit or the jug in water.
- Keep the appliance and its mains cord out of reach
of children when the appliance is switched on or
cooling down.
- Keep the appliance and the mains cord away from
hot surfaces.
- The temperature of accessible surfaces is high when
the appliance is operating (Fig. 2).
- Check if the voltage indicated on the appliance
corresponds to the local mains voltage before you
connect the appliance.
- Do not use the appliance if the plugs, the mains cord
or the appliance itself are damaged.
- If the mains cord is damaged, always have it replaced
with one of the original type in order to avoid a hazard.
- Make sure that your hands are dry when you
insert the mains cord into the appliance and in the
wall socket.
- This appliance is not intended for use by persons
(including children) with reduced physical, sensory
or mental capabilities, or lack of experience and
knowledge, unless they have been given supervision
or instruction concerning use of the appliance by a
person responsible for their safety.
- Children should be supervised to ensure that they
do not play with the appliance.
Caution
- This appliance is intended for household use only.
If the appliance is used improperly or for professional
or semi-professional purposes or if it is not used
according to the instructions in the user manual, the
guarantee becomes invalid and Philips refuses any
liability for damage caused.
- Always place the appliance on a dry, at and stable
surface.
- Only connect the appliance to an earthed wall socket.
- Never use any accessories or parts from other
manufacturers or that Philips does not specically
recommend. If you use such accessories or parts, your
guarantee becomes invalid.
- This appliance is not intended to be operated
by means of an external timer or a separate
remote-control system.
- Do not let the appliance run unattended.
- Do not let the appliance operate when it is empty.
- Never exceed the MAX indication in the jug.
- Beware of hot steam coming out of the appliance when
you remove the motor unit after preparing hot soup.
- Be careful, the cutting edges of the blade unit are sharp.
- Do not move the appliance when it is operating.
This Philips appliance complies with all standards regarding electromagnetic
elds (EMF). If handled properly and according to the instructions in this
user manual, the appliance is safe to use based on scientic evidence
available today.
Remove the sticker from the jug and clean all parts before you use te
appliance for the rst time.
1 Hold the handle of the jug with one hand and with the other hand lift
the motor unit off the jug by its handgrip (Fig. 3).
2 Fill the jug with water up to the MAX indication (Fig. 4).
3 Hold the motor unit above the jug with both connectors aligned and
then lower the motor unit into the jug (Fig. 5).
4 Put the small plug in the socket of the jug (1) and put the mains plug
in the wall socket (2) (Fig. 6).
5 Press the program selection button 3 times to select the compote
program and then press the start/stop button (Fig. 7).
, After approx. 10 minutes you hear a beep to indicate that the
program has nished.
6 Hold the handle of the jug with one hand and with the other hand lift
the motor unit off the jug by its handgrip (Fig. 3).
7 Pour the water out of the soup jug and rinse the inside of the jug
under the tap (Fig. 8).
The soup maker has a blade unit for blending ingredients and a heating
element to heat the ingredients to cook soup. You can also use the
appliance to make compotes or smoothies. It has 4 preset modes and
a manual program button:
1 Smooth soup program to make a smooth soup in 23 minutes.
2 Chunky soup program to make a chunky soup in 20 minutes.
3 Compote program to make a compote in 13 minutes.
4 Smoothie program to make a smoothie in 3 minutes.
5 Manual blending program.
Note: You can nd delicious recipes and many tips in the separate recipe booklet.
General procedure
The following steps are general steps that apply to all ve programs.
1 Hold the handle of the jug with one hand and with the other hand lift
the motor unit off the jug by its handgrip (Fig. 3).
2 Put the ingredients in the jug (Fig. 9).
Note: If you are cooking meat and vegetables, make sure you put the vegetables
in the jug rst.
Note: Make sure the ingredients are spread evenly over the bottom of the jug.
Tips
- For best taste, use fresh seasonal ingredients.
- Cut the ingredients in cubes of 2cm to get perfect results.
- Defrost ingredients before putting them in the jug.
3 Add water or another liquid to the ingredients in the jug (Fig. 4).
Make sure the water level is somewhere between the MIN and MAX
indication.
4 Stir the liquid and ingredients (Fig. 10).
5 Hold the motor unit above the jug with both connectors aligned and
then lower the motor unit into the jug (Fig. 5).
6 Put the small plug in the socket of the jug (1) and put the mains plug
in the wall socket (2) (Fig. 6).
7 Press the program selection button to select the desired
program (Fig. 7).
Tip: If you prefer your soup even ner, or would like to do some blending in your
chunky soup or compote, select the manual blending program. Press and hold
the start/stop button to start blending. To stop blending, simply release the
start/stop button.
8 Press the start/stop button to start operating (Fig. 11).
, The corresponding light goes on and the soup maker starts the
cooking and/or blending process (Fig. 12).
, When the program has nished, the appliance beeps.
Note: You can stop the process at any time by pressing the start/stop button again.
9 Remove the mains plug from the wall socket and from the appliance.
10 Hold the handle of the jug with one hand and with the other hand lift
the motor unit off the jug by its handgrip (Fig. 3).
11 You can now pour the soup, smoothie or compote into a bowl (Fig. 13).
Note: Clean the appliance after every use. See chapter ‘Cleaning’.
Always unplug the appliance before you clean it.
Never immerse the motor unit or jug in water. Do not clean the motor
unit in the dishwasher.
Never use scouring pads, abrasive cleaning agents or aggressive liquids
such as petrol or acetone to clean the appliance.
Tip: Cleaning the jug and motor unit is easiest immediately after use.
1 Remove the small plug from the appliance and remove the plug from
the wall socket.
2 Hold the handle of the jug with one hand and with the other hand lift
the motor unit off the jug by its handgrip (Fig. 3).
3 Clean the blade unit and overow sensor by rinsing them under
the tap (Fig. 14).
Do not touch the blades. The blades are very sharp.
Tip: If necessary, clean the blade unit and overow sensor with a soft brush.
4 Clean the top part of the motor unit and the outside of the jug with
a moist cloth (Fig. 15).
Tip: If the appliance and the blade unit are very dirty, pour boiling hot water
into the jug and place the motor unit on the jug. Let the jug and the motor unit
soak for 10 minutes.
5 Clean the inside of the jug under the tap. If necessary use a soft
brush (Fig. 16).
Note: The product information below is subject to change without prior notice.
Rated voltage: 230V
Rated frequency: 50Hz
Motor power: 120W
Heating power: 990W
Dimensions:
- Soup maker: 205x153x310mm
- Packaging: 220x220x340mm
Weight:
- Net weight: 2.0kg
- Gross weight: 2.6kg
Capacity: 1200ml (for 2-4 persons)
Environment
- Do not throw away the appliance with the normal household waste
at the end of its life, but hand it in at an ofcial collection point for
recycling. By doing this, you help to preserve the environment (Fig. 17).
Guarantee & service
If you need service or information or if you have a problem, please visit
the Philips website at www.philips.com/support or contact the Philips
Consumer Care Centre in your country. You nd its phone number in the
worldwide guarantee leaet. If there is no Consumer Care Centre in your
country, go to your local Philips dealer.
This chapter summarises the most common problems you could encounter
with the appliance. If you are unable to solve the problem with the
information below, visit www.philips.com/support for a list of frequently
asked questions or contact the Consumer Care Centre in your country.
Problem Cause Solution
The
appliance
does not
work.
There is a
connection
problem.
Check if the small plug is inserted in
the appliance properly and if mains
plug is inserted in the wall socket
properly. Remove the plugs and
reinsert them.
The motor unit does
not t onto the jug
properly because
there are too many
ingredients in the jug.
Remove some of the ingredients
and make sure not to ll the jug
beyond the MAX indication.
The light of
the selected
mode does
not go on.
There is a
connection
problem.
Check if the small plug is inserted in
the appliance properly and if mains
plug is inserted in the wall socket
properly. Remove the plugs and
reinsert them.
The motor unit
has not been
placed onto the jug
properly.
Make sure motor unit connector
and the jug connector are aligned
before you lower the motor unit
into the jug.
You have exceeded
the MAX indication
in the jug.
Remove some of the ingredients
and make sure the ingredients are
spread evenly over the bottom of
the jug.
The light of
the selected
program is
on, but the
appliance
does not
work.
You have not
pressed the start
button.
Press the start button.
You have exceeded
the MAX indication
in the jug.
Remove some of the ingredients
and make sure the ingredients are
spread evenly over the bottom of
the jug.
The
ingredients
have not
blended well.
You have exceeded
the MAX indication
in the jug.
Remove some of the ingredients
and make sure the ingredients are
spread evenly over the bottom of
the jug.
You did not add
enough water or
other liquid.
Make sure the liquid level is above
the MIN and below the MAX
indication.
The
appliance
overows.
You have selected
the wrong program.
Select another program (see the
separate recipe booklet).
You have exceeded
the MAX indication.
Remove some of the ingredients
and make sure the ingredients are
spread evenly over the bottom of
the jug.
The overow
sensor is dirty.
The overow sensor prevents the
appliance from overowing. Clean
the overow sensor.
The food is
burnt.
You have selected
the wrong program.
Select another program (see the
separate recipe booklet).
You did not add
enough water or
other liquid.
Make sure the liquid level is above
the MIN and below the MAX
indication.
You have heated
up milk.
The soup maker is not suitable for
heating up milk.
Поздравляем с покупкой продукции Philips! Для получения полной
поддержки, оказываемой компанией Philips, зарегистрируйте прибор на
веб-сайте www.philips.com/welcome.
1 Ручка
2 Блок электродвигателя
3 Датчик переполнения
4 Ножевой блок
5 Кувшин
6 Панель управления
- A. Программа приготовления супа-пюре (с индикатором)
- B. Программа приготовления обычного супа (с индикатором)
- C. Программа приготовления компота (с индикатором)
- D. Программа приготовления смузи (с индикатором)
- E. Программа измельчения в ручном режиме (с индикатором)
- F. Кнопка выбора программы
- G. Кнопка старт/стоп
7 Разъем на блоке электродвигателя
8 Разъем на кувшине
9 Индикация уровня (индикации MIN и MAX находятся на
внутренней стороне кувшина).
10 Ручка
11 Гнездо подключения сетевого шнура
12 Сетевой шнур
Перед использованием прибора внимательно
ознакомьтесь с руководством пользователя и
сохраните его для дальнейшего использования
в качестве справочного материала.
- Запрещается погружать блок электродвигателя
или кувшин в воду.
- Не допускайте контакта детей с прибором и
сетевым шнуром во время работы или в процессе
охлаждения прибора.
- Не допускайте контакта прибора и сетевого
шнура с горячими поверхностями.
- Во время работы прибора открытые поверхности
сильно нагреваются (Рис. 2).
- Перед подключением прибора убедитесь, что
указанное на нем номинальное напряжение
соответствует напряжению местной электросети.
- Запрещено пользоваться прибором, если сетевая
вилка, сетевой шнур или сам прибор повреждены.
- При повреждении сетевого шнура заменяйте его
только оригинальным шнуром, чтобы обеспечить
безопасную эксплуатацию прибора.
- Подключение сетевого шнура к розетке и
прибору должно проводиться сухими руками.
- Данный прибор не предназначен для
использования лицами (включая детей) с
ограниченными возможностями сенсорной
системы или ограниченными умственными или
физическими способностями, а также лицами с
недостаточным опытом и знаниями, кроме как под
контролем и руководством лиц, ответственных за
их безопасность.
- Не позволяйте детям играть с прибором.
- Прибор предназначен только для домашнего
использования. В случае неверного
использования прибора, в профессиональных
или полупрофессиональный условиях или
при нарушении правил данного руководства
гарантийные обязательства утрачивают силу,
и компания Philips не несет ответственности
за любой причиненный ущерб.
- Всегда ставьте прибор на твердую, ровную,
устойчивую поверхность.
- Подключайте прибор только к заземленной розетке.
- Запрещается пользоваться какими-
либо аксессуарами или деталями других
производителей без специальной рекомендации
компании Philips. При использовании таких
аксессуаров гарантийные обязательства
утрачивают силу.
- Данное устройство нельзя подключать к
внешнему таймеру или автономным системам
дистанционного управления.
- Не оставляйте включенный прибор без присмотра.
- Не включайте прибор, если в кувшине нет
ингредиентов.
- Количество ингредиентов в кувшине не должно
превышать отметку MAX.
- Остерегайтесь выхода горячего пара при
извлечении блока электродвигателя после
приготовления горячего супа.
- Будьте аккуратны, режущие края ножевого блока
очень острые.
- Не перемещайте прибор во время работы.
Данный прибор Philips соответствует стандартам по
электромагнитным полям (ЭМП). При правильном обращении согласно
инструкциям, приведенным в руководстве пользователя, применение
прибора безопасно в соответствии с современными научными данными.
Перед первым использованием прибора снимите с кувшина наклейку
и очистите все детали.
1 Придерживая кувшин за ручку одной рукой, другой снимите блок
электродвигателя с кувшина, приподняв его за ручку (Рис. 3).
2 Наполните кувшин водой до отметки MAX (Рис. 4).
3 Удерживая блок электродвигателя над кувшином, совместите оба
разъема, опустите блок электродвигателя в кувшин (Рис. 5).
4 Вставьте маленький штекер в гнездо на кувшине (1), подключите
вилку питания в розетку электросети (2) (Рис. 6).
5 Нажмите кнопку выбора программы 3 раза, выберите программу
приготовления компота, нажмите кнопку старт/стоп (Рис. 7).
, Примерно через 10 минут раздастся звуковой сигнал,
указывающий на окончание программы.
6 Придерживая кувшин за ручку одной рукой, другой снимите блок
электродвигателя с кувшина, приподняв его за ручку (Рис. 3).
7 Вылейте воду из кувшина для супа и промойте кувшин
водопроводной водой (Рис. 8).
В суповарке есть ножевой блок, предназначенный для измельчения
ингредиентов, а также нагревательный элемент для нагрева
ингредиентов для супа. Прибор можно также использовать
для приготовления компотов и смузи. В нем предусмотрено
4 запрограммированных режима, а также кнопка ручного режима:
1 Режим приготовления супа-пюре (23 минуты).
2 Режим приготовления обычного супа (20 минут).
3 Режим приготовления компота (13 минут).
4 Режим приготовления смузи (3 минуты).
5 Программа измельчения в ручном режиме.
Примечание Рецепты вкусных блюд и полезные советы вы можете
найти в отдельном буклете с рецептами.
Следующие рекомендации, описанные ниже, применимы для всех пяти
режимов приготовления.
1 Придерживая кувшин за ручку одной рукой, другой снимите блок
электродвигателя с кувшина, приподняв его за ручку (Рис. 3).
2 Положите ингредиенты в кувшин (Рис. 9).
Примечание При приготовлении мяса и овощей первыми в кувшин
кладите овощи.
Примечание Ингредиенты должны быть равномерно распределены на
дне кувшина.
- Чтобы блюдо получилось вкусным и полезным, используйте свежие
сезонные ингредиенты.
- Для наилучших результатов нарежьте ингредиенты кубиками
размером 2 см.
- Перед помещением в кувшин замороженных ингредиентов их
необходимо разморозить.
3 К ингредиентам в кувшине добавьте воду или другую
жидкость (Рис. 4).
Уровень ингредиентов должен находиться в диапазоне между
отметками MIN и MAX.
4 Перемешайте ингредиенты и воду (Рис. 10).
5 Удерживая блок электродвигателя над кувшином, совместите оба
разъема, опустите блок электродвигателя в кувшин (Рис. 5).
6 Вставьте маленький штекер в гнездо на кувшине (1), подключите
вилку питания в розетку электросети (2) (Рис. 6).
7 Выберите режим приготовления, нажав кнопку выбора
программы (Рис. 7).
Совет. Чтобы сделать суп однородным или измельчить ингредиенты
супа или компота, выберите программу измельчения в ручном режиме.
Для начала измельчения нажмите и удерживайте кнопку старт/стоп.
Чтобы прекратить измельчение, просто отпустите кнопку старт/стоп.
8 Для запуска приготовления нажмите кнопку старт/стоп (Рис. 11).
, Загорится соответствующий индикатор, в суповарке начнется
процесс приготовления/измельчения (Рис. 12).
, По окончании программы на устройстве раздастся звуковой сигнал.
Примечание Работу можно прервать в любое время, нажав кнопку
старт/стоп.
9 Отключите сетевой шнур от электросети и устройства.
10 Придерживая кувшин за ручку одной рукой, другой снимите блок
электродвигателя с кувшина, приподняв его за ручку (Рис. 3).
11 Перелейте суп, смузи или компот в чашу (Рис. 13).
Примечание Проводите очистку прибора после каждого использования.
См. главу “Очистка”.
Перед очисткой прибора обязательно отсоединяйте его от электросети.
Запрещается погружать блок электродвигателя или кувшин в воду.
Также запрещается мыть блок электродвигателя в посудомоечной
машине.
Запрещается использовать для чистки прибора губки с абразивным
покрытием, абразивные чистящие средства или растворители типа
бензина или ацетона.
Совет. Очистить кувшин и блок электродвигателя легче всего сразу
после использования.
1 Извлеките маленький штекер из прибора, отключите сетевую
вилку от розетки электросети.
2 Придерживая кувшин за ручку одной рукой, другой снимите блок
электродвигателя с кувшина, приподняв его за ручку (Рис. 3).
3 Очистите ножевой блок и датчик переполнения, промыв их под
водой (Рис. 14).
Не прикасайтесь к лезвиям. Лезвия очень острые.
Совет. При необходимости для очистки ножевого блока и датчика
переполнения используйте мягкую щетку.
4 Верхнюю часть блока электродвигателя и внешний корпус
кувшина протрите влажной тканью (Рис. 15).
Совет. Если прибор и ножевой блок сильно загрязнены, налейте в кувшин
кипяток, поместите на кувшин блок электродвигателя и оставьте на
10 минут.
5 Внутреннюю поверхность кувшина промойте водой. При
необходимости используйте мягкую щеточку (Рис. 16).
1
2 3 4 5
6
7 8 9
10 11 12 13
14 15 16 17
4203_000_7642_1_DFU-Leaflet_A6_v1.indd 2 1/23/13 10:58 AM

Присоединиться к беседе по данному изделию
Здесь вы можете поделиться тем, что думаете о Philips HR2200 Блендер-суповарка. Если у вас есть вопросы, сначала внимательно прочтите инструкцию. Запросить руководство можно с помощью контактной формы.