ENGLISH
AMBIENT GAS MEMBRANE THERMOST
Read all the instruction carefully
USER MANUAL
This thermostat is designed for automatic regulation of heating and conditioning systems in
houses, hotels, schools, offices, workshops and many other environments, both domestic and
industrial. It is also ideal for heating and air conditioning numerous industrial and civil
applications
SAFETY WARNINGS
When installing and operating the product it is absolutely necessary to observe the following
instructions:
• The appliance must be installed by a qualified person
• Disconnect power supply while installing the appliance.
• Do not power or connect the appliance if any part of it is damaged.
• Connect the appliance considering the diagrams described in the following manual and
those on the instrument
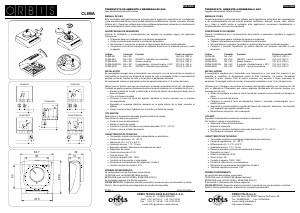
Code Contact Functions Capacity the contacts
CLIMA ML NA + NC 16(2,5) A 250 V~
CLIMA MLI NA + NC ON/OFF + Power on warning lamp 10(1,5) A 250 V~
CLIMA MLW NA + NC Summer /Winter 10(1,5) A 250 V~
CLIMA FANCOIL NA + NC 2 speed + Summer/Winter + OFF 10(1,5) A 250 V~
CLIMA MLFI NA + NC ON/OFF + Power on warning lamp 10(1,5) A 250 V~
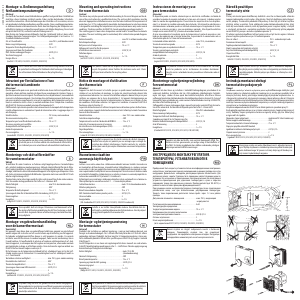
INSTALLATION
You are advised to position the thermostat as far as possible in a place that reflects the
average temperature of the whole area. Avoid positioning it near doors, windows, sources of
heat and in places where there is too much or too little ventilation.
The thermostat should be fitted at approximately 1,5 m from the ground.
The thermostat can bi fitted to the flush-mounting box of the electric system (centre distance
60 mm) or directly to the wall (centre distance 60 mm).
• Remove the knob and unscrew the screw of the cover as shown in the drawing.
• Fix the base to the wall.
• Connect the thermostat earth by using the terminal marked with the earth symbol.
• Follow the wiring diagram inside the cover, fix the flexible inseparable wires to the
relative screw terminals.
• Replace the cover, screws and knob.
USER’S GUIDE
Set the temperature required by turning the knob.
To limit the setting field:
• Isolate the power supply line
• Remove the knob
• Insert the limit markers in the housing under the knob (17 ºC ÷ 23 ºC)
• Return the knob to its housing.
TECHNICAL SPECIFICATIONS
• Free mounted non-electronic single-pole thermostat.
• Setting range: +5 / +30 ºC
• Differential: Δt = 1,5 ºC ± 0,5 ºC
• Thermal gradient: 1 ºC / 15 min.
• Sensitive element: Vapour expansion lung
• Protection against shock: I
• Degree of protection: IP 20
• Action type: 1B
• Silver contacts: 1000 / 1000
• Break or switching contacts
• Pollution level of the device: Degree of pollution 2
• Rated pulsating voltage: 4 kV
REFERENCE STANDARDS
Conformity with EU directives:
73/23/CEE modified by 93/68/CEE (low voltage)
89/336/CEE modified by 92/31/CEE y 93/68/CEE (E.M.C.)
Is declared with reference to the following standard:
CEI-EN 60730-2-9: Automatic electric command devices for household and similar use.
Part 2: Particular provisions for thermosensitive command devices.
FRANÇAIS
THERMOSTAT D’AMBIANCE A MEMBRANE A GAZ
Lire attentivement les instructions
MODE D’EMPLOI
Ce thermostat est particulièrement indiqué pour le réglage automatique du chauffage et de l’air
conditionné des ambiances les plus diverses (chambres, hôtels, écoles, bureaux, ateliers,
etc.). Il peut être utilisé pour de nombreuses autres applications relatives au chauffage ou au
conditionnement, tant civiles qu’industrielles.
AVERTISSEMENTS DE SÉCURITÉ
Durant l’installation et le fonctionnement de l’appareil, suivre les indications suivantes:
• L’appareil doit être installé par une personne compétente.
• Couper l’alimentation durant l’installation de l’appareil.
• Ne pas connecter l’appareil si l’une de ses parties est endommagée.
• Connecter le produit en respectant le schéma décrit dans le présent manuel et sur
l’appareil.
Code Contact Fonction Pouvoir de rupture
CLIMA ML NA + NC 16(2,5) A 250 V~
CLIMA MLI NA + NC ON/OFF + Indicateur de marche 10(1,5) A 250 V~
CLIMA MLW NA + NC Été / hiver 10(1,5) A 250 V~
CLIMA FANCOIL NA + NC 2 vitesses + Été/Hiver + OFF 10(1,5) A 250 V~
CLIMA MLFI NA + NC ON/OFF + Indicateur de marche 10(1,5) A 250 V~
INSTALLATION
Il est conseillé de choisir pour le thermostat un emplacement dans une zone où est respectée
autant que possible la condition de température moyenne de toute l’ambiance. Éviter la
proximité de portes, fenêtres, sources de chaleur et zones peu ou trop aérées.
Il est recommandé d’installer le thermostat ambiant à environ 1,5 mètre du sol.
Utiliser pour la fixation un boîtier de mécanisme universel encastré, de 60 mm de diamètre. On
peut aussi l’encastrer directement dans le mur (toujours avec une perforeuse de 60 mm.)
• Extraire le bouton de commande et dévisser la vis de fixation du couvercle pour libérer la
base de fixation.
• Fixer la base au mur.
• Connecter la prise de terre de l’appareil à l’aide de la vis marquée avec le symbole
correspondant.
• Suivant le schéma électrique marqué sur la porte intérieure du couvercle, connecter
l’appareil.
• Replacer le couvercle en le fixant à l’aide de la vis et du bouton de commande.
UTILISATION
Sélectionner la température choisie en tournant le bouton de commande.
Pour limiter le champ de réglage:
• Couper la ligne d’alimentation
• Extraire le bouton de commande
• Introduire la vis de limitation dans la position souhaitée (17 ºC ÷ 23 ºC)
• Replacer le bouton de commande.
CARACTÉRISTIQUES TECHNIQUES
• Thermostat unipolaire à montage indépendant, non électronique.
• Champ de régulation: +5 / +30 ºC
• Différentiel: Δt = 1,5 ºC ± 0,5 ºC
• Gradient thermique: 1 ºC / 15 mn.
• Élément sensible: Membrane d’expansion de vapeur.
• Dispositif de classe I
• Degré de protection: IP 20
• Type d’action : 1B
• Contact en argent 1000 / 1000
• Contact d’interruption ou commutateur
• Situation de pollution du dispositif: Degré 2
• Tension nominale d’impulsion: 4 kV
NORMES DE RÉFÉRENCE
La conformité avec les directives communautaires:
73/23/CEE mod. de 93/68/CEE (Basse tension)
89/336/CEE mod. de 92/31/CEE et 93/68/CEE (E.M.C.),
est déclarée par rapport à la Norme suivante:
CEI-EN 60730-2-9: Dispositif électrique automatique de commande pour l’usage domestique
et similaire.
Partie 2: Norme particulière pour dispositif de commande thermosensible.
DEUSTCH
RAUMTEMPERATUR-THERMOSTAT MIT GASMEMBRAN
Diese Bedienungsanleitung bitte sorgfältig lesen.
BEDIENUNGSANLEITUNG
Dieses Thermostat ist speziell für die automatische Regulierung von Heizungen und
Klimaanlagen in jeder möglichen Umgebung konzipiert (Zimmer, Hotels, Schulen, Büros,
Werkstätten, usw.). Es kann auch für andere vielfältige Anwendungen, sowohl privater als
auch industrieller Art, im Heizungs- oder Klimatisierungsbereich eingesetzt werden.
SICHERHEITSHINWEISE
Folgende Hinweise sind während der Montage und des Betriebs des Gerätes zu beachten:
• Das Gerät muss von einer fachkundigen Person montiert werden.
• Die Stromzuführung während der Montage abschalten.
• Das Gerät nicht einschalten oder anschließen, solange ein Bauteil defekt ist.
• Das Gerät unter Berücksichtigung des in dieser Bedienungsanleitung und auf dem Gerät
selbst beschriebenen Anschlussdiagramms anschließen.
Code Kontakt Funktion Schaltvermögen
CLIMA ML NO + NC 16(2,5) A 250 V~
CLIMA MLI NO + NC ON/OFF + Betriebsanzeige 10(1,5) A 250 V~
CLIMA MLW NO + NC Sommer/Winter 10(1,5) A 250 V~
CLIMA
FANCOIL
NO + NC
2 Geschwindigkeiten + Sommer/Winter + OFF
10(1,5) A 250 V~
CLIMA MLFI NO + NC ON/OFF + Betriebsanzeige 10(1,5) A 250 V~
MONTAGE
Für die Montage des Thermostats ist es ratsam einen Bereich zu wählen, in dem soweit wie
möglich die Durchschnittstemperatur der Umgebung beibehalten wird. Deshalb sollte man die
Nähe von Türen, Fenstern, Wärmequellen sowie wenig oder stark belüftete Bereiche
vermeiden.
Es wird empfohlen, das Thermostat ca. 1,5 m über dem Boden zu installieren.
Für den Einbau ist eine universelle UP-Gerätedose mit 60 mm Durchmesser zu verwenden.
Das Gerät kann aber ebenso direkt in die Wand eingelassen werden (Bohrung mit 60 mm
Durchmesser).
• Den Bedienungsknopf abziehen und die Befestigungsschraube der Abdeckung vom
Grundkörper abschrauben.
• Den Grundkörper an der Wand befestigen.
• Den Erdanschluss des Gerätes an die dafür gekennzeichnete Schraube anschließen.
• Die restlichen Anschlüsse gemäß dem im Innern der Abdeckung angebrachten
Anschlussdiagramm anschließen und das Gerät einschalten.
• Die Abdeckung wieder anschrauben und den Bedienungsknopf aufstecken.
BEDIENUNG
Die gewünschte Temperatur durch Drehen des Bedienungsknopfes einstellen.
Zum Begrenzen des Einstellbereiches folgendermaßen vorgehen:
• Die Stromzufuhr unterbrechen.
• Den Bedienungsknopf abziehen.
• Die Begrenzungsschraube auf die gewünschte Position drehen (17 ºC ÷ 23 ºC).
• Den Bedienungsknopf wieder aufstecken.
TECHNISCHE DATEN
• Nicht elektronisches einpoliges Thermostat mit unabhängiger Montage.
• Einstellbereich: +5 / +30 ºC
• Differential: Δt = 1,5 ºC ± 0,5 ºC
• Wärmegradient: 1 ºC / 15 Min.
• Sensor: Feuchtigkeitsempfindliche Ausdehnungsmembran
• Gerät der Schutzklasse I
• Schutzgrad: IP 20
• Schaltart: 1B
• Silberkontakt 1000 / 1000
• Unterbrechungs- oder Umschaltkontakt
• Verschmutzungsgrad des Gerätes: 2
• Prüfspannung: 4 kV
BEZUGSNORMEN
Die Übereinstimmung mit den folgenden CE-Richtlinien:
73/23/EWG geändert durch 93/68/EWG (Niederspannung)
89/336/EWG geändert durch 92/31/EWG und 93/68/EWG (E.M.C.)
wird gemäß der folgenden Norm erfüllt:
CEI-EN 60730-2-9: Automatische elektrische Regel- und Steuergeräte für den Hausgebrauch
und ähnliche Anwendungen.
Teil 2: Besondere Anforderungen an temperaturabhängige Regel- und Steuergeräte.
ORBIS TECNOLOGÍA ELÉCTRICA, S.A.
Lérida, 61. E-28020 MADRID
Teléf: +34 1 567 22 77 · +34 1 567 22 90
Fax : +34 1 571 40 06 · +34 1 570 20 00
e-mail: Info @ orbis.es / www.orbis.es
ORBIS TECNOLOGÍA ELÉCTRICA, S.A.
Lérida, 61. E-28020 MADRID
Teléf: +34 1 567 22 77 · +34 1 567 22 90
Fax : +34 1 571 40 06 · +34 1 570 20 00
e-mail: Info @ orbis.es / www.orbis.es
ORBIS TECNOLOGÍA ELÉCTRICA, S.A.
Lérida, 61. E-28020 MADRID
Teléf: +34 1 567 22 77 · +34 1 567 22 90
Fax : +34 1 571 40 06 · +34 1 570 20 00
e-mail: Info @ orbis.es / www.orbis.es


Присоединиться к беседе по данному изделию
Здесь вы можете поделиться тем, что думаете о Orbis Clima MLW Термостат. Если у вас есть вопросы, сначала внимательно прочтите инструкцию. Запросить руководство можно с помощью контактной формы.