Description English
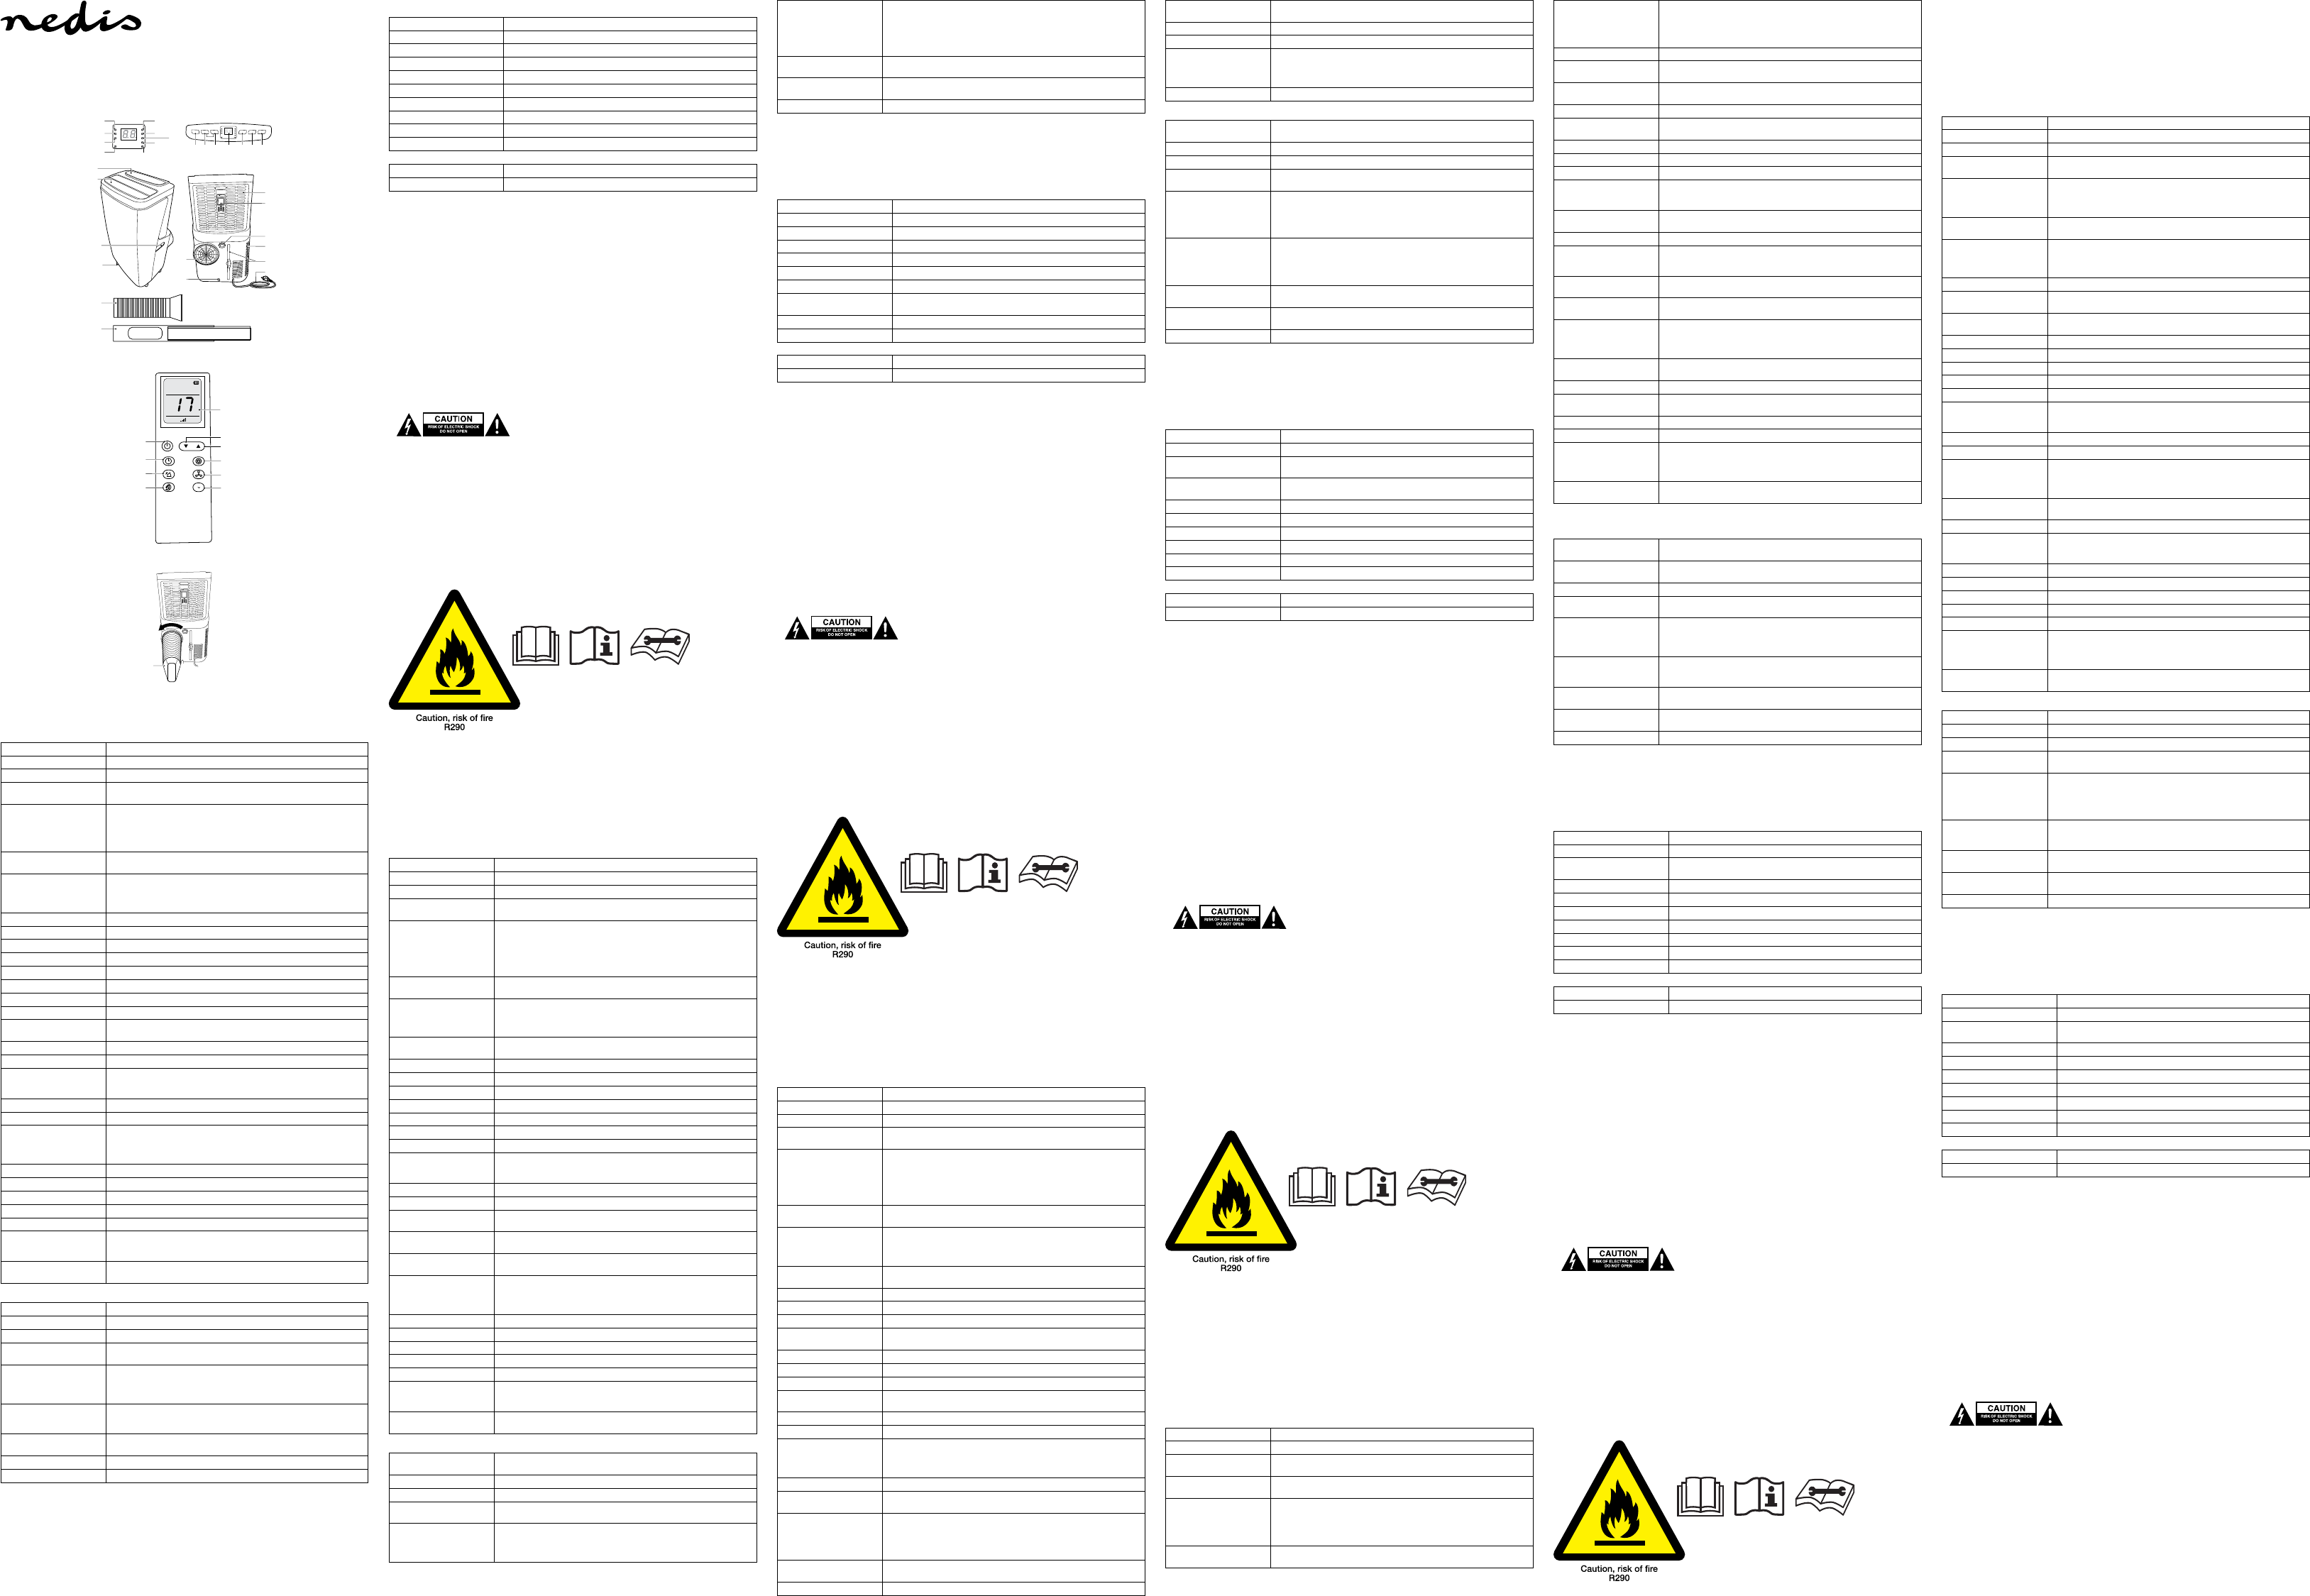
Device (g. A)
1. Control panel
2. Air outlet
3. On/o button • Press the button to switch on or o the device.
4. Mode button
• Repeatedly press the button to select the mode: Cooling mode / Dehumidifying
mode / Fan mode.
5. Up button
6. Down button
• Cooling mode: Press the up button or the down button to change the set
temperature. Simultaneously press both buttons to switch between Celsius (°C)
and Fahrenheit (°F).
• Press the up button or the down button to change the set timing value.
7. Timer button
• Press the button to set the timer.
Note: The timer can be set upto a maximum of 24 h.
8. Wind Speed selection
button
• In cooling or fan mode, press the button repeatedly to select the fan speed: Low
/ Medium / High.
• In dehumidication mode the wind speed selection button is invalid. The fan
remains in low wind speed operation.
9. Display window • The display window shows the set temperature or the set timing.
10. Cooling mode indicator • This indicator shows that the device is in cooling mode.
11. Dry mode indicator • This indicator shows that the device is in dehumidifying mode.
12. Fan indicator • This indicator shows that the device is in fan mode.
13. Water reservoir indicator • This indicator shows that the water reservoir needs drainage.
14. Celsius indicator • This indicator shows that the temperature is set in Celsius (°C).
15. Fahrenheit indicator • This indicator shows that the temperature is set in Fahrenheit (°F).
16. Hr indicator • This indicator shows that the device is in timer mode.
17. Sleep mode indicator
• This indicator shows that the device is in sleeping mode. This function is only
available in cooling mode. Simultaneously press buttons 5 and 8 to activate.
18. On/o indicator • This indicator shows that the device is on or o.
19. Handle
20. Continous drainage hole
• In the cooling and dehumidication mode continuous draining is possible:
• Unplug the water plug and connect the water outlet to a water container or
drainage.
21. Power cord xing board
22. Remote control holder
23. Drainage hole
• To drain the device, switch o the device and disconnect the power plug of the
mains socket.
• Loosen the drainage cover and unplug the water plug. Let the water ow into a
water container. Connect the water plug and tighten the drainage cover.
24. Air lter • For an optimum ltration clean the lter frame and inner lter regularly.
25. Exhaust connector
26. Air lter • For an optimum ltration clean the lter frame and inner lter regularly.
27. Wheels • Place the device on a at and dry surface.
28. Power cord
29. Exhaust pipe
• Connect the exhaust pipe to the exhaust connector and the connector of the
window adapter. The length of the exhaust hose must be between 28 and150 cm.
Do not use extension tubes. Make sure that the exhaust is unobstructed.
30. Connector of the window
adapter
• The device can be placed in horizontal or vertical direction.
Remote control (g. B)
1. Remote control • Use the remote control to control the device from a distance of maximum 5 m.
2. On/o button • Press the button to switch on or o the device.
3. Timer button • Press the button to set the timing value.
4. Swing button
• Press the swing button to open or close swing style. The air ow of the air outlet can
blow at dierent angles.
5. Sleep mode
• In cooling mode, press the button to select sleep mode.
Note: After selecting the sleep mode the temperature increases by 1 °C after one
hour and again 1 °C after two hours. After two hours the temperature remains
constant.
6. Up button
7. Down button
• Press the up button to increase the temperature or the timing set value.
Note: The temperature can be set to a minimum of 16 °C and a maximum of 31 °C.
• Press the down button to decrease the temperature or the timing set value.
8. Mode selection button
• Repeatedly press the button to select the mode: Cooling mode / Dehumidifying
mode / Fan mode.
9. Fan button • Press the fan button to select high, medium or low wind speed output.
10. Celsius - Fahrenheit button • Press the button to switch between Celsius (°C) and Fahrenheit (°F).
Installation (g. C)
• Refer to the illustration to install the device.
Note: The distance between the device and the wall or other objects must be at least 50 cm.
Protection functions
• The device has ve protection functions: Frost protection function, overfow protection, automatic defrosting,
automatic thermal protection and protection of the compressor.
Technical data
Electrical power 1357 W
Cooling capacity 12,000 BTU / 3.5 kW
Energy eciency ratio (EER) 2.60
Coecient of performance (COP) 2.50
Energy class A
Air circulation 400 m³/h
Noise level ≤ 65 dB
Room size capacity 18 - 26 m²
Dehumidication 28 l/day
Refrigerant R290, 230 g
Dimensions 42 x 72 x 36 cm
Weight 28 kg
Safety
• Read the manual carefully before use. Keep the manual for future reference.
• Only use the device for its intended purposes. Do not use the device for other purposes than described in the manual.
• The manufacturer is not liable for consequential damages or for damages to property or persons caused by non-
observance of the safety instructions and improper use of the device.
• The device can be used by children aged from 8 years and above and persons with reduced physical, sensory
or mental capabilities or lack of experience and knowledge if they have been given supervision or instruction
concerning use of the device in a safe way and understand the hazards involved. Cleaning and user maintenance
shall not be made by children unless they are older than 8 years and supervised. Keep the device and the mains cable
out of the reach of children younger than 8 years. Children shall not play with the device.
• Do not use the device if any part is damaged or defective. If the device is damaged or defective, replace the device
immediately.
• Do not use the device outdoors. The device is suitable for indoor use only.
• The device is suitable for domestic use only. Do not use the device for commercial purposes.
• Do not use the device near bathtubs, showers, basins or other vessels containing water.
• Do not immerse the device in water or other liquids. If the device is immersed in water or other liquids, do not
remove the device with your hands. Immediately remove the mains plug from the wall socket. If the device is
immersed in water or other liquids, do not use the device again.
• Keep the device away from heat sources. Do not place the device on hot surfaces or near open ames.
• Do not use the device near explosive or ammable materials.
• Keep your hands away from the moving parts. Do not insert ngers, pencils or other objects through the guard.
• Before moving the device, always remove the mains plug from the wall socket. Do not pull the mains cord.
Electrical safety
• To reduce risk of electric shock, this product should only be opened by an authorized technician when service is required.
• Disconnect the product from the mains and other equipment if a problem should occur.
• Do not use the device if the mains cable or mains plug is damaged or defective. If the mains cable or mains plug is
damaged or defective, it must be replaced by the manufacturer or an authorised repair agent.
• Before use, always check that the mains voltage is the same as the voltage on the rating plate of the device.
• Connect the device to an earthed wall socket. If necessary, use an earthed extension cable of a suitable diameter.
• Always fully unwind the mains cable and the extension cable.
• The device is not intended to be operated by means of an external timer or separate remote-control system.
• Do not move the device by pulling the mains cable. Make sure that the mains cable cannot become entangled. Make
sure that the mains cable does not hang over the edge of a worktop and cannot be caught accidentally or tripped over.
• Do not immerse the device, the mains cable or the mains plug in water or other liquids.
• Do not leave the device unattended while the mains plug is connected to the mains supply.
Cleaning and maintenance
Warning!
• Before cleaning or maintenance, switch o the device, remove the mains plug from the wall socket and wait until the
device has cooled down.
• Do not use cleaning solvents or abrasives.
• Do not clean the inside of the device.
• Do not attempt to repair the device. If the device does not operate correctly, replace it with a new device.
• Clean the device using a soft, damp cloth. Thoroughly dry the device with a clean, dry cloth.
• Use a vacuum cleaner with brush nozzle to remove dust from the airfow outlet.
• Clean the lters under warm water with a neutral detergent. Do not dry the lters in direct sunlight.
Beschrijving Nederlands
Apparaat (g. A)
1. Bedieningspaneel
2. Luchtuitvoer
3. Aan/uit-knop • Druk op de knop om het apparaat in of uit te schakelen.
4. Modusknop
• Druk herhaaldelijk op de knop om de modus te selecteren: Koelmodus /
Ontvochtigingsmodus / Ventilatormodus.
5. Omhoog-knop
6. Omlaag-knop
• Koelmodus: Druk op de omhoog-knop of omlaag-knop om de ingestelde
temperatuur te wijzigen. Druk tegelijkertijd op beide knoppen om te schakelen
tussen Celsius (°C) en Fahrenheit (°F).
• Druk op de omhoog-knop of omlaag-knop om de ingestelde timerwaarde te
wijzigen.
7. Timerknop
• Druk op de knop om de timer in te stellen.
Opmerking: De timer kan tot maximaal 24 uur worden ingesteld.
8. Windsnelheidselectieknop
• Druk in de koel- of ventilatormodus herhaaldelijk op de knop om de
ventilatorsnelheid te selecteren: Laag/Middel/Hoog.
• In de ontvochtigingsmodus is de windsnelheidselectieknop ongeldig. De
ventilator blijft op de lage windsnelheid.
9. Displayvenster
• In het displayvenster wordt de ingestelde temperatuur of de ingestelde timing
weergegeven.
10. Koelmodusindicator • De indicator geeft aan dat het apparaat in de koelmodus staat.
11. Droogmodusindicator • Deze indicator geeft aan dat het apparaat in de ontvochtigingsmodus staat.
12. Ventilatorindicator • Deze indicator geeft aan dat het apparaat in de ventilatormodus staat.
13. Waterreservoirindicator • Deze indicator geeft aan dat het waterreservoir leeg moet worden gemaakt.
14. Celsiusindicator • Deze indicator geeft aan dat de temperatuur is ingesteld op Celsius (°C).
15. Fahrenheitindicator • Deze indicator geeft aan dat de temperatuur is ingesteld op Fahrenheit (°F).
16. Hr-indicator • Deze indicator geeft aan dat het apparaat in de timermodus staat.
17. Slaapmodusindicator
• Deze indicator geeft aan dat het apparaat in de slaapmodus staat. Deze functie is
alleen in de koelmodus beschikbaar. Druk tegelijkertijd op knop 5 en 8 om deze
te activeren.
18. Aan/uit-indicator • Deze indicator geeft aan dat het apparaat aan of uit staat.
19. Greep
20. Opening voor continue
waterafvoer
• In de koel- en ontvochtigingsmodus is continue waterafvoer mogelijk:
• Verwijder de waterdop en sluit de wateruitlaat aan op een waterbak of een afvoer.
21. Bevestigingsplaat voor
netsnoer
22. Houder voor de
afstandsbediening
23. Afvoeropening
• Als u water uit het apparaat wilt afvoeren, schakelt u het apparaat uit en haalt u de
netstekker uit het stopcontact.
• Maak de kap van de afvoer los en verwijder de waterdop. Laat het water in een
waterbak lopen. Bevestig de waterdop en zet de kap van de afvoer vast.
24. Luchtlter • Reinig voor optimale ltratie het lterframe en het binnenste lter regelmatig.
25. Afvoerconnector
26. Luchtlter • Reinig voor optimale ltratie het lterframe en het binnenste lter regelmatig.
27. Wielen • Plaats het apparaat op een vlakke en droge ondergrond.
28. Netsnoer
29. Afvoerpijp
• Sluit de afvoerpijp op de afvoerconnector en de connector van de raamadapter
aan. De lengte van de afvoerslang moet tussen 28 en 150 cm liggen. Gebruik geen
verlengbuizen. Zorg ervoor dat de afvoer niet wordt geblokkeerd.
30. Connector van de
raamadapter
• Het apparaat kan in horizontale of verticale richting worden geplaatst.
Afstandsbediening (g. B)
1. Afstandsbediening
• Gebruik de afstandsbediening om het apparaat vanaf een maximumafstand van
5m te bedienen.
2. Aan/uit-knop • Druk op de knop om het apparaat in of uit te schakelen.
3. Timerknop • Druk op de knop om de timerwaarde in te stellen.
4. Zwenkknop
• Druk op de zwenkknop om het zwenken in en uit te schakelen. De luchtstroming
van de luchtuitlaat kan in verschillende hoeken blazen.
5. Slaapmodus
• Druk in de koelmodus op de knop om de slaapmodus te selecteren.
Opmerking: Na selectie van de slaapmodus neemt de temperatuur na één uur
met 1 °C toe en na twee uur opnieuw met 1 °C. Na twee uur blijft de temperatuur
constant.
6. Omhoog-knop
7. Omlaag-knop
• Druk op de omhoog-knop om de instelwaarde voor temperatuur of timing te
verhogen.
Opmerking: De temperatuur kan op minimaal 16°C en maximaal op 31°C worden
ingesteld.
• Druk op de omlaag-knop om de instelwaarde voor temperatuur of timing te
verlagen.
8. Modusselectieknop
• Druk herhaaldelijk op de knop om de modus te selecteren: Koelmodus /
Ontvochtigingsmodus / Ventilatormodus.
9. Ventilatorknop
• Druk op de ventilatorknop om een hoge, gemiddelde of lage windsnelheid te
kiezen.
10. Celsius - Fahrenheit-knop • Druk op de knop om te schakelen tussen Celsius (°C) en Fahrenheit (°F).
Installatie (g. C)
• Raadpleeg de illustratie om het apparaat te installeren.
Opmerking: De afstand tussen het apparaat en de muur of andere objecten moet minimaal 50 cm zijn.
Beveiligingsfuncties
• Het apparaat heeft vijf beveiligingsfuncties: Vorstbeveiligingsfunctie, overloopbeveiliging, automatisch ontdooien,
automatische thermische beveiliging en beveiliging van de compressor.
Technische gegevens
Vermogen 1357 W
Koelvermogen 12.000 BTU / 3,5 kW
Energie-eciëntieverhouding (EER) 2.60
Prestatiecoëciënt (COP) 2.50
Energieklasse A
Luchtcirculatie 400 m³/uur
Geluidsniveau ≤ 65 dB
Vermogen voor grootte van de
ruimte
18 - 26 m²
Ontvochtiging 28 l/dag
Koelmiddel R290, 230 g
Afmetingen 42 x 72 x 36 cm
Gewicht 28 kg
Veiligheid
• Lees voor gebruik de handleiding zorgvuldig door. Bewaar de handleiding voor latere raadpleging.
• Gebruik het apparaat uitsluitend voor de beoogde doeleinden. Gebruik het apparaat niet voor andere doeleinden
dan beschreven in de handleiding.
• De fabrikant is niet aansprakelijk voor gevolgschade of voor schade aan eigendommen of personen veroorzaakt door
het niet naleven van de veiligheidsinstructies en door verkeerd gebruik van het apparaat.
• Het apparaat kan worden gebruikt door kinderen vanaf 8 jaar en door personen met verminderde lichamelijke,
zintuiglijke of geestelijke vermogens of gebrek aan de benodigde ervaring en kennis indien zij onder toezicht staan
of instructies krijgen over hoe het apparaat op een veilige manier kan worden gebruikt alsook de gevaren begrijpen
die met het gebruik samenhangen. Reiniging en onderhoud mogen niet worden uitgevoerd door kinderen, tenzij ze
ouder zijn dan 8 jaar en onder toezicht staan. Houd het apparaat en het netsnoer buiten bereik van kinderen jonger
dan 8 jaar. Kinderen mogen niet met het apparaat spelen.
• Gebruik het apparaat niet als een onderdeel beschadigd of defect is. Vervang een beschadigd of defect apparaat onmiddellijk.
• Gebruik het apparaat niet buitenshuis. Het apparaat is uitsluitend geschikt voor gebruik binnenshuis.
• Het apparaat is uitsluitend geschikt voor huishoudelijk gebruik. Gebruik het apparaat niet voor commerciële doeleinden.
• Gebruik het apparaat niet in de buurt van badkuipen, douches, wastafels of andere voorzieningen die water bevatten.
• Dompel het apparaat niet onder in water of andere vloeistoen. Verwijder het apparaat niet met uw handen als het is
ondergedompeld in water of andere vloeistoen. Verwijder onmiddellijk de netstekker uit het stopcontact. Gebruik
het apparaat niet langer als het is ondergedompeld in water of andere vloeistoen.
• Houd het apparaat uit de buurt van warmtebronnen. Plaats het apparaat niet op hete oppervlakken of in de buurt van open vuur.
• Gebruik het apparaat niet in de buurt van explosieve of brandbare materialen.
• Houd uw handen uit de buurt van de bewegende delen. Steek geen vingers, potloden of andere voorwerpen door
de beschermkap.
• Verwijder voor het verplaatsen van het apparaat altijd de netstekker uit het stopcontact. Trek niet aan het netsnoer.
Elektrische veiligheid
• Dit product mag voor onderhoud alleen worden geopend door een erkend technicus om het risico op elektrische
schokken te verkleinen.
• Koppel het product los van het stopcontact en van andere apparatuur als er zich problemen voordoen.
• Gebruik het apparaat niet als het netsnoer of de netstekker beschadigd of defect is. Indien het netsnoer of de netstekker
beschadigd of defect is, moet het onderdeel door de fabrikant of een erkend servicecentrum worden vervangen.
• Controleer voor gebruik altijd of de netspanning overeenkomt met de spanning op het typeplaatje van het apparaat.
• Sluit het apparaat aan op een geaard stopcontact. Gebruik indien nodig een geaard verlengsnoer met een geschikte diameter.
• Wikkel het netsnoer en het verlengsnoer altijd volledig af.
• Het apparaat is niet bedoeld voor bediening met behulp van een externe timer of een afzonderlijk
afstandsbedieningssysteem.
• Verplaats het apparaat niet door aan het netsnoer te trekken. Zorg ervoor dat het netsnoer niet in de war kan
geraken. Zorg ervoor dat het netsnoer niet over de rand van een werkblad hangt, dat het niet per ongeluk
verstrengeld kan raken en dat niemand erover kan struikelen.
• Dompel het apparaat, het netsnoer of de netstekker niet onder in water of andere vloeistoen.
• Laat het apparaat niet onbeheerd achter terwijl de netstekker op de netvoeding is aangesloten.
Reiniging en onderhoud
Waarschuwing!
• Schakel voor reiniging en onderhoud het apparaat uit, verwijder de netstekker uit het stopcontact en wacht totdat
het apparaat is afgekoeld.
• Gebruik geen reinigingsmiddelen of schuurmiddelen.
• Reinig niet de binnenzijde van het apparaat.
• Probeer het apparaat niet te repareren. Indien het apparaat niet juist werkt, vervang het dan door een nieuw apparaat.
• Reinig het apparaat met een zachte, vochtige doek. Droog het apparaat grondig af met een schone, droge doek.
• Gebruik een stofzuiger met borstelmondstuk om stof van de luchtstroomuitlaat te verwijderen.
• Reinig de lters in warm water met een neutraal reinigingsmiddel. Droog de lters niet in direct zonlicht.
Beschreibung Deutsch
Gerät (Abb. A)
1. Bedienfeld
2. Luftausgang
3. Ein-/Aus-Taste • Drücken Sie zum Ein- oder Ausschalten des Geräts auf die Taste.
4. Modustaste
• Drücken Sie wiederholt auf die Taste, um den Modus zu wählen: Kühlmodus /
Entfeuchtermodus / Lüftermodus.
5. Aufwärtstaste
6. Abwärtstaste
• Kühlmodus: Drücken Sie auf die Aufwärts- oder die Abwärts-Taste, um die
Temperatureinstellung anzupassen. Drücken Sie beide Tasten gleichzeitig, um
zwischen Celsius (°C) und Fahrenheit (°F) zu wechseln.
• Drücken Sie auf die Aufwärts- oder die Abwärts-Taste, um die Zeiteinstellung
anzupassen.
7. Timer-Taste
• Drücken Sie auf die Taste, um den Timer zu programmieren.
Hinweis: Der Timer kann bis auf 24 h gestellt werden.
8. Auswahltaste
Gebläsegeschwindigkeit
• Drücken Sie im Kühl- bzw. Lüftermodus wiederholt auf die Taste, um die
Lüftergeschwindigkeit anzupassen: Niedrig / Mittel / Hoch.
• Im Modus Entfeuchtung ist die Auswahltaste Gebläsegeschwindigkeit inaktiv. Der
Lüfter arbeitet lediglich auf niedrigster Stufe.
9. Anzeigedisplay
• Im Anzeigedisplay werden die eingestellten Werte für Temperatur und Zeit
angezeigt.
10. Kühlmodusanzeige • Diese Anzeige leuchtet, wenn das Gerät im Kühlmodus arbeitet.
11. AnzeigeTrocknen-Modus • Diese Anzeige leuchtet, wenn das Gerät im Modus Trocknen arbeitet.
12. Lüfteranzeige • Diese Anzeige leuchtet, wenn das Gerät im Lüftermodus arbeitet.
13. Anzeige Wasserbehälter
• Diese Anzeige leuchtet, wenn Wasser aus dem Wasserbehälter abgelassen werden
muss.
14. Celsius-Anzeige • Leuchtet, wenn die Temperatur in Grad Celsius (°C) angezeigt wird.
15. Fahrenheit-Anzeige • Leuchtet, wenn die Temperatur in Fahrenheit (°F) angezeigt wird.
16. Hr-Anzeige • Diese Anzeige leuchtet, wenn das Gerät im Timer-Modus arbeitet.
17. Schlafmodusanzeige
• Diese Anzeige leuchtet, wenn das Gerät im Schlafmodus arbeitet. Nur im
Kühlmodus verfügbar. Drücken Sie zum aktivieren gleichzeitig die Tasten 5 und 8.
18. Ein-/Aus-Anzeige • Diese Anzeige leuchtet, sobald das Gerät eingeschaltet wird.
19. Gri
20. Wasser-Auslass für Dauer-
Ablassen
• Im Kühl- und Entfeuchtungsmodus kann Wasser im Dauerbetrieb abgelassen
werden.
• Entfernen Sie den Verschluss und schließen Sie eine geeignete Schlauchleitung zu
einem Wasser- bzw. Auangbehälter an.
21. Stromkabelhalterung
22. Halterung für die
Fernbedienung
23. Wasser-Auslass
• Schalten Sie vor dem Ablassen des Wassers das mittels Hauptschalter Gerät aus
ziehen Sie den Netzstecker.
• Önen Sie die Abdeckung und entfernen Sie den Verschluss des Wasser-Auslasses.
Lassen Sie das Wasser in einen geeigneten Behälter abießen. Verschließen Sie
den Wasser-Auslass wieder und schließen Sie die Abdeckung.
24. Luftlter
• Reinigen Sie den Filterrahmen und den Gerätelter in regelmäßigen Abständen,
um eine sichere Filterung der Geräteabluft zu gewährleisten.
25. Abluftanschluss
26. Luftlter
• Reinigen Sie den Filterrahmen und den Gerätelter in regelmäßigen Abständen,
um eine sichere Filterung der Geräteabluft zu gewährleisten.
27. Räder • Stellen Sie das Gerät auf einer ebenen und trockenen Oberäche auf.
28. Netzkabel
29. Abluftrohr
• Verbinden Sie das Abluftrohr mit dem Abluftanschluss und dem Anschluss des
Fensteradapters. Der Abluftschlauch muss zwischen 28 und150 cm lang sein.
Verwenden Sie ausschließlich exible Schlauchleitungen! Achten Sie darauf, den
Auslass nicht zu blockieren.
30. Anschluss Fensteradapter • Das Gerät kann horizontal oder vertikal aufgestellt werden.
Fernbedienung (Abb. B)
1. Fernbedienung
• Mit der Fernbedienung können Sie das Gerät aus einem Abstand von bis zu 5m
steuern.
2. Ein-/Aus-Taste • Drücken Sie zum Ein- oder Ausschalten des Geräts auf die Taste.
3. Timer-Taste • Drücken Sie auf die Taste, um den Timer zu programmieren.
4. Taste Schwenken
• Drücken Sie diese Taste, um den Abluftstrom zu lenken. Die Richtung des
Abluftstroms aus dem Luftausgang kann nach Wunsch angepasst werden.
5. Schlafmodus
• Drücken Sie im Kühlmodus wiederholt auf die Taste, um den Schlafmodus zu
wählen.
Hinweis: Im Schlafmodus wird die Temperatur zweimal im Abstand von jeweils
einer Stunde automatisch um jeweils 1 °C erhöht. Nach zwei Stunden wird die
Temperatur konstant gehalten.
6. Aufwärtstaste
7. Abwärtstaste
• Drücken Sie auf die Aufwärts-Taste, um den Anzeigewert für Temperatur oder
Zeit zu erhöhen.
Hinweis: Die Temperatur lässt sich zwischen 16 °C und 31 °C einstellen.
• Drücken Sie auf die Abwärts-Taste, um den Anzeigewert für Temperatur oder Zeit
zu verringern.
8. Modusauswahltaste
• Drücken Sie wiederholt auf die Taste, um den Modus zu wählen: Kühlmodus /
Entfeuchtermodus / Lüftermodus.
9. Lüfter-Taste
• Drücken Sie die Lüfter-Taste mehrmals, um die Lüftergeschwindigkeit anzupassen
(niedrig, mittel, hoch).
10. Celsius/Fahrenheit-Taste • Drücken Sie diese Taste, um zwischen Celsius (°C) und Fahrenheit (°F) zu wechseln.
Installation (Abb. C)
• Halten Sie sich zur Installation des Geräts an die Abbildung.
Hinweis: Achten Sie auf einen Mindestabstand von 50 cm zwischen dem Gerät und der Wand oder anderen Objekten.
Schutzfunktionen
• Das Gerät bietet fünf Schutzfunktionen: Frostschutz, Überlaufschutz, Enteisungsautomatik, Überhitzungsschutz und
Kompressorüberwachung.
Technische Daten
Leistungsaufnahme 1357 W
Kühlkapazität 12.000 BTU / 3,5 kW
Leistungsgrad (Energy eciency
ratio; EER)
2.60
Leistungszahl (Coecient of
performance; COP)
2.50
Energieklasse A
Luftzirkulation 400 m³/h
Geräuschpegel ≤ 65 dB
Zimmergrößenkapazität 18 - 26 m²
Entfeuchtung 28 l/Tag
Kühlmittel R290, 230 g
Abmessungen 42 x 72 x 36 cm
Gewicht 28 kg
Sicherheit
• Lesen Sie die Bedienungsanleitung vor dem Gebrauch genau durch. Bitte bewahren Sie die Bedienungsanleitung zur
späteren Bezugnahme auf.
• Verwenden Sie das Gerät nur bestimmungsgemäß. Verwenden Sie das Gerät nur für den in dieser
Bedienungsanleitung beschriebenen Zweck.
• Der Hersteller ist nicht schadensersatzpichtig für Folgeschäden, Sachschäden oder Personenverletzungen, die durch
die Nichtbeachtung der Sicherheitshinweise und durch unsachgemäße Handhabung des Gerätes entstanden sind.
• Das Gerät darf von Kindern ab 8 Jahren sowie von Personen mit eingeschränkten physischen, sensorischen oder
geistigen Fähigkeiten oder einem Mangel an Erfahrung und Kenntnis verwendet werden, sofern diese Personen
beaufsichtigt oder in den sicheren Gebrauch des Geräts eingewiesen wurden und die damit verbundenen Gefahren
verstehen. Die Reinigung und Wartung seitens des Benutzers darf nicht von Kindern durchgeführt werden, es sei
denn, sie sind älter als 8 Jahre und werden beaufsichtigt. Halten Sie das Gerät und das Netzkabel außerhalb der
Reichweite von Kindern, die jünger als 8 Jahre sind. Kinder dürfen nicht mit dem Gerät spielen.
• Verwenden Sie das Gerät nicht, falls ein Teil beschädigt oder defekt ist. Ist das Gerät beschädigt oder defekt, erneuern
Sie es unverzüglich.
• Verwenden Sie das Gerät nicht im Freien. Das Gerät eignet sich nur zur Verwendung in Innenräumen.
• Das Gerät eignet sich nur für den Hausgebrauch. Verwenden Sie das Gerät nicht für den gewerblichen Gebrauch.
• Verwenden Sie das Gerät nicht in der Nähe von Badewannen, Duschen, Becken oder anderen Behältnissen, die
Wasser enthalten.
• Tauchen Sie das Gerät nicht in Wasser oder andere Flüssigkeiten ein. Wenn das Gerät in Wasser oder andere
Flüssigkeiten eingetaucht ist, entfernen Sie das Gerät nicht mit Ihren Händen. Ziehen Sie sofort den Netzstecker aus
der Wandsteckdose. Wenn das Gerät in Wasser oder andere Flüssigkeiten eingetaucht wurde, darf es nicht mehr
verwendet werden.
• Halten Sie das Gerät von Hitzequellen fern. Legen Sie das Gerät nicht auf heiße Oberächen oder in die Nähe von
oenen Flammen.
• Verwenden Sie das Gerät nicht in der Nähe von explosiven oder brennbaren Materialien.
• Halten Sie Ihre Hände von den sich bewegenden Teilen fern. Stecken Sie nicht die Finger, Stifte oder andere
Gegenstände durch das Schutzgitter.
• Bevor Sie das Gerät bewegen, ziehen Sie stets den Netzstecker aus der Wandsteckdose. Ziehen Sie nicht am
Netzkabel.
Elektrische Sicherheit
• Um die Gefahr eines elektrischen Schlags zu verringern, sollte dieses Produkt bei erforderlichen Servicearbeiten
ausschließlich von einem autorisierten Techniker geönet werden.
• Bei Problemen trennen Sie das Gerät bitte von der Spannungsversorgung und von anderen Geräten.
• Verwenden Sie das Gerät nicht, falls das Netzkabel oder der Netzstecker beschädigt oder defekt ist. Ist das Netzkabel
oder der Netzstecker beschädigt oder defekt, muss das Netzkabel oder der Netzstecker vom Hersteller oder einem
autorisierten Service-Partner erneuert werden.
• Vergewissern Sie sich stets vor dem Gebrauch, dass die Netzspannung mit der Spannung auf dem Typenschild des
Geräts übereinstimmt.
• Verbinden Sie das Gerät mit einer geerdeten Wandsteckdose. Verwenden Sie ggf. ein geerdetes Verlängerungskabel
mit einem geeigneten Leiterquerschnitt.
• Wickeln Sie das Netzkabel und das Verlängerungskabel immer vollständig ab.
• Das Gerät ist nicht dafür ausgelegt, mit einer externen Zeitschaltuhr oder einem separaten Fernsteuersystem
betrieben zu werden.
• Bewegen Sie das Gerät nicht durch Ziehen am Netzkabel. Achten Sie darauf, dass sich das Netzkabel nicht verwickeln
kann. Vergewissern Sie sich, dass das Netzkabel nicht über die Kante einer Arbeitsplatte hängt und sich niemand
darin verfangen oder darüber stolpern kann.
• Tauchen Sie das Gerät, das Netzkabel oder den Netzstecker nicht in Wasser oder andere Flüssigkeiten ein.
• Lassen Sie das Gerät nicht unbeaufsichtigt, während der Netzstecker mit dem Stromnetz verbunden ist.
Reinigung und Pege
Warnung!
• Schalten Sie das Gerät vor der Reinigung oder Pege aus, ziehen Sie den Netzstecker aus der Wandsteckdose und
warten Sie, bis sich das Gerät abgekühlt hat.
• Verwenden Sie keine Lösungs- oder Scheuermittel.
• Reinigen Sie das Gerät nicht von innen.
• Versuchen Sie nicht, das Gerät zu reparieren. Falls das Gerät nicht einwandfrei arbeitet, tauschen Sie es gegen ein
neues aus.
• Reinigen Sie das Gerät mit einem weichen feuchten Tuch. Trocknen Sie das Gerät gründlich mit einem sauberen
trockenen Tuch ab.
• Verwenden Sie einen Staubsauger mit einer Bürstendüse, um den Staub vom Luftauslass zu entfernen.
• Reinigen Sie die Filter unter warmem Wasser mit einem neutralen Reinigungsmittel. Trocknen Sie die Filter nicht
unter direkter Sonneneinstrahlung.
Descripción Español
Dispositivo (g. A)
1. Panel de control
2. Salida de aire
3. Botón de encendido/
apagado
• Pulse el botón para encender o apagar el dispositivo.
4. Botón de modo
• Pulse el botón repetidamente para seleccionar el modo: Modo de refrigeración /
Modo de deshumidicación / Modo de ventilación.
5. Botón Arriba
6. Botón abajo
• Modo de refrigeración: Pulse el botón arriba o el botón abajo para cambiar la
temperatura denida. Simultáneamente pulse ambos botones para cambiar entre
Celsius (°C) y Fahrenheit (°F).
• Pulse el botón arriba o el botón abajo para cambiar el valor de tiempo denido.
7. Botón del temporizador
• Pulse el botón para ajustar el temporizador.
Nota: El temporizador puede ajustarse hasta un máximo de 24 h.
8. Botón de selección de
Velocidad de Viento
• En el modo de refrigeración o el modo de ventilación, pulse el botón
repetidamente para seleccionar la velocidad de ventilación: Baja / Media / Alta.
• En el modo de deshumidicación, el botón de selección de velocidad del viento
no es válido. El ventilador permanece en funcionamiento a baja velocidad de
viento.
9. Ventana de visualización • La ventana de visualización muestra la temperatura denida o el tiempo denido.
10. Indicador de modo de
refrigeración
• Este indicador muestra que el dispositivo está en el modo de refrigeración.
11. Indicador de modo de
secado
• Este indicador muestra que el dispositivo está en el modo de deshumidicación.
12. Indicador del ventilador • Este indicador muestra que el dispositivo está en el modo de ventilación.
13. Indicador del depósito
de agua
• Este indicador muestra que el depósito de agua necesita drenarse.
14. Indicador Celsius • Este indicador muestra que la temperatura está denida en grados Celsius (°C).
15. Indicador Fahrenheit • Este indicador muestra que la temperatura está denida en grados Fahrenheit (°F).
16. Indicador Hr • Este indicador muestra que el dispositivo está en el modo de temporizador.
17. Indicador de modo de
autoapagado
• Este indicador muestra que el dispositivo está en el modo de autoapagado. Esta
función solo está disponible en el modo de refrigeración. Simultáneamente, pulse
los botones 5 y 8 para activar.
18. Indicador de encendido/
apagado
• Este indicador muestra que el dispositivo está encendido o apagado.
19. Asa
20. Oricio de drenaje continuo
• En el modo de refrigeración y deshumidicación, es posible un drenaje continuo:
• Quite el tapón de agua y conecte la salida de agua a un recipiente de agua o
drenaje.
21. Placa de jación del cable
de alimentación
22. Soporte del mando a
distancia
23. Oricio de drenaje
• Para drenar el dispositivo, apague el dispositivo y desconecte el enchufe de la
toma de corriente.
• Aoje la cubierta de drenaje y quite el tapón de agua. Deje que el agua uya a un
recipiente de agua. Conecte el tapón de agua y apriete la cubierta de drenaje.
24. Filtro de aire
• Para una ltración óptima limpie el marco del ltro y el ltro interior con
regularidad.
25. Conector de evacuación
26. Filtro de aire
• Para una ltración óptima limpie el marco del ltro y el ltro interior con
regularidad.
27. Ruedas • Coloque el dispositivo sobre una supercie plana y seca.
28. Cable de alimentación
29. Tubo de evacuación
• Conecte el tubo de evacuación al conector de evacuación y al conector del
adaptador de ventana. La longitud de la manguera de evacuación debe estar
entre 28 y 150 cm. No utilice tubos alargadores. Asegúrese de que la evacuación
no esté obstruida.
30. Conector del adaptador de
ventana
• El dispositivo puede colocarse en dirección horizontal o vertical.
Mando a distancia (g. B)
1. Mando a distancia
• Utilice el mando a distancia para controlar el dispositivo desde una distancia
máxima de 5 m.
2. Botón de encendido/
apagado
• Pulse el botón para encender o apagar el dispositivo.
3. Botón del temporizador • Pulse el botón para denir el valor de tiempo.
4. Botón de oscilación
• Pulse el botón de oscilación para abrir o cerrar el estilo de oscilación. El ujo de
aire de la salida de aire puede soplar en diferentes ángulos.
5. Modo de autoapagado
• En el modo de refrigeración, pulse el botón para seleccionar el modo de autoapagado.
Nota: Después de seleccionar el modo de autoapagado, la temperatura aumenta
en 1 °C tras una hora y nuevamente 1 °C tras dos horas. Tras dos horas, la
temperatura permanece constante.
6. Botón Arriba
7. Botón abajo
• Pulse el botón arriba para aumentar el valor denido de temperatura o de tiempo.
Nota: La temperatura puede denirse a un mínimo de 16 °C y un máximo de 31 °C.
• Pulse el botón abajo para disminuir el valor denido de temperatura o de tiempo.
8. Botón de selección de modo
• Pulse el botón repetidamente para seleccionar el modo: Modo de refrigeración /
Modo de deshumidicación / Modo de ventilación.
9. Botón de ventilación
• Presione el botón de ventilación para seleccionar una salida de velocidad del
viento alta, media o baja.
10. Botón Celsius - Fahrenheit • Pulse el botón para cambiar entre Celsius (°C) y Fahrenheit (°F).
Instalación (g. C)
• Consulte la ilustración para instalar el dispositivo.
Nota: La distancia entre el dispositivo y la pared u otros objetos debe ser de al menos 50 cm.
Funciones de protección
• El dispositivo tiene cinco funciones de protección: Función de protección antiescarcha, protección contra
desbordamiento, descongelación automática, protección térmica automática y protección del compresor.
Datos técnicos
Potencia eléctrica 1357 W
Capacidad de refrigeración 12.000 BTU / 3,5 kW
Relación de eciencia energética
(EER)
2.60
Coeciente de rendimiento (COP) 2.50
Clase energética A
Circulación de aire 400 m³/h
Nivel de ruido ≤ 65 dB
Capacidad de tamaño de estancia 18 - 26 m²
Deshumidicación 28 l/día
Refrigerante R290, 230 g
Dimensiones 42 x 72 x 36 cm
Peso 28 kg
Seguridad
• Lea el manual detenidamente antes del uso. Conserve el manual en caso de futura necesidad.
• Utilice el dispositivo únicamente para su uso previsto. No utilice el dispositivo con una nalidad distinta a la descrita
en el manual.
• El fabricante no es responsable de daños consecuentes o de daños en la propiedad o en las personas causados por
no seguir estas instrucciones de seguridad y por un uso inadecuado de este dispositivo.
• El dispositivo puede ser utilizado por niños a partir de los 8 años y por personas con capacidades físicas, sensoriales
o mentales reducidas, o que no tengan experiencia ni conocimientos, si son supervisados o instruidos en el uso
del dispositivo de forma segura y entienden los riesgos implicados. Los niños no podrán realizar la limpieza ni el
mantenimiento reservado al usuario a menos que tengan más de 8 años y cuenten con supervisión. Mantenga el
dispositivo y el cable de red fuera del alcance de los niños menores de 8 años. Los niños no pueden jugar con el dispositivo.
• No utilice el dispositivo si alguna pieza ha sufrido daños o tiene un defecto. Si el dispositivo ha sufrido daños o tiene
un defecto, sustitúyalo inmediatamente.
• No utilice el dispositivo en exteriores. El dispositivo sólo es apto para uso en interiores.
• El dispositivo sólo es apto para uso doméstico. No utilice el dispositivo con nes comerciales.
• No utilice el dispositivo cerca de bañeras, duchas, lavabos u otros recipientes que contengan agua.
• No sumerja el dispositivo en agua ni otros líquidos. Si el dispositivo se sumerge en agua u otros líquidos, no saque el
dispositivo con las manos. Retire inmediatamente el enchufe de red de la toma de pared. Si el dispositivo se sumerge
en agua u otros líquidos, no vuelva a utilizar el dispositivo.
• Mantenga el dispositivo alejado de fuentes de calor. No coloque el dispositivo sobre supercies calientes ni cerca de
llamas abiertas.
• No utilice el dispositivo cerca de explosivos o materiales inamables.
• Mantenga las manos alejadas de las piezas móviles. No meta los dedos, lapiceros u otros objetos por la protección.
• Antes de mover el dispositivo, retire siempre el enchufe de red de la toma de pared. No tire del cable de red.
Seguridad eléctrica
• Para reducir el peligro de descarga eléctrica, este producto sólo debería abrirlo un técnico autorizado cuando
necesite reparación.
• Desconecte el producto de la toma de corriente y de los otros equipos si ocurriera algún problema.
• No utilice el dispositivo si el cable de red o el enchufe de red está dañado o es defectuoso. Si el cable de red o el enchufe
de red está dañado o es defectuoso, éste debe ser sustituido por el fabricante o un servicio técnico autorizado.
• Antes del uso, compruebe siempre que la tensión de red sea la misma que se indica en la placa de características del dispositivo.
• Conecte el dispositivo a una toma de pared con tierra. Si es necesario, utilice un cable alargador con toma de tierra
de un diámetro adecuado.
• Desenrolle siempre totalmente el cable de red y el cable alargador.
• El dispositivo no se ha diseñado para funcionar mediante un temporizador externo o un sistema de control remoto independiente.
• No mueva el dispositivo tirando del cable de red. Asegúrese de que el cable de red no se enrede. Asegúrese de que el
cable de red no cuelgue del borde de una encimera y no pueda engancharse accidentalmente o tropezarse con él.
• No sumerja el dispositivo, el cable de red o el enchufe de red en agua ni otros líquidos.
• No deje el dispositivo desatendido cuando el enchufe de red esté conectado al suministro de red.
Limpieza y mantenimiento
¡Advertencia!
• Antes de la limpieza o el mantenimiento, apague el dispositivo, retire el enchufe de red de la toma de pared y espere
hasta que el dispositivo se haya enfriado.
• No utilice disolventes de limpieza ni productos abrasivos.
• No limpie el interior del dispositivo.
• No intente reparar el dispositivo. Si el dispositivo no funciona correctamente, sustitúyalo por uno nuevo.
• Limpie el dispositivo con un paño suave humedecido. Seque bien el dispositivo con un paño limpio y seco.
• Utilice un aspirador con una boquilla de cepillo para eliminar el polvo de la salida del ujo de aire.
• Limpie los ltros en agua templada con un detergente neutro. No seque los ltros a la luz solar directa.
Description Français
Appareil (g. A)
1. Panneau de commande
2. Sortie d'air
3. Bouton marche/arrêt • Appuyez sur le bouton pour allumer/éteindre l'appareil.
4. Bouton mode
• Appuyez de manière répétée sur le bouton pour sélectionner le mode : Mode
refroidissement /Mode déshumidication /Mode ventilateur.
5. Bouton haut
6. Bouton bas
• Mode refroidissement : Appuyez sur le bouton haut ou bas pour modier le
réglage de température. Appuyez simultanément sur les deux boutons pour
alterner entre Celsius (°C) et Fahrenheit (°F).
• Appuyez sur le bouton haut ou bas pour modier le réglage de durée.
7. Bouton minuteur
• Appuyez sur le bouton pour régler le minuteur.
Remarque: Le minuteur peut être réglé pour un maximum de 24 h.
8. Bouton de sélection de
vitesse du vent
• En mode ventilateur ou refroidissement, appuyez sur le bouton de manière
répétée pour sélectionner la vitesse du ventilateur : Bas / Moyen / Haut.
• En mode déshumidication, le bouton de sélection de vitesse du vent n'est pas
valide. Le ventilateur reste en mode vitesse du vent basse.
9. Fenêtre d'achage • La fenêtre d'achage indique la température ou la durée réglée.
10. Témoin de mode
refroidissement
• Ce témoin indique que l'appareil est en mode refroidissement.
11. Indicateur de mode de
séchage
• Ce témoin indique que l'appareil est en mode déshumidication.
12. Indicateur de ventilateur • Ce témoin indique que l'appareil est en mode ventilateur.
13. Indicateur de réservoir d’eau • Ce témoin indique que le réservoir d'eau doit être évacué.
14. Indicateur Celsius • Ce témoin indique que la température est réglée en Celsius (°C).
15. Indicateur Fahrenheit • Ce témoin indique que la température est réglée en Fahrenheit (°F).
16. Indicateur Hr • Ce témoin indique que l'appareil est en mode minuteur.
17. Témoin de mode veille
• Ce témoin indique que l'appareil est en mode veille. Cette fonction est
uniquement disponible en mode refroidissement. Appuyez simultanément sur les
boutons 5 et 8 pour activer.
18. Témoin marche/arrêt • Ce témoin indique que l'appareil est en marche ou arrêté.
19. Poignée
20. Orice d'évacuation
continue
• Pour les modes refroidissement et déshumidication, l'évacuation continue est
possible :
• Retirez le bouchon d'eau et connectez la sortie d'eau à un conteneur d'eau ou
une évacuation.
21. Plaque de xation de
cordon d'alimentation
22. Support de télécommande
23. Orice d'évacuation
• Pour vidanger l'appareil, arrêtez-le et déconnectez la che électrique de la prise secteur.
• Desserrez le cache d'évacuation et retirez le bouchon d'eau. Laissez l'eau s'écouler
dans un conteneur d'eau. Mettez le bouchon d'eau et serrez le cache d'évacuation.
24. Filtre à air • Pour une ltration optimale, nettoyez régulièrement le châssis du ltre et le ltre intérieur.
25. Connecteur d'évacuation
26. Filtre à air • Pour une ltration optimale, nettoyez régulièrement le châssis du ltre et le ltre intérieur.
27. Roulettes • Placez l'appareil sur une surface plane et sèche.
28. Cordon d'alimentation
29. Tuyau d'évacuation
• Connectez le tuyau d'évacuation sur le connecteur d'évacuation puis ce
connecteur sur l'adaptateur de fenêtre. Le exible d'évacuation doit présenter
une longueur entre 28 et 150 cm. N'utilisez aucune rallonge. Assurez-vous que
l'évacuation n'est pas obstruée.
30. Connecteur d'adaptateur
de fenêtre
• L'appareil peut être placé à l'horizontale ou à la verticale.
Télécommande (g. B)
1. Télécommande • Utilisez la télécommande pour commander l'appareil à une distance maximum de 5 m.
2. Bouton marche/arrêt • Appuyez sur le bouton pour allumer/éteindre l'appareil.
3. Bouton minuteur • Appuyez sur le bouton pour régler la durée.
4. Bouton oscillation
• Appuyez sur le bouton d'oscillation pour une ouverture ou fermeture de type
oscillant. Le débit d'air de la sortie d'air peut souer selon diérents angles.
5. Mode veille
• En mode refroidissement, appuyez de manière répétée sur le bouton pour
sélectionner le mode veille :
Remarque: Suite à la sélection du mode veille, la température augmente de 1 °C
après une heure puis à nouveau de 1 °C après deux heures. Après deux heures, la
température reste constante.
6. Bouton haut
7. Bouton bas
• Appuyez sur le bouton haut pour augmenter la valeur de température ou de durée.
Remarque: La température est réglable au minimum sur 16 °C et au maximum sur 31 °C.
• Appuyez sur le bouton bas pour réduire la valeur de température ou de durée.
8. Sélecteur de mode
• Appuyez de manière répétée sur le bouton pour sélectionner le mode : Mode
refroidissement /Mode déshumidication /Mode ventilateur.
9. Bouton ventilateur
• Appuyez sur le bouton de ventilateur pour sélectionner la vitesse du vent haute,
moyenne ou basse.
10. Bouton Celsius - Fahrenheit • Appuyez sur le bouton pour alterner entre Celsius (°C) et Fahrenheit (°F).
Installation (g. C)
• Consultez l'illustration pour installer l'appareil.
Remarque: La distance entre l'appareil et le mur ou d'autres objets doit être d'au moins 50 cm.
Fonctions de protection
• L'appareil intègre cinq fonctions de protection : Fonction de protection contre le gel, fonction de protection contre le
débordement, dégel automatique, protection thermique automatique et protection du compresseur.
Caractéristiques techniques
Puissance électrique 1357 W
Capacité de refroidissement 12000 BTU / 3,5 kW
Taux de rendement énergétique
(EER)
2.60
Coecient de performances (COP) 2.50
Classe d'énergie A
Circulation d'air 400 m³/h
Niveau acoustique ≤ 65 dB
Capacité de salle 18 - 26 m²
Déshumidication 28 l/jour
Réfrigérant R290, 230 g
Dimensions 42 x 72 x 36 cm
Poids 28 kg
Sécurité
• Lisez attentivement le manuel avant usage. Conservez le manuel pour toute référence ultérieure.
• Utilisez l'appareil uniquement pour son usage prévu. N'utilisez pas l'appareil à d'autres ns que celles décrites dans le manuel.
• Le fabricant décline toute responsabilité pour les dommages ou blessures consécutifs causés par le non-respect des
consignes de sécurité et d'une utilisation inappropriée de l'appareil.
• L'appareil peut être utilisé par des enfants 8 ans ou plus et des personnes présentant des capacités physiques,
sensorielles ou intellectuelles réduites, voire ne disposant pas des connaissances et de l'expérience nécessaires en
cas de surveillance ou d'instructions sur l'usage de l'appareil en toute sécurité et de compréhension des risques
impliqués. Le nettoyage et l'entretien utilisateur ne doivent pas être conés à des enfants sauf s'ils ont 8 ans ou plus
et sont sous surveillance. Maintenez l'appareil et le cordon d'alimentation hors de portée des enfants de moins de 8
ans. Les enfants ne doivent pas jouer avec l'appareil.
• N'utilisez pas l'appareil si une pièce quelconque est endommagée ou défectueuse. Si l'appareil est endommagé ou
défectueux, remplacez-le immédiatement.
• N'utilisez pas l'appareil à l'extérieur. L'appareil est conçu exclusivement pour une utilisation en intérieur.
• L'appareil est conçu exclusivement pour un usage domestique. N'utilisez pas l'appareil à des ns commerciales.
• N'utilisez pas l'appareil à proximité d'une baignoire, d'une douche, d'un lavabo ou d'autres récipients contenant de l'eau.
• Ne plongez pas l'appareil dans l'eau ou autres liquides. Si l'appareil est plongé dans l'eau ou d'autres liquides, ne le
retirez pas avec vos mains. Débranchez immédiatement la che secteur de la prise murale. Si l'appareil est plongé
dans l'eau ou d'autres liquides, ne l'utilisez pas à nouveau.
• Maintenez l'appareil à l'écart des sources de chaleur. Ne placez pas l'appareil sur une surface chaude ou à proximité de flammes nues.
• N'utilisez pas l'appareil à proximité de matières explosives ou inammables.
• Maintenez vos mains à l'écart des pièces en mouvement. N'insérez pas les doigts, des crayons ou d'autres objets à travers la protection.
• Avant de déplacer l'appareil, débranchez-le toujours de la prise secteur. Ne tirez pas sur le cordon d'alimentation.
Sécurité électrique
• Pour réduire le risque de choc électrique, ce produit doit être ouvert uniquement par un technicien qualié si une
réparation s'impose.
• Débranchez l'appareil et les autres équipements du secteur s'il y a un problème.
• N'utilisez pas l'appareil si le cordon d'alimentation ou la che secteur est endommagé ou défectueux. Si le cordon
d'alimentation ou la che secteur est endommagé ou défectueux, il doit être remplacé par le fabricant ou par un
réparateur agréé.
• Avant toute utilisation, vériez que la tension du secteur correspond à celle indiquée sur la plaque signalétique de l'appareil.
• Connectez l'appareil à une prise murale mise à la terre. Si nécessaire, utilisez une rallonge mise à la terre d'un
diamètre adapté.
• Déroulez toujours complètement le cordon d'alimentation et la rallonge.
• L'appareil n'est pas conçu pour être utilisé avec une minuterie externe ou un système de télécommande séparé.
• Ne déplacez pas l'appareil en le tirant par le cordon d'alimentation. Assurez-vous que le cordon d'alimentation ne
s'enchevêtre pas. Assurez-vous que le cordon d'alimentation ne pend pas sur le bord d'un plan de travail et ne peut
pas être happé ou faire trébucher quelqu'un accidentellement.
• N'immergez pas l'appareil, le cordon d'alimentation ou la che secteur dans l'eau ou d'autres liquides.
• Ne laissez pas l'appareil sans surveillance si la che secteur est branchée.
ACMB1WT12
Local air conditioner
TIMERF AN UP DOWN MODE
POWER
Cool
Dry
Fan
Full
SLEEP
ºC
ºF
Hr
Sleep
on/o
Cool
Dry
Fan
Full
ºC
ºF
Hr
Sleep
on/off
26
20
24
21
22
13
7
12
11
10
18
17
15
14
16
8 5 69 4 3
2
1
27
29
30
19
23
25
28
A
30
B
C
Cool
ºC
1
5
4
3
ºC ºF
10
9
8
2
6
7


Присоединиться к беседе по данному изделию
Здесь вы можете поделиться тем, что думаете о Nedis ACMB1WT12 Кондиционер воздуха. Если у вас есть вопросы, сначала внимательно прочтите инструкцию. Запросить руководство можно с помощью контактной формы.
ответить | Это было полезно (16) (Переведено Google)
ответить | Это было полезно (10) (Переведено Google)
ответить | Это было полезно (3) (Переведено Google)
ответить | Это было полезно (2) (Переведено Google)