
* English
* Deutsch
* Español
* Français
T
2
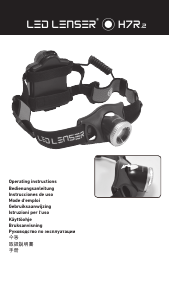
Thank you for choosing a LED LENSER product. To
familiarize yourself with this product, please read
the following instructions.
Item
LED LENSER
9802 LED LENSER T
9902 LED LENSER T Blister
Version: 1.0
Battery pack:
3 x AAA / LR03 / Micro (1.5 V DC)
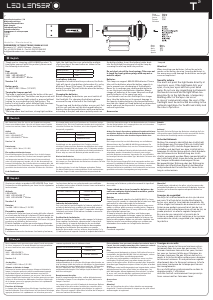
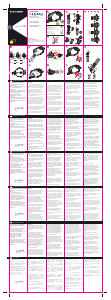
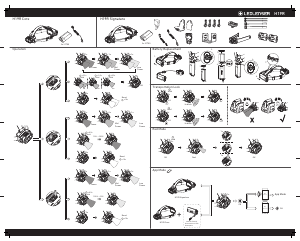
Turning the lamp on and o
The lamp is operated through the button at the end
of the flashlight tube. The button can be pressed until
it locks (for constant light output) or pressed without
locking for e.g. producing short light pulses. The
button is also used to select dierent light functions
by using multiple short presses of the button.
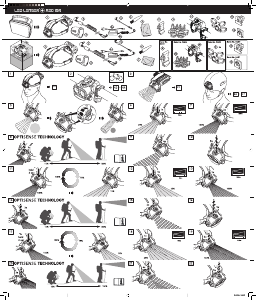
Light-Functions
The lamp oers two functions, strong light and dim
light; the light functions are selected by multiple
short presses of the rear button as shown in the
following table.
Low battery indicator
Regardless of which function you choose, the flash-
light will signal a low battery status when it is on by
blinking 3 times (3 Hz) every 15 seconds until the
battery is empty. This will indicate when the battery
needs to be changed.
Changing the batteries
Before changing the batteries you must switch o
the flashlight. For changing the batteries please
unscrew the cap at the end of the flashlight.
The end cap and the battery holder are one unit. Pull
out this unit and take out the discharged batteries.
Replace the discharged batteries with new batteries
according to the plus and minus polarity marks on
the battery holder. Insert the battery holder back
into the flashlight housing and close the lamp by
screwing the end cap back into position.
Do not short-circuit the front springs. Take care not
to touch the front golden springs with any wet or
metallic object.
Batteries
This lamp can support AAA Ni-MH batteries. Please
take out the batteries when the battery capacity is
low to prevent over-discharging of the batteries.
Never try to recharge non-rechargeable batteries
or use fresh and used batteries together. Always
change all batteries at the same time and use high
quality batteries of the same type only.
If you intend to not use this flashlight for a longer
time, take the batteries out to prevent damage to
the lamp by leaking batteries; discharged batteries
must be also taken out. Used batteries are hazardous
waste and must be disposed of according to the
national legislation.
Accessories
Lanyard
Attention!
When inserting new batteries, follow the polarity
marks on the battery housing. Inserting batteries in
the wrong way could damage the batteries and might
cause an explosion!
Security advice
You must not point the light beam directly at
a person’s eyes. If the light beam hits your
eyes, close your eyes and turn your head
away. Do not use any magnifying instruments
that would concentrate the light. When loo-
king directly in the light beam, a temporary
blinding eect of the eyes can occur.
In case of commercial usage, the user of the
flashlight must be instructed according to the
national regulations for health and safety and
the rules of practice.
Wir freuen uns, dass Sie sich für ein Produkt aus unserem
Hause entschieden haben. Um sich mit Ihrem neuen Produkt
vertraut zu machen, finden Sie hier eine Gebrauchsanleitung.
Artikel
LED LENSER
9802 LED LENSER T
9902 LED LENSER T Blister
Version: 1.0
Batteriesatz:
3 x AAA / LR03 / Micro (1.5 V DC)
Ein-und Ausschalten der Lampe
Durch Betätigung des Druckschalters lässt sich die Lampe
ein- und ausschalten. Der Schalter kann komplett gedrückt
und eingerastet werden (für konstante Lichtausstrahlung)
oder nur leicht gepresst werden, z.B. für die Aussendung von
kurzen Lichtimpulsen. Der Schalter dient ausserdem dazu, die
verschiedenen Licht-Funktionen der Lampe anzuwählen; dieses
geschieht durch mehrfaches schnelles Drücken des Schalters.
Licht-Funktionen
Die Lampe bietet zwei Licht-Funktionen an, Starklicht und ge-
dimmtes Licht. Die Licht-Funktionen werden durch mehrfaches
schnelles Drücken des Schalters, wie in der folgende Tabelle
dargestellt, angewählt.
Batterie-Entlade-Anzeige
Unabhängig von der gewählten Licht-Funktion, wird ein
niedriger Ladezustand der Batterie durch Blinken der Lampe
angezeigt. Hierbei blinkt die Lampe -alle 15 Sekunden wieder-
holt- dreimal mit 3 Hz bis die Batterie vollständig entladen ist.
Dieses zeigt an, wann die Batterie geladen werden muss.
Wechsel der Batterien
Vor dem Wechseln der Batterien schalten Sie bitte unbedingt
die Lampe aus. Zum Wechseln der Batterien schrauben Sie bitte
die Lampe hinten auf.
Der Batteriehalter ist mit der Endkappe verbunden. Ziehen
Sie diese Einheit heraus und entnehmen Sie die verbrauchten
Batterien. Legen Sie die neuen Batterien entsprechend der
Polaritäts-Kennzeichnungen in den Batteriehalter ein. Schieben
Sie den Batteriehalter ins Lampengehäuse ein und schrauben
danach die Endkappe wieder auf.
Achten Sie darauf, die vorderen goldenen Kontakte nicht kurz-
zuschließen. Halten Sie diese Kontakte beim Batteriewechsel
von allen metallischen oder feuchten Gegenständen fern.
Batterien
Die Lampe unterstützt auch die Benutzung von aufladbaren
Akkumulatoren des Typs AAA Ni-MH. Bitte entnehmen Sie
diese wenn diese Entladen sind, um eine Tiefenentladung zu
vermeiden.
Nicht wieder aufladbare Batterien dürfen keinesfalls wieder
aufgeladen werden. Verwenden Sie niemals neue und ge-
brauchte Batterien zusammen. Verwenden Sie ausschließlich
hochwertige Batterien desselben Typs. Wechseln Sie immer alle
Batterien auf einmal.
Falls Sie die Lampe längere Zeit nicht verwenden wollen, ent-
nehmen Sie unbedingt die Batterien um Schäden zu vermeiden;
entladene Batterien müssen ebenfalls entnommen werden.
Verbrauchte Batterien und Akkus sind Sondermüll und müssen
gemäß der nationalen Gesetzgebung entsorgt werden.
Zubehör
Trageband
Achtung!
Beachten Sie beim Einlegen der Batterien unbedingt die Pola-
ritätsmarkierungen! Andernfalls besteht eventuell die Gefahr,
dass Batterien beschädigt werden und explodieren.
Sicherheitshinweis
Richten Sie niemals absichtlich den Lichtstrahl
in die Augen von Personen.Falls ein Lichtstrahl
in die Augen trit, sind die Augen bewusst zu
schließen und der Kopf aus dem Lichtstrahl zu
bewegen. Es dürfen keine optisch stark bündeln-
den Instrumente zur Betrachtung des Licht-
strahls verwendet werden.Wenn jemand direkt in
den Lichtstrahl blickt, kann die hohe Leuchtkraft
der Lampe zu Blenderscheinungen führen.
Bei gewerblicher Nutzung oder der Nutzung im
Bereich der öentlichen Hand ist der Benutzer
entsprechend der Vorschriften für Laserstrah-
lung zu unterweisen.
Gracias por elegir un producto LED LENSER. Para fami-
liarizarse con este producto, por favor lea las siguientes
instrucciones.
Artículo
LED LENSER
9802 LED LENSER T
9902 LED LENSER T Blister
Versión: 1.0
Baterías:
3 x AAA / LR03 / Micro (1.5 V DC)
Encendido y apagado
La linterna se hace funcionar a través del botón situado
en el extremo del tubo de la linterna. El botón puede ser
presionado totalmente (hasta hacer clic) para salida de
luz constante, o pulsado suavemente (sin hacer clic) para
producir p.ej. destellos de luz cortos.
El botón también se utiliza para seleccionar diferentes
funciones de luz mediante el uso de múltiples pulsados.
Funciones luz
La linterna ofrece dos funciones: luz fuerte y luz tenue;
las funciones de luz son seleccionadas por múltiples
pulsados cortos sobre el botón trasero como se muestra
en la siguiente tabla.
Pulsados sobre el Botón Función de luz
1 Fuerte
2 Tenue
Indicador de batería baja
Sea cual sea la función elegida, la linterna señalará el
estado de batería baja cuando está encendida parpa
-
deando 3 veces (con 3 Hz) cada 15 segundos hasta que
la batería está vacía. Esto indicará cuando se necesita
cambiar la batería.
Sustitución de las baterías
Antes de cambiar las baterías debe apagar la linterna.
Para cambiar las baterías, desenrosque la tapa final.
La tapa final y el soporte de baterías es una unidad.
Saque la unidad y extraiga las baterías descargadas.
Reemplace las baterías descargadas con nuevas
baterías de acuerdo con las marcas de polaridad (+) y
(-) indicadas en el soporte. Inserte el soporte de baterías
de nuevo en la linterna y ciérrela roscando la tapa final
en su sitio.
Tenga cuidado de no tocar los muelles delanteros do
-
rados con cualquier objeto húmedo o metálico, podría
provocar un cortocircuito.
Baterías
Esta linterna puede admitir pilas AAA Ni-MH. Por favor,
saque las pilas cuando la capacidad de la batería es baja
para evitar la sobre-descarga de las baterías.
Nunca intente recargar las baterías que no sean recar
-
gables o utilizar pilas nuevas y usadas juntas. Siempre
cambie todas las baterías a la vez y utilice solo pilas de
alta calidad del mismo tipo.
Si tiene la intención de no utilizar esta linterna por
un período prolongado de tiempo, saque las baterías
para evitar pérdidas que puedan dañar la linterna; las
baterías descargadas deben ser retiradas también. Las
baterías usadas son residuos peligrosos y deben ser
eliminados de acuerdo con la legislación nacional.
Accesorios
Cuerda de seguridad
Atención!
Cuando vaya a introducir las pilas, siga las marcas de
polaridad indicadas en la carcasa de la batería. Insertar
las pilas en la dirección equivocada podría dañar las
baterías!
Consejos de seguridad
No dirija la luz directamente en los ojos de una
persona. Si el haz de luz incide directamente
en los ojos, apartar la mirada de inmediato. No
utilice ningún instrumento de aumento con esta
linterna que pudiera concentrar el haz de luz.
Cuando se mira directamente en el haz de luz, se
puede producir un efecto cegador temporal.
En caso de uso comercial, el usuario de la
linterna se debe instruir conforme a las normas
nacionales de salud y seguridad y las reglas de
la práctica.
Nous sommes ravis que vous ayez acheté l‘un de nos produ-
its. Vous trouverez ici le mode d‘emploi qui vous permettra
de vous familiariser avec votre nouveau produit.
Produit
9802 LED LENSER T
9902 LED LENSER T Blister
Version : 1.0
Jeu de piles :
3 x AAA / LR03 / Micro (1,5 V DC)
Allumer et éteindre la lampe
Actionnez le bouton-poussoir pour allumer et éteindre la
lampe. Le bouton-poussoir peut être entièrement appuyé
et encliqueté (pour un faisceau lumineux constant) ou
légèrement appuyé seulement, par ex. pour l‘émission de
courtes impulsions lumineuses. Le bouton-poussoir sert par
ailleurs à sélectionner les diérentes fonctions d‘éclairage
de la lampe ; pour cela, appuyer plusieurs fois rapidement
sur le bouton-poussoir.
Fonctions d‘éclairage
La lampe ore deux fonctions d‘éclairage : lumière forte et
lumière atténuée. Pour sélectionner les fonctions d‘éclairage,
appuyez plusieurs fois rapidement sur le bouton-poussoir,
comme représenté dans le tableau suivant.
Appuis sur le bouton-poussoir Fonction
1 Lumière forte
2 Lumière atténuée
Achage de pile déchargée
Indépendamment de la fonction d‘éclairage sélectionnée, un
état de charge faible de la pile est aché par le clignotement
de la lampe. La lampe clignote alors toutes les 15 secondes
en trois répétitions avec 3 Hz jusqu‘à ce que la pile soit
entièrement déchargée. Cela indique à quel moment la pile
doit être rechargée.
Remplacement des piles
Avant le remplacement des piles, veillez obligatoirement
à éteindre la lampe. Pour remplacer les piles, dévissez la
lampe à l‘arrière.
Le support à piles est relié à l‘embout de fermeture. Retirez
cette unité et les piles usées. Installez les nouvelles piles
conformément au marquage de polarité dans le support à
piles. Glissez le support à piles dans le boîtier de la lampe et
revissez l‘embout de fermeture.
Faites attention à ne pas court-circuiter les contacts dorés à
l‘avant. Lors du remplacement des piles, tenez ces contacts
éloignés de tous les objets métalliques ou humides.
Piles
La lampe prend également en charge l‘utilisation d‘accus re
-
chargeables du type AAA Ni-MH. Une fois déchargés, retirez
ces accus afin d‘éviter une décharge profonde.
Les piles non rechargeables ne doivent en aucun cas être
rechargées. N‘utilisez jamais en même temps des piles
neuves et des piles usées. N‘utilisez que des piles de qualité,
du même type. Remplacez toujours toutes les piles en même
temps.
Si la lampe reste inutilisée pendant une longue durée, retirez
obligatoirement les piles afin d‘éviter les dommages ; les
piles déchargées doivent également être retirées. Les piles
et accus usés sont des déchets spéciaux et doivent être
éliminés conformément à la législation nationale.
Accessoires
Cordon
Attention !
Lors de l‘insertion des piles, faites attention au marquage
de polarité ! Il existe autrement le risque que les piles soient
endommagées et explosent.
Consigne de sécurité
N‘orientez jamais le faisceau lumineux volon-
tairement dans les yeux des personnes. Si le
faisceau lumineux rencontre les yeux, fermez
les yeux ou tournez la tête pour l‘éloigner du
faisceau lumineux. Ne pas utiliser des instru-
ments à forte focalisation optique pour observer
le faisceau lumineux. Si une personne regarde
directement dans le faisceau lumineux, la forte
puissance lumineuse de la lampe peut causer
des aveuglements.
En cas d‘utilisation professionnelle ou dans le
domaine public, l‘utilisateur
doit être instruit conformément aux prescrip-
tions concernant les faisceaux laser.
LED LENSER®*
* English
Close
Schließen
Cerrar
Fermer
Chiudere
Sluiten
閉める
닫다
关闭
Open
Önen
Abrir
Ouvrir
Aperto
Open
開ける
열다
打开
T
Operating instructions | 1.0
Bedienungsanleitung
Instrucciones de uso
Mode d‘emploi
Istruzioni per l‘uso
Gebruiksaanwijzing
Руководство по эксплуатации
日本語
한국어
手册
Hersteller - Manufactured by
ZWEIBRÜDER® OPTOELECTRONICS GMBH & CO. KG
Kronenstr. 5-7 • 42699 Solingen • Germany
Tel. +49 (0)212/5948-0 • Fax +49 (0)212/5948-200
info@zweibrueder.com • www.zweibrueder.com
2
2
2
2
2
2
2
2
2
2
Button presses Light Function
1 Strong
2 Dim
Schalter-Drücke Licht Funktion
1 Starklicht
2 Gedimmtes Licht
+ -
+ -
+ -
T
1406000001

Присоединиться к беседе по данному изделию
Здесь вы можете поделиться тем, что думаете о Led Lenser T2 Фонарь. Если у вас есть вопросы, сначала внимательно прочтите инструкцию. Запросить руководство можно с помощью контактной формы.
ответить | Это было полезно (19) (Переведено Google)