5
УСТАНОВКА
Поместите стиральную машину вблизи места ее использования без подставки и упаковки.
Осторожно, чтобы не повредить шланг и электрический провод, перережьте пластиковый хомут на
задней стенке стиральной машины.
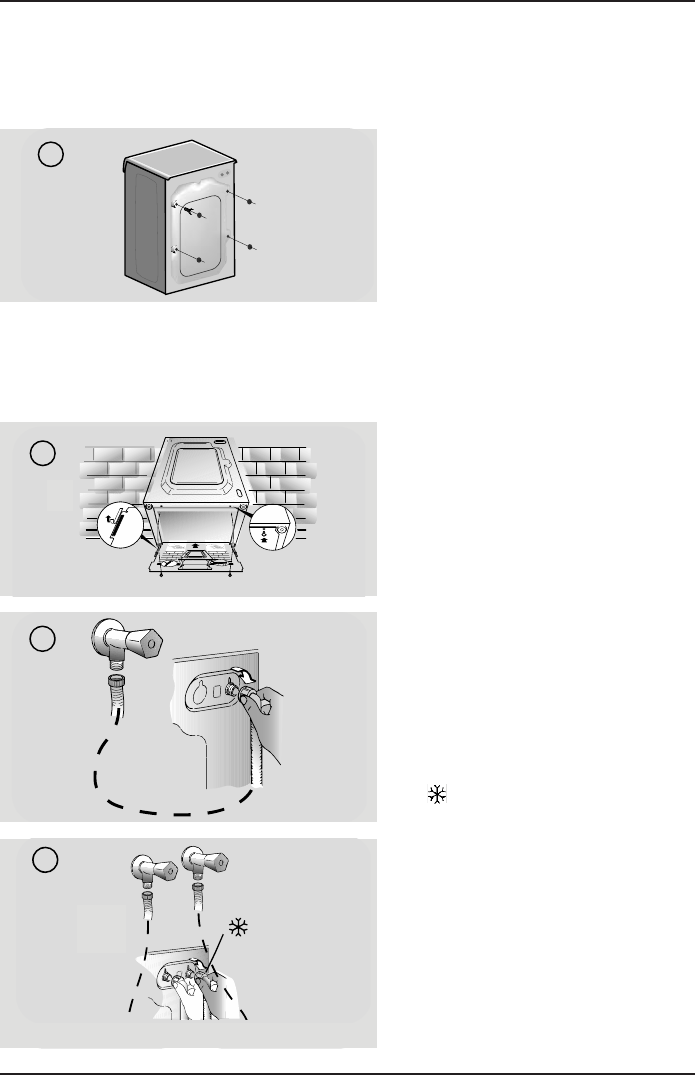
Открутите 4 болта (А) на задней стенке и
извлеките 4 траспортировочные втулки (В),
рис. 1. Закройте 4 отверстия специальными
заглушками из комплекта стиральной ма-
шины.
ПРИМЕЧАНИЕ! СОХРАНИТЕ ТРАНСПОРТИРОВОЧНЫЕ БОЛТЫ ДЛЯ СЛУЧАЕВ ПЕ-
РЕМЕЩЕНИЯ И ПЕРЕВОЗКИ СТИРАЛЬНОЙ МАШИНЫ.
В СЛУЧАЕ ЕСЛИ ТРАНСПОРТИРОВОЧНЫЕ ВТУЛКИ УПАЛИ ВНУТРЬ, НАКЛОНИТЕ
СТИРАЛЬНУЮ МАШИНУ ВПЕРЕД ДЛЯ ИХ ИЗВЛЕЧЕНИЯ.
Закрепите лист гофрированного материала
на дне, как показано на рис. 2.
Подсоедините шланг (рис. 3) к
водопроводному крану. Используйте новый
заливной шланг идущий в комплекте.
Повторное и спользование старого
заливного шланга не допускается!
НЕКОТОРЫЕ МОДЕЛИ МОГУТ ВКЛЮЧАТЬ В
СЕБЯ НЕСКОЛЬКО ФУНКЦИЙ:
ПОДКЛЮЧЕНИЕ К ГОРЯЧЕЙ / ХОЛОДНОЙ
ВОДЕ (рис.4)
Для экономии электроэнергии прибор
можно подключить к холодной и горячей
воде.
Подсоедините серый шланг к холодной
воде , красный шланг к горячей воде.
Если стиральная машина подключается
только к холодной воде, то некоторые
программы могут запускаться с задержкой,
т.к. происходит дополнительный нагрев
воды.
АКВАСТОП (рис. 5)
Устройство, блокирующее подачу воды
в случае протечки. В окне (А) появляется
красная отметка, шланг должен быть
заменен. Для замены шланга нажмите
на кнопку блокиратора (В) и открутите
фиксирующую гайку.
Release the power chord and
drain hose from the securing
clip at the rear of the machine.
Remove the
2
or
4
transportation
screws
(A)
on the back and
remove the
2
or
4
flat washers,
rubber bungs and plastic spacer
tubes
(B)
as illustrated
in figure 1
.
If the washing machine is built-in,
unscrew the
3
or
4
transportation
screws
(A)
and remove the
3
or
4
flat washers, rubber bungs and
plastic spacer tubes
(B)
.
During the removal of the screws
occasionally spacer tubes fall
inside the product, these can be
remove by tilting the product forward
and recovering them from the floor
or inside the base of the machine.
Cover the open transportation
screw holes with the 2 or 4
plastic caps included in the
instruction bag.
Place the corrugated plastic
sheet, found on top of the
appliance during the unpacking
process, into the base of the
appliance as shown in figure 2
(according to the model,
consider version A, B or C).
WARNING:
keep packaging materials
away from children.
Release the power chord and
drain hose from the securing
clip at the rear of the machine.
Remove the
2
or
4
transportation
screws
(A)
on the back and
remove the
2
or
4
flat washers,
rubber bungs and plastic spacer
tubes
(B)
as illustrated
in figure 1
.
If the washing machine is built-in,
unscrew the
3
or
4
transportation
screws
(A)
and remove the
3
or
4
flat washers, rubber bungs and
plastic spacer tubes
(B)
.
During the removal of the screws
occasionally spacer tubes fall
inside the product, these can be
remove by tilting the product forward
and recovering them from the floor
or inside the base of the machine.
Cover the open transportation
screw holes with the 2 or 4
plastic caps included in the
instruction bag.
Place the corrugated plastic
sheet, found on top of the
appliance during the unpacking
process, into the base of the
appliance as shown in figure 2
(according to the model,
consider version A, B or C).
WARNING:
keep packaging materials
away from children.
Connect the water hose to the water
supply tap (fig. 3) only using the hose
supplied with the appliance (do not
reuse old hose-sets).
SOME MODELS may include one or
more of the following features:
HOT&COLD (fig. 4):
water mains connection settings with hot
and cold water for higher energy savings.
Connect the grey tube to the cold water
tap and the red one to the hot water
tap. The machine can be connected to
the cold water tap only: in this case, some
programs may start a few minutes later.
AQUASTOP (fig. 5):
a device located on the supply tube that
stops water flow if the tube deteriorates;
in this case, a red mark will appear in the
window “A” and the tube must be
replaced. To unscrew the nut, press the
one-way lock device "B".
AQUAPROTECT – SUPPLY TUBE WITH
GUARD (fig. 6):
Should water leak from the primary
internal tube "A", the transparent
containment sheath "B" will contain water
to permit the washing cycle to complete.
At the end of the cycle, contact the
Customer Service Centre to replace the
supply tube.
The washing machine should be installed
in its final position such that the water fill
hose is not kinked or trapped. The
corrugated drain hose should be inserted
into suitable drain pipe of between 50 cm
and 85 cm height above the floor using
the curved drain hose support. If an under
sink connection is used the drain hose
must be routed above the sink overfill
opening to prevent back siphoning. Care
must be taken to avoid kinking or trapping
the drain hose (fig. 7).
Connect the water hose to the water
supply tap (fig. 3) only using the hose
supplied with the appliance (do not
reuse old hose-sets).
SOME MODELS may include one or
more of the following features:
HOT&COLD (fig. 4):
water mains connection settings with hot
and cold water for higher energy savings.
Connect the grey tube to the cold water
tap and the red one to the hot water
tap. The machine can be connected to
the cold water tap only: in this case, some
programs may start a few minutes later.
AQUASTOP (fig. 5):
a device located on the supply tube that
stops water flow if the tube deteriorates;
in this case, a red mark will appear in the
window “A” and the tube must be
replaced. To unscrew the nut, press the
one-way lock device "B".
AQUAPROTECT – SUPPLY TUBE WITH
GUARD (fig. 6):
Should water leak from the primary
internal tube "A", the transparent
containment sheath "B" will contain water
to permit the washing cycle to complete.
At the end of the cycle, contact the
Customer Service Centre to replace the
supply tube.
The washing machine should be installed
in its final position such that the water fill
hose is not kinked or trapped. The
corrugated drain hose should be inserted
into suitable drain pipe of between 50 cm
and 85 cm height above the floor using
the curved drain hose support. If an under
sink connection is used the drain hose
must be routed above the sink overfill
opening to prevent back siphoning. Care
must be taken to avoid kinking or trapping
the drain hose (fig. 7).
Connect the water hose to the water
supply tap (fig. 3) only using the hose
supplied with the appliance (do not
reuse old hose-sets).
SOME MODELS may include one or
more of the following features:
HOT&COLD (fig. 4):
water mains connection settings with hot
and cold water for higher energy savings.
Connect the grey tube to the cold water
tap and the red one to the hot water
tap. The machine can be connected to
the cold water tap only: in this case, some
programs may start a few minutes later.
AQUASTOP (fig. 5):
a device located on the supply tube that
stops water flow if the tube deteriorates;
in this case, a red mark will appear in the
window “A” and the tube must be
replaced. To unscrew the nut, press the
one-way lock device "B".
AQUAPROTECT – SUPPLY TUBE WITH
GUARD (fig. 6):
Should water leak from the primary
internal tube "A", the transparent
containment sheath "B" will contain water
to permit the washing cycle to complete.
At the end of the cycle, contact the
Customer Service Centre to replace the
supply tube.
The washing machine should be installed
in its final position such that the water fill
hose is not kinked or trapped. The
corrugated drain hose should be inserted
into suitable drain pipe of between 50 cm
and 85 cm height above the floor using
the curved drain hose support. If an under
sink connection is used the drain hose
must be routed above the sink overfill
opening to prevent back siphoning. Care
must be taken to avoid kinking or trapping
the drain hose (fig. 7).


Присоединиться к беседе по данному изделию
Здесь вы можете поделиться тем, что думаете о Körting KWDI1485W Стиральная машина с сушилкой. Если у вас есть вопросы, сначала внимательно прочтите инструкцию. Запросить руководство можно с помощью контактной формы.