Руководство Hoover CU71_CU12011 Пылесос

Вам нужно руководство для вашего Hoover CU71_CU12011 Пылесос? Ниже вы можете бесплатно просмотреть и скачать PDF-инструкцию на русском языке. В настоящее время этот продукт имеет 9 часто задаваемых вопроса, 0 комментариев и имеет 0 голосов. Если это не то руководство, которое вам нужно, свяжитесь с нами.

Ваше устройство неисправно, и в руководстве отсутствует решение? Перейдите в Repair Café для получения бесплатных ремонтных услуг.
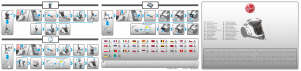
Руководство

Loading…

CLEANER MAINTENANCE
Emptying the Dust Container
When the dust reaches the max level indicator in the container empty the dust bin.
IMPORTANT: To maintain optimum performance do not allow the dust to sit higher than
the max level.
1. Release the container by sliding the dust container release button towards the rear of
the cleaner. Lift the dust container from the cleaner main body. [14]
2. Hold the dust container over a bin with one hand and use the other hand press the
Dust Container Door Release Button. [15]
3. Close the Dust Container door and refit to the cleaner main body.
Cleaning the washable filters
The cleaner is fitted with a blue filter pack. To maintain optimum cleaning performance
regularly remove the the filters and tap against the side of the bin to release dust. The
filters should be washed after 5 container empties or when the filter has excessive dust
level.
IMPORTANT: All bagless cleaners require regular filter cleaning. Failure to clean your
filters may result in air blockage, overheating and product failure. This may invalidate
your guarantee.
IMPORTANT: Regularly check and maintain the filters by following the filter
maintenance instructions , it is also recommended that you purchase new filters after
every 3rd filter wash. This will maintain your cleaners performance.
IMPORTANT: Always ensure the filters are fully dry before use.
To access the pre-motor filter:
1. Release the container by sliding the dust container release button towards the rear of
the cleaner. Lift the dust container from the cleaner main body. [14]
2. Hold the dust container with one hand and with the other hand rotate the bin handle
anti clockwise to release it from the dust container. [16]
3. Remove the blue filter pack located in the dust container handle. [17]
4. Gently tap and wash the filter using warm water. Do not use hot water or detergents.
Remove excess water from the filter and leave to dry fully before re-using. [18]
5. Reassemble to filter pack once fully dry and refit to the cleaner.
IMPORTANT: Do not use the product without the filter pack fitted.
*Certain Models Only ** Certain models only, nozzles may vary according to model
To access the exhaust filter:
1. Release the container by sliding the dust container release button towards the rear of
the cleaner. Lift the dust container from the cleaner main body. [14]
2. Unclip the exhaust filter cover from the dust container cradle on the cleaner main
body. [19]
3. Using the tab remove the exhaust filter from the cleaner main body. [20]
4. Gently tap and wash the filter using warm water. Do not use hot water or detergents.
Remove excess water from the filter and leave to dry fully before re-using. [21]
3
GB
Furniture Nozzle – For soft furniture and fabrics. [13]
Parquet Nozzle* – For parquet floors and other delicate floors. [1U]
Pet Hair Remover Mini Turbo Nozzle* - Use the mini turbo nozzle on stairs or for deep
cleaning on textile surfaces and other hard to clean areas. Particularly suitable for pet hairs
removal. [1V]
Allergen Remover Mini Turbo Nozzle* – Use the mini turbo nozzle on stairs or for deep
cleaning on textile surfaces and other hard to clean areas. Particularly suitable for allergen
removal. [1W]
Grand Turbo Nozzle* - Use the turbo nozzle for deep cleaning on carpets. [1X]
IMPORTANT: Do not use the grand turbo and mini turbo nozzles on rugs with long fringes,
animal hides and carpet pile deeper than 15mm. Do not keep the nozzle stationary while
the brush is rotating.
Cleaning the dust container / multi-cyclonic separation unit
This cleaner uses a multicyclonic separation system, unique to Hoover. If necessary the
separation unit can be disassembled from the dust container and cleaned.
1. Release the dust container by sliding the dust container release button towards the
rear of the cleaner. Lift the dust container from the cleaner main body. [14]
2. Hold the dust container with one hand and with the other hand rotate the dust
container handle anti clockwise to release it from the dust container. [16]
3. Remove the multicyclonic separation unit from the dust container by pulling the
handle provided. [22]
4. If necessary, use a cloth to remove excessive dust from the multi-cyclonic unit surface.. [23]
5. Reassemble the multicyclonic separation unit to the dust container and refit the filter
pack in position.
6. Reassemble the dust container handle to the bin container. Refit the dust container to
the cleaner.
Note: For stubborn dirt the multi-cyclonic separation unit, or the dust container can be washed,
but care must be taken to ensure that both are completely dry before use.
Important: For optimum performance, we recommend that the multi-cyclonic separation
system is inspected after each empty.
Removing a blockage from the cleaner
1. Check if the dust container is full. If so refer to ‘Emptying the dust container.
2. If the dust container is empty but suction is still low:
A. Do the filters need cleaning? If so refer to ‘Cleaning the washable filters.
B. Check if there is any other blockage in the system - Use a rod or pole to remove any
blockage from the extension tube or flexible hose.
C. Check if pre-motor filter is fitted.
D.
Check if the separation unit needs to be cleaned. Refer to ‘Cleaning the separation unit’
USER CHECKLIST
Should you have a problem with the product, complete this simple user checklist before
calling your local Hoover service.
•  Is there a working electricity supply to the cleaner? Please check with another electrical
appliance.
•  Is the dust bag over-lled? Please refer to ‘Cleaner Maintenance’.
•  Is the lter blocked? Please refer to ‘Cleaner Maintenance.
•  Is the hose or nozzle blocked? Please refer to ‘Removing a blockage from the system.
•  Has the cleaner overheated? If so, it will take approximately 30 minutes to automatically reset.
Загрузить руководство на русскийском (PDF, 2.17 MB)
(Помните о необходимости охраны окружающей среды и распечатывайте настоящее руководство только в том случае, если это действительно необходимо)

Loading…

Рейтинг

Сообщите нам, что вы думаете о Hoover CU71_CU12011 Пылесос, оставив оценку продукта. Хотите поделиться вашими впечатлениями от данного изделия или задать вопрос? Вы можете оставить комментарий в нижней части страницы.
Вы довольны Hoover CU71_CU12011 Пылесос?
Да Нет
Будьте первым, кто оценит это изделие
0 голоса

Присоединиться к беседе по данному изделию

Здесь вы можете поделиться тем, что думаете о Hoover CU71_CU12011 Пылесос. Если у вас есть вопросы, сначала внимательно прочтите инструкцию. Запросить руководство можно с помощью контактной формы.

Подробнее об этом руководстве

Мы понимаем, что приятно иметь бумажное руководство для вашего Hoover CU71_CU12011 Пылесос. Вы всегда можете скачать инструкцию с нашего сайта и распечатать самостоятельно. Если вы хотите получить оригинальное руководство, мы рекомендуем вам связаться с Hoover. Возможно, они смогут предоставить оригинальное руководство. Вы ищете руководство для вашего Hoover CU71_CU12011 Пылесос на другом языке? Выберите предпочитаемый язык на нашей домашней странице и найдите номер модели, чтобы узнать, есть ли она у нас в наличии.

Технические характеристики

Бренд Hoover
Модель CU71_CU12011
Категория Пылесосы
Тип файла PDF
Размер файла 2.17 MB

Все инструкции для Hoover Пылесосы
Больше руководств Пылесосы

Часто задаваемые вопросы о Hoover CU71_CU12011 Пылесос

Наша служба поддержки выполняет поиск полезной информации по изделиям и отвечает на часто задаваемые вопросы. Если вы заметили неточность в наших часто задаваемых вопросах, сообщите нам об этом с помощью нашей контактной формы.

Шланг моего пылесоса забит. Как его прочистить? Проверенный

Отсоедините шланг и посмотрите в него, чтобы определить, действительно ли он забит. Если да, то возьмите длинный узкий предмет, например, метлу, и осторожно протолкните его через шланг. Это обычно удаляет любые предметы, которые забивают шланг. Если это не помогло, обратитесь к производителю.

Это было полезно (1465) Читать далее

Какие размеры мешков для пыли есть? Проверенный

Следует учитывать два размера. Во-первых, это размер тарелки с входом в мешок. Это определяет, подойдет ли мешок для пыли к определенному пылесосу. Тогда есть размер сумки. Обычно это указывается в литрах и определяет, сколько пыли может вместить мешок.

Это было полезно (956) Читать далее

Шнур пылесоса не сматывается обратно в корпус пылесоса. Что мне делать? Проверенный

Вероятно, шнур перекрутился. Несколько раз полностью размотайте и смотайте шнур обратно в пылесос, контролируя процесс руками. Если это не помогло устранить проблему, вероятно, сломан механизм смотки шнура. В этом случае обратитесь к производителю или в ремонтную службу.

Это было полезно (663) Читать далее

Пылесос издает свист. Что мне делать? Проверенный

Обычно причиной неполадки является заполненный пылесборник или фильтр либо отверстие в шланге, пропускающее воздух. Проверьте пылесборник и фильтр и при необходимости замените их. Проверьте, нет ли в шланге отверстий или непрочных соединений. Если это не поможет, обратитесь к производителю.

Это было полезно (555) Читать далее

Как удалить пыль и волосы с насадки-щетки пылесоса? Проверенный

Удаление пыли и волос с насадки-щетки пылесоса производится вручную. Если все идет не так, как нужно, можно использовать тонкую расческу, чтобы удалить оставшуюся грязь.

Это было полезно (539) Читать далее

Какую настройку на щеточной головке пылесоса мне следует использовать? Проверенный

Почти все пылесосы имеют насадку с регулируемой щеткой. Используйте щетку для твердых поверхностей, чтобы предотвратить царапины и повреждения. Отключите щетку для ковровых покрытий и ковриков.

Это было полезно (422) Читать далее

Можно ли использовать бумажный пылесборник более одного раза? Проверенный

Это делать не рекомендуется. Микропоры в мешке могут засориться, что приведет к снижению силы всасывания и может повредить двигатель.

Это было полезно (289) Читать далее

Что такое HEPA? Проверенный

HEPA означает высокоэффективный воздух для твердых частиц. Многие пылесосы имеют фильтр HEPA. HEPA-фильтр задерживает от 85% до 99,999995% всех частиц размером 0,3 микрометра (мкм) и выше.

Это было полезно (262) Читать далее

Могу ли я использовать обычный пылесос для сбора золы? Проверенный

Нет, это невозможно. Пепел, который кажется остывшим, может оставаться внутри теплым или даже горячим. Обычный пылесос для этого не предназначен и может вызвать пожар. Кроме того, фильтры обычных пылесосов не всегда подходят для удержания очень мелких частиц, таких как зола. Затем он может попасть в двигатель пылесоса и вызвать повреждение.

Это было полезно (256) Читать далее
Руководство Hoover CU71_CU12011 Пылесос

Сопутствующие товары

Связанные категории