
4
injury or damage to the device.
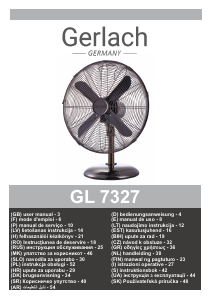
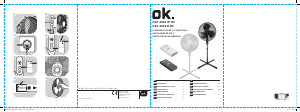
Product description: Stand fan – Picture A
1. Centre plate 2. Front grille
3. Hook 4. Fixing clip
5. Locking cap 6. Fan blade
7.Rear grille securing nut 8. Rear grille
9. Motor shaft 10. Shaft pin
11. Round pins 12. Motor housing
13.Motor housing fixing screw 14.Tilt adjustment
15. Switch housing 16. Set knob
17. Inner pipe 18. Height adjustment screw
19. Stand pipe 20. Base
21. Balancing weight 22. Fixing washer
23. Grille screw and nut 24."J" shaped fixing screw
25. Control Panel 26. Remote controller
27. Signal receiver
BEFORE FIRST USE – Assembly way
1. Insert the stand pipe (19) into the base (20) and put the balancing weight (21) and the fixing washer (22) under the base (20) and fix it
tightly by turning clockwise the fixing screw (24).
2. To adjust height, loosen the height adjustment screw (18). Slide the inner pipe (17) to the desired height, and then tighten again.
3. Loosen the set knob (16) by turning it anti-clockwise.
4. Slide the switch housing (15) down over the inner pipe (17) until it makes contact with the inner stopper, and tighten with the set knob
(16).
5. Unscrew the rear grille securing nut (7) from the motor housing (12) by turning it anti-clockwise.
6. Mount the rear grille (8) onto the motor housing (12) by matching the three holes on the rear grille (8) to the three round pins (11) on
the front of the motor housing (12).
7. Push firmly until the pins protrude through the holes and secure the rear grille (8) to the motor housing (12) with the rear grille securing
nut (7).
8. Remove the protective tube from the motor shaft (9).
9. Insert the fan blade (6) onto the motor shaft (9). Align the slots on the back of the fan blade (6) to the shaft pin (10). Press firmly until
the fan blade (6) engages the shaft pin (10).
10. Secure the fan blade (6) with the locking cap (5), turning anti-clockwise to tighten.
11. Test the fan blade (6) operation by rotating it with your hand. There should be no friction with the rear grille securing nut (7). If the
fan blade (6) does not operate freely, disassemble and repeat the procedure.
12. Remove the protective foil from the centre cap (1)
13. Open the fixing clips (4) around the front grille (2) and loosen the grille screw and nut (23) at the bottom of the front grille (2).
14. Position the hook (3) on the uppermost part of the rear grille (8).
15. Push the hook (3) down and press the rim of the front grille (2) onto the rear grille (8). Close all the clips around the grille and
tighten the grille screw and nut (23).
USE
1. Plug in the device.
2. You can control your fan either with the remote controller (26) or with buttons on the control panel (25).
3. Press the “A” button to switch on the device. At first start-up the fan will operate at low speed.
4. Press the button “A” repeatedly to choose between low, medium and fast fan airflow speed at remote control or press repeatedly the
icon”A1” at control panel.
5. The fan will swing in left and right direction after pressing the button “B”. Press it again to stop oscillation mode.
6. Press the button "C" on remote control or suitable icon (C1 or C2 or C3) at contrl panel to select one of the 3 wind modes namely
normal wind mode, natural wind mode, sleeping wind mode:
Normal wind mode (C1) means the fan operates according to selected fan airflow speed: low or medium or fast speed.
Natural wind mode (C2) means the wind speed is changing to imitate the natural wind:
-at low speed the wind power is low for every 5 seconds and stop for every 5 seconds,
-at medium speed the wind is working in repeated cycles. One cycle is wind power changing every 5 seconds: low / stop / low / medium /
medium / low / stop / low / stop / low / medium / low / stop,
-at fast speed the wind is working in repeated cycles. One cycle is wind power changing every 5 seconds: low / stop / low / medium / fast
/ medium / low / stop / low / stop / low / stop / low / stop / low / medium / fast.
Sleep wind mode (C3) means operation in cycles same as natural wind mode, but the speed will be decreased one step each half hour. .
For instance, if the device currently operates at fast speed , then half hour late, it will operate on medium speed and 1 hour later, it will
operate on low speed, finally it will continue the operation at low speed.
7. Press the button “D” repeatedly to change the timer setting. The time increases in increments of 1 hours and it has 12 time steps in
total. The maximum timer setting is 12 hours. Do not press ”D” button if you want to keep your fan operating indefinitely – the timer
indicator lamps will not light up if the timer button is not pressed.
8. To operate the device through remote control (26), note that the sensor of the remote control (26) must be pointed at the fan receiver
(27) to operate properly. The distance between the remote control (26) and the receiver (27) should be no more than 6 meters and 30
degrees radius left to right of the fan.
9. To switch off the device press the button “E” at remote control or press icon “A” at control panel (25).
To use the device with the remote control (26) supplied, pull the cover and insert 2 x AAA (1,5V) lithium battery into the battery chamber.
IMPORTANT: The + and - symbols on the battery should match same marking in the battery chamber. Firmly close the battery
compartment to begin using the Remote Control (26).
CLEANING AND MAINTENANCE


Присоединиться к беседе по данному изделию
Здесь вы можете поделиться тем, что думаете о Gerlach GL 7325 Вентилятор. Если у вас есть вопросы, сначала внимательно прочтите инструкцию. Запросить руководство можно с помощью контактной формы.