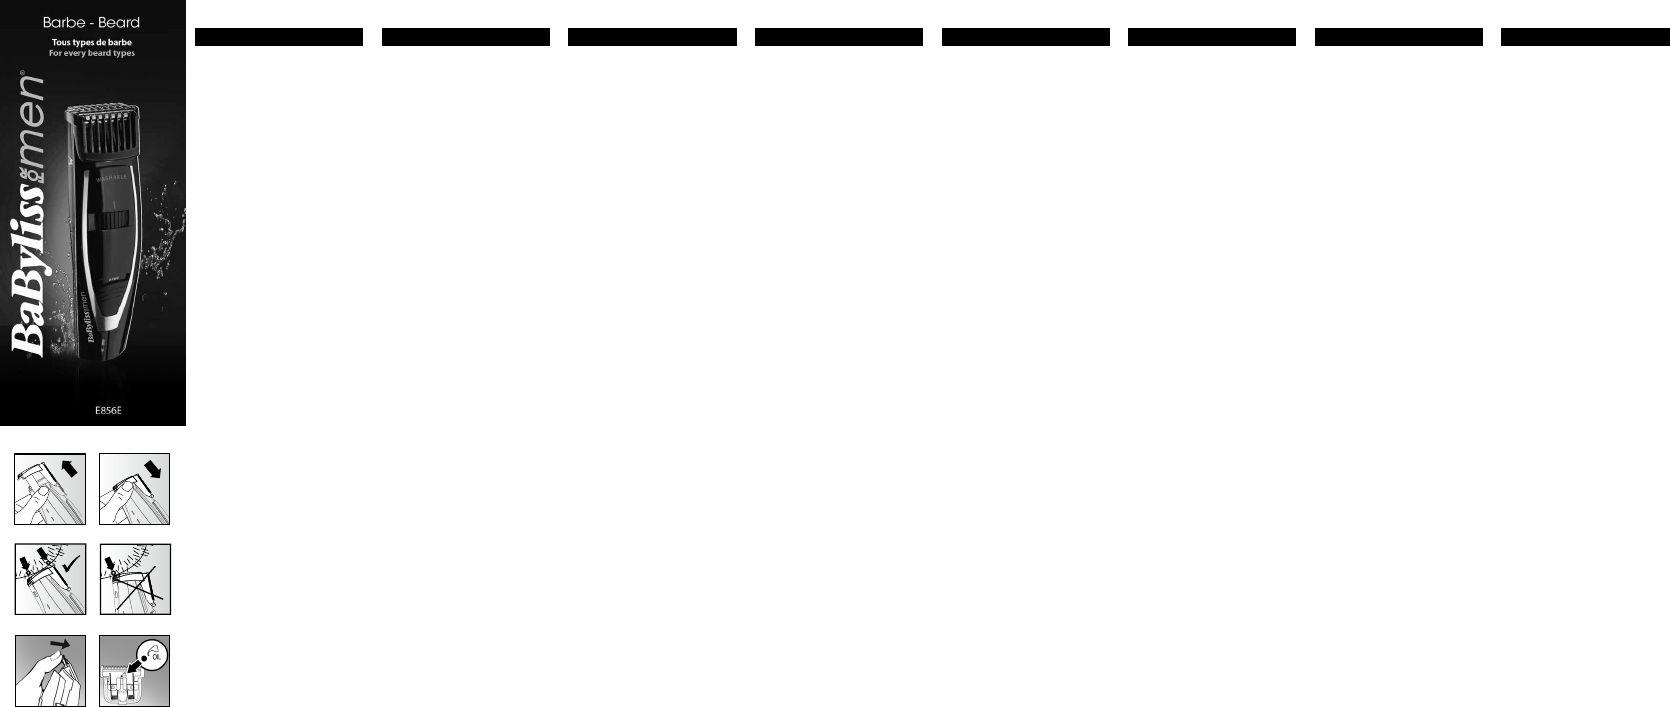
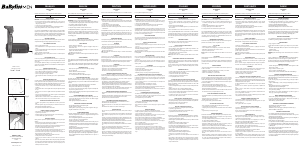
E856E
Veuillez lire attentivement les consignes de sécurité avant
toute utilisation de l’appareil.
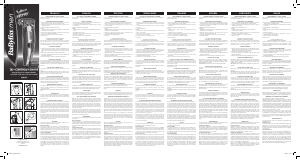
CARACTÉRISTIQUES DU PRODUIT
1. Lames:
• Couteau mobile - W-Tech : CMS (alliage acier inoxydable
chrome-molybdène)
• Couteau xe : acier inoxydable
2. 1 guide de coupe unique pour 18 longueurs (de 1 à 18 mm,
avec un pas de 1 mm)
3. Bouton ON/OFF
4. Molette de réglage de la hauteur de coupe
5. Achage de la hauteur de coupe par écran LED
6. Voyant lumineux de charge
7. Accessoires : adaptateur, huile, brosse de nettoyage
INFORMATION IMPORTANTE CONCERNANT
LES BATTERIES NI-MH DE CET APPAREIL
Pour atteindre et préserver la plus grande autonomie
possible des batteries, eectuer une charge de 16 heures
avant la première utilisation et tous les 3 mois environ. La
pleine autonomie du produit ne sera atteinte qu’après 3
cycles de charge complets.
CHARGER LA TONDEUSE
1. Introduire la che dans l’appareil et brancher l’adaptateur
à la prise secteur. Avant d’utiliser l’appareil pour la
première fois, le charger pendant 16 heures. S’assurer que
l’interrupteur de l’appareil est en position OFF.
2. Vérier que le voyant lumineux de charge est bien allumé.
3. Une charge complète permet d’utiliser l’appareil pendant
un minimum de 45 minutes.
4. La durée des charges suivantes est également de 16 heures.
UTILISATION SUR SECTEUR
Pour utiliser l’appareil sur secteur, introduire la fiche
directement dans l’appareil. Brancher l’appareil éteint sur le
secteur et mettre en position ON (si la batterie est très faible,
attendre environ 1 minute).
IMPORTANT! Utiliser exclusivement l’adaptateur fourni avec
l’appareil
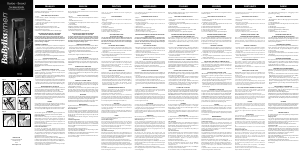
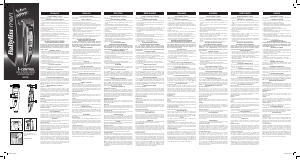
UTILISATION DU GUIDE DE COUPE
IMPORTANT: Toujours placer le guide de coupe AVANT
d’allumer l’appareil, et toujours éteindre l’appareil pour
mettre en place le guide de coupe.
- Pour retirer le guide de coupe, régler au préalable la hauteur
de coupe au-delà de la position 18 et, moteur éteint, tirer le
guide vers le haut pour le retirer (Fig. 1).
- Pour mettre en place le guide de coupe, enfoncer le guide de
coupe sur la tête de l’appareil puis actionner la molette de
réglage pour positionner correctement le guide de coupe
et pour sélectionner la hauteur de coupe souhaitée (Fig. 2).
MISE EN MARCHE ET UTILISATION
Pour sélectionner la hauteur de coupe de l’appareil, tourner la
molette de réglage. Actionner le bouton ON/OFF. La hauteur
de coupe sélectionnée est achée sur l’écran LED.
Vous pouvez changer la hauteur de coupe à tout moment.
IMPORTANT ! Veillez à maintenir la tête du guide de coupe
bien à plat sur la peau. Autrement dit, le sommet des dents et
les petits angles sortants du peigne doivent toujours être en
contact avec la peau. Dans le cas contraire, la précision de la
coupe peut en être altérée (Fig. 3-4).
LAVABLE
Il est possible de rincer la tête de l’appareil sous l’eau courante, à
condition que l’appareil soit éteint et débranché. Veiller à ce que la
tête de l’appareil soit totalement sèche avant utilisation.
N.B. Le manche de l’appareil n’a pas été conçu pour entrer en contact
avec l’eau. Ne pas utiliser l’appareil sous la douche ou dans le bain.
ENTRETIEN
Un entretien régulier des lames de l’appareil permettra de
maintenir l’appareil en état de fonctionnement optimal.
Lames démontables
Pour faciliter le nettoyage, les lames de l’appareil sont
démontables. Assurez-vous que l’appareil est éteint et
enlevez le guide de coupe. Tenez l’appareil en dirigeant les
lames vers le haut et détachez les lames en appuyant à la
pointe des lames (Fig. 5).
Brossez soigneusement les lames à l’aide de la brosse de
nettoyage pour éliminer les poils.
Lames auto-lubriantes
Les lames de l’appareil sont équipées d’un tampon
réservoir qui distille la quantité d’huile nécessaire au bon
fonctionnement de l’appareil, utilisation après utilisation. Il
est cependant recommandé de recharger périodiquement
le tampon réservoir, dès que l’on constate une baisse de
rendement de l’appareil.
Démontez les lames comme indiqué ci-dessus.
Déposez avec soin quelques gouttes de l’huile BaByliss sur
le tampon (Fig. 6). Replacez ensuite les lames sur l’appareil.
Formulée spécialement pour l’appareil, l’huile BaByliss ne
s’évaporera pas et ne ralentira pas les lames.
Il est possible de se procurer des lames de rechange lorsque
celles-ci sont usées ou abîmées.
FRANÇAIS ENGLISH DEUTSCH NEDERLANDS ITALIANO ESPAÑOL PORTUGUÊS DANSK
E856E
Please carefully read the instructions for use below before
using the appliance.
PRODUCT FEATURES
1. Blades:
• Moveable blade: CMS (Chrome-Molybdenum-Stainless
Steel)
• Fixed Blade: stainless steel
2. 1 comb guide for 18 lengths (from 1 mm to 18 mm, in 1mm
increments)
3. ON-OFF button
4. Wheel to adjust the cutting length
5. LED display window of the cutting length
6. Charging indicator light
7. Accessories : adaptor, oil, cleaning brush
IMPORTANT INFORMATION REGARDING
THE NIMH BATTERIES OF THIS UNIT
To obtain and maintain the longest battery autonomy
possible, allow it to charge for 16 hours before using it
for the rst time and then approximately every three
months. Full autonomy of the unit will only be obtained
after three complete recharge cycles.
CHARGING THE TRIMMER
1. Plug the cord into the unit and connect the adaptor. Before
using the unit for the rst time, allow it to charge for 16
hours. Make sure the unit’s switch is in the OFF position.
2. Check that the charging indicator light is lit.
3. A full charge provides a minimum of 45 minutes’ use of the
unit.
4. Subsequent charges should also be 16 hours.
USE ON THE MAINS
To use the unit on the mains, plug the cord directly into the
unit. Plug the unit, in the OFF position, into the mains and
switch ON (if the battery is very weak, wait about 1 minute).
IMPORTANT! Use only the adaptor that is supplied with the
trimmer.
HANDLING THE COMB GUIDE
NOTE: Always put the comb guide on BEFORE turning the unit
on, and turn the unit o before removing the comb guide.
- To remove the comb guide, rst set the comb guide beyond
position 18 and, with the motor o, pull the comb guide up
to remove it (Fig.1),
- To replace the comb guide, press the comb guide down then
turn the wheel to put it on and to select the desired cutting
length (Fig.2).
TURNING IT ON AND USING IT
To adjust the cutting length of the trimmer, turn the wheel.
Switch the ON/OFF button. The selected cutting length is
displayed on the LED display window. You can change the
cutting length at any time.
NOTE! Make sure you hold the comb guide head at against
the skin. That is, the tips of the teeth and the little corners
protruding from the comb should always be in contact with
the skin. If not, the precision of the cut may change (Fig.3-4).
WASHABLE
It is possible to rinse the head of the unit under running water,
as long as the unit is switched o and unplugged. Make sure
the head is thoroughly dry before using the unit again.
NOTE! The handle of the unit is not designed to be exposed to
water. Do not use the unit in the shower or in the bath.
MAINTENANCE
Regular maintenance of the trimmer blades will keep them in
optimal working condition.
Removable blades
To make cleaning easier, the BaByliss trimmer blades can
be removed. Make sure the trimmer is turned o and then
remove the comb guide. Hold the trimmer with the blades
facing up and remove them by pressing on the tips of the
blades (Fig.5).
Carefully brush the blades using the cleaning brush to
remove hair.
Self-lubricating blades
The blades of your trimmer have a reservoir pad for releasing
the necessary amount of oil for proper operation of your
trimmer, time after time. Nevertheless, it is recommended
that it be relled occasionally when you notice performance
is not as high.
Remove the blades as described above.
Squeeze a few drops of BaByliss oil onto the pad (Fig.6). Then
replace the blades on the trimmer.
The BaByliss oil is specially formulated for the trimmer, it does
not evaporate nor does it slow the blades.
It is possible to obtain replacement blades when these are
worn out or damaged.
E856E
Lesen Sie vor jeglichem Gebrauch des Geräts sorgfältig die
Sicherheitshinweise.
PRODUKTMERKMALE
1. Klingen:
• Mobile W-Tech-Klingen: CMS (Edelstahl-Chrom-Molybdän-
Legierung)
• Feste Klinge: Edelstahl
2. 1 einzige Scherführung für 18 Längen (1 bis 18 mm, mit einer
Teilung von 1 mm)
3. EIN/AUS-Taste
4. Schnitthöhen-Einstellrad
5. Schnitthöhen-Anzeige über ein LED-Display
6. Leuchtanzeige für den Ladestand
7. Zubehör: Adapter, Öl, Reinigungsbürste
WICHTIGER HINWEIS ZU DEN
NI-MH-AKKUS DES GERÄTS
Um eine möglichst hohe Autonomie der Akkus zu erzielen und
zu bewahren, laden Sie das Gerät vor dem ersten Gebrauch
und etwa alle 3 Monate 16 Stunden lang auf. Die vollständige
Autonomie des Produktes wird erst nach 3 vollständigen
Ladezyklen erreicht.
AUFLADEN DES BARTSCHNEIDERS
1. Schließen Sie den Stecker an das Gerät und den Adapter an die
Netzsteckdose an. Laden Sie das Gerät vor dem ersten Gebrauch
16 Stunden lang auf. Stellen Sie sicher, dass der Schalter des Geräts
auf AUS steht.
2. Überprüfen Sie, ob die Ladestandsanzeige leuchtet.
3. Bei vollständig aufgeladenem Akku kann das Gerät mindestens 45
Minuten lang betrieben werden.
4. Die anschließenden Ladezeiten betragen ebenfalls 16 Stunden.
NETZBETRIEB
Für den Gebrauch des Geräts im Netzbetrieb schließen Sie den
Stecker direkt an das Gerät an. Schließen Sie das ausgeschaltete
Gerät an das Stromnetz an und schalten Sie es EIN (bei sehr
schwacher Batterie ca. 1 Minute warten).
WICHTIG! Verwenden Sie ausschließlich den mit dem Gerät
mitgelieferten Adapter
GEBRAUCH DER SCHERFÜHRUNG
WICHTIG: Setzen Sie die Scherführung grundsätzlich VOR dem
Einschalten des Geräts auf und schalten Sie das Gerät grundsätzlich
aus, bevor Sie die Scherführung aufsetzen.
- Um die Scherführung zu entfernen, stellen Sie zunächst die
Schnitthöhe über die Position 18 hinaus und ziehen die Führung
bei abgeschaltetem Motor nach oben, um sie abzunehmen (Abb. 1).
- Um die Scherführung aufzusetzen, drücken Sie die Scherführung
auf den Gerätekopf und betätigen das Einstellrad, um die
Scherführung richtig zu positionieren und die gewünschte
Schnitthöhe auszuwählen (Abb. 2).
INBETRIEBNAHME UND GEBRAUCH
Drehen Sie am Einstellrad, um die Schnitthöhe des Geräts
auszuwählen. Betätigen Sie die EIN/AUS-Taste. Die ausgewählte
Schnitthöhe wird auf dem LED-Display angezeigt.
Sie können die Schnitthöhe jederzeit ändern.
WICHTIG! Achten Sie darauf, dass der Kopf der Scherführung
vollständig auf der Haut auiegt. Das heißt, die Zahnspitzen und
die aus dem Kamm hervorstehenden kleinen Winkel müssen sich
grundsätzlich in Kontakt mit der Haut benden. Andernfalls kann
die Schnittgenauigkeit beeinträchtigt werden (Abb. 3-4).
ABSPÜLBAR
Der Gerätekopf kann unter laufendem Wasser abgespült werden,
sofern das Gerät ausgeschaltet und der Netzstecker gezogen
ist. Achten Sie darauf, dass der Gerätekopf vor dem Gebrauch
vollständig getrocknet ist.
Hinweis: Der Gri des Geräts ist nicht dafür ausgelegt, mit Wasser in
Kontakt zu kommen. Verwenden Sie das Gerät deshalb nicht unter
der Dusche oder in der Badewanne.
PFLEGE
Durch das regelmäßige Reinigen der Klingen erhalten Sie das Gerät
in einem optimalen Betriebszustand.
Herausnehmbare Klingen
Zur Vereinfachung des Reinigungsvorgangs sind die Klingen
des Geräts herausnehmbar. Stellen Sie sicher, dass das Gerät
ausgeschaltet ist und nehmen Sie die Scherführung ab. Halten Sie
das Gerät mit den Klingen nach oben und lösen Sie die Klingen,
indem Sie auf ihre Spitzen drücken (Abb. 5).
Entfernen Sie mit Hilfe der Reinigungsbürste sorgfältig die Haare aus
den Klingen.
Selbstschmierende Klingen
Die Klingen des Geräts verfügen über einen Puerbehälter, von
dem bei jedem Gebrauch die für den ordnungsgemäßen Betrieb
des Geräts erforderliche Ölmenge freigegeben wird. Es empehlt
sich jedoch, den Puerbehälter regelmäßig aufzufüllen, sobald Sie
feststellen, dass die Leistung des Geräts nachlässt.
Nehmen Sie die Klingen heraus, wie obenstehend beschrieben.
Geben Sie vorsichtig einige Tropfen BaByliss-Öl in den Behälter (Abb.
6). Setzen Sie die Klingen anschließend wieder auf das Gerät auf.
Das BaByliss-Öl wurde speziell für das Gerät entwickelt, verdunstet
nicht und beeinträchtigt keineswegs die Betriebsgeschwindigkeit
der Klingen.
Es besteht die Möglichkeit, abgenutzte oder beschädigte Klingen
durch neue Klingen zu ersetzen.
E856E
Lees nauwkeurig de veiligheidsvoorschriften voordat u het
apparaat gaat gebruiken.
KENMERKEN VAN HET PRODUCT
1. Mesjes:
• Afneembaar mes - W-Tech: CMS (legering van roestvrij staal en
chroom-molybdeen)
• Vast mesje: roestvrij staal
2. 1 unieke trimgeleider voor 18 lengtes (van 1 tot 18 mm, in
stappen van 1 mm)
3. ON/OFF-knop
4. Afstelwieltje voor de snijhoogte
5. Weergave snijhoogte op een ledscherm
6. Verklikkerlampje voor opladen
7. Accessoires: adapter, olie, reinigingsborstel
BELANGRIJKE INFORMATIE OVER DE NI-MH-BATTERIJEN
VAN DIT APPARAAT
Om de grootst mogelijke autonomie van de batterijen te
bereiken en in stand te houden, deze gedurende 16 uur
voor het eerste gebruik en ongeveer om de 3 maanden
opladen. De volle autonomie van het product wordt pas
bereikt na 3 volledige laadcycli.
DE TONDEUSE OPLADEN
1. De stekker in het apparaat steken en de adapter aansluiten.
Voordat u de tondeuse voor het eerst gebruikt, dient u deze
gedurende 16 uur op te laden. Zorg dat de schakelaar van de
tondeuse in de OFF-stand staat.
2. Controleer of het ladingsverklikkerlampje aan is.
3. Volledig opgeladen kan de tondeuse minimaal 45 minuten
worden gebruikt.
4. De duur van de volgende opladingen is ook 16 uur.
GEBRUIK OP NETVOEDING
Om de tondeuse op netvoeding te gebruiken de stekker
rechtstreeks in het apparaat steken. De tondeuse uitgeschakeld
op de netvoeding aansluiten en in de ON-stand zetten (als de
batterij heel zwak is, ongeveer 1 minuut wachten).
BELANGRIJK! Uitsluitend de met de tondeuse meegeleverde
adapter gebruiken.
GEBRUIK VAN DE TRIMGELEIDER
BELANGRIJK: De trimgeleider altijd aanbrengen VOORDAT u de
tondeuse aanzet en de tondeuse uitzetten om de trimgeleider
te plaatsen.
- Om de trimgeleider te verwijderen vooraf de trimhoogte
instellen boven stand 18 en met de motor uitgezet de geleider
naar boven trekken om deze te verwijderen (afb. 1).
- Om de trimgeleider te plaatsen, duwt u hem op de kop van
het apparaat en bedient u het afstelwieltje om de trimgeleider
correct te plaatsen en de gewenste trimhoogte te kiezen (afb.
2).
INSCHAKELING EN GEBRUIK
Om de trimhoogte van de tondeuse aan te passen het wieltje
verdraaien. Druk op de ON/OFF-knop. De geselecteerde
snijhoogte verschijnt op het ledscherm.
U kunt de trimhoogte op elk moment aanpassen.
BELANGRIJK! Zorg ervoor dat u de kop van de kam goed vlak
houdt op de huid. Anders gezegd, de punt van de tanden en
de kleine uitspringende hoeken van de kam moeten steeds in
contact met de huid zijn. Doet u dit niet, dan kan de trimprecisie
worden aangetast (afb. 3-4).
AFWASBAAR
U kunt de kop van het apparaat onder de kraan afspoelen, als
het apparaat uitgeschakeld is en de stekker uit het stopcontact
is gehaald. Let op: de kop van het apparaat moet helemaal
droog zijn voordat u het gaat gebruiken.
N.B. Het handvat van het apparaat is niet ontworpen om met
water in contact te komen. Gebruik het apparaat niet onder de
douche of in bad.
ONDERHOUD
Door de mesjes van de tondeuse regelmatig te onderhouden,
blijft het apparaat optimaal functioneren.
Afneembare mesjes
Om de reiniging te vergemakkelijken zijn de mesjes van
het apparaat demonteerbaar. Zorg dat het apparaat is
uitgeschakeld en verwijder de trimgeleider. De tondeuse met
de mesjes naar boven vastnemen en deze losmaken door op
de punt van de mesjes te drukken (g. 5). De mesjes zorgvuldig
afborstelen met behulp van de reinigingsborstel om de
haartjes te verwijderen.
Zelfsmerende mesjes
De mesjes van het apparaat zijn uitgerust met een
kussenreservoir dat bij elk gebruik de nodige hoeveelheid
olie voor de goede werking van uw tondeuse afscheidt. Het
is echter toch aan te raden dit reservoir af en toe bij te vullen
zodra u merkt dat het apparaat minder goed gaat werken.
Demonteer de mesjes zoals hierboven aangeduid.
Breng voorzichtig enkele druppels van de BaByliss-olie op het
kussen aan (g. 6). De mesjes vervolgens opnieuw aanbrengen
op de tondeuse.
De BaByliss-olie werd speciaal ontwikkeld voor tondeuses,
deze verdampt niet en vertraagt de mesjes ook niet.
Het is mogelijk nieuwe mesjes aan te schaen als deze versleten
of beschadigd zijn.
E856E
Prima di utilizzare l’apparecchio, leggere attentamente le
indicazioni in materia di sicurezza.
CARATTERISTICHE DEL PRODOTTO
1. Lame:
• Coltello mobile - W-Tech: CMS (Cromo-Molibdeno-Acciaio
inossidabile)
• Coltello sso: acciaio inossidabile
2. 1 guida di taglio unica per 18 lunghezze (da 1 a 18 mm, con
passo di 1 mm)
3. Pulsante ON/OFF
4. Rotella di regolazione dell’altezza di taglio
5. Visualizzazione dell’altezza di taglio su schermo a LED
6. Spia luminosa di carica
7. Accessori: adattatore, olio, spazzolina di pulizia
INFORMAZIONI IMPORTANTI RELATIVE ALLE
BATTERIE NI-MH DI QUESTO APPARECCHIO
Per ottenere e mantenere la massima autonomia possibile
delle batterie, eseguire una ricarica di 16 ore prima del
primo utilizzo e ogni 3 mesi circa. Il prodotto risulterà
completamente autonomo soltanto dopo 3 cicli di ricarica
completi.
CARICARE IL RASORIO
1. Inserire la spina nell’apparecchio e collegare l’adattatore
alla presa di rete. Prima di utilizzare l’apparecchio la
prima volta, lasciarlo in carica per 16 ore. Accertare che
l’interruttore dell’apparecchio sia posizionato su OFF.
2. Vericare che la spia luminosa di carica sia accesa.
3. Una ricarica completa consente di utilizzare l’apparecchio
per almeno 45 minuti.
4. Anche le ricariche successive devono essere di 16 ore.
UTILIZZO CON ATTACCO ALLA CORRENTE ELETTRICA
Per utilizzare l’apparecchio con attacco alla corrente elettrica,
inserire la spina direttamente nell’apparecchio. Attaccare alla
corrente elettrica l’apparecchio spento e mettere in posizione
ON (se la batteria è debole, aspettare circa 1 minuto).
IMPORTANTE! Utilizzare esclusivamente l’adattatore con
l’apparecchio
UTILIZZO DELLA GUIDA DI TAGLIO
IMPORTANTE: posizionare sempre la guida di taglio PRIMA
di accendere l’apparecchio e spegnere sempre l’apparecchio
per posizionare la guida di taglio.
- Per estrarre la guida di taglio, regolare preliminarmente
l’altezza di taglio oltre la posizione 18 e, a motore spento,
tirare la guida verso l’alto ed estrarla (Fig. 1).
- Per posizionare la guida di taglio, premerla sulla testina
dell’apparecchio, quindi azionare la rotella di regolazione
per posizionare correttamente la guida di taglio e
selezionare l’altezza di taglio prevista (Fig. 2).
ACCENSIONE E UTILIZZO
Per selezionare l’altezza di taglio dell’apparecchio, girare la
rotella di regolazione. Azionare il pulsante ON/OFF. L’altezza
di taglio selezionata viene visualizzata sullo schermo a LED.
È possibile cambiare l’altezza di taglio in qualsiasi momento.
IMPORTANTE! Attenzione a mantenere piatta la testina della
guida di taglio sulla pelle. In altre parole, la parte alta dei
denti e i piccoli angoli che escono dal pettine devono sempre
essere a contatto con la pelle. In caso contrario, il taglio rischia
di essere meno preciso (Fig. 3-4)..
LAVABILE
Si può risciacquare la testina dell’apparecchio sotto l’acqua
corrente, purché l’apparecchio sia spento e scollegato.
Prima dell’uso, vericare che la testina dell’apparecchio sia
completamente asciutta.
N.B. Il manico dell’apparecchio non è stato concepito per il
contatto con l’acqua. Non utilizzare l’apparecchio sotto la
doccia o a bagno.
MANUTENZIONE
La manutenzione regolare delle lame dell’apparecchio
consentirà di mantenerlo in condizioni di funzionamento
ottimali.
Lame smontabili
Le lame dell’apparecchio sono smontabili, per facilitare la
pulizia. Controllare che l’apparecchio sia spento e togliere la
guida di taglio. Tenere l’apparecchio orientando le lame verso
l’alto e staccarle premendone la punta (Fig. 5).
Pulire con cura le lame con la spazzolina di pulizia per
eliminare i peli.
Lame auto-lubricanti
Le lame dell’apparecchio sono dotate di serbatoio-tampone
che fornisce la quantità di olio necessaria al corretto
funzionamento dell’apparecchio, utilizzo dopo utilizzo.
Si raccomanda tuttavia di ricaricare periodicamente
il serbatoio-tampone, appena si riscontra un minore
rendimento dell’apparecchio.
Smontare le lame come indicato sopra.
Versare accuratamente qualche goccia di olio BaByliss
sul tampone (Fig. 6). Riposizionare quindi le lame
sull’apparecchio.
Formulato appositamente per l’apparecchio, l’olio BaByliss
non evapora e non rallenta le lame.
In caso di danni o usura, sono disponibili lame di ricambio.
E856E
¡Lea atentamente estas instrucciones de seguridad antes de
utilizar el aparato!
CARACTERÍSTICAS DEL PRODUCTO
1. Cuchillas:
• Cuchilla móvil - W-Tech: CMS (aleación de acero inoxidable
cromo-molibdeno)
• Cuchilla ja: acero inoxidable
2. 1 guía de corte única para 18 longitudes de corte (de 1 a 18
mm, en incrementos de 1 mm).
3. Botón ON/OFF (encendido/apagado)
4. Rueda de ajuste de la altura de corte
5. Indicación de la altura de corte en pantalla LED
6. Indicador luminoso de carga
7. Accesorios: adaptador, aceite, cepillo de limpieza
INFORMACIÓN IMPORTANTE SOBRE
LAS PILAS NI-MH DE ESTE APARATO
Para que las pilas obtengan y conserven la mayor autonomía
posible, cárguelas durante 16 horas antes de utilizarlas por
primera vez y también cada tres meses, aproximadamente.
El producto no alcanzará plena autonomía hasta haber
completado tres ciclos de carga.
CARGA DEL CORTAPELO
1. Introduzca la clavija en el aparato y conecte el adaptador a
la red eléctrica. Antes de utilizar el aparato por primera vez,
cárguelo durante 16 horas. Compruebe que el interruptor
del aparato está en posición OFF (apagado).
2. Compruebe que el indicador luminoso de carga está
encendido.
3. Una carga completa permite utilizar el aparato durante un
mínimo de 45 minutos.
4. La duración de las cargas sucesivas es también de 16 horas.
UTILIZACIÓN CONECTADO A LA RED ELÉCTRICA
Para utilizar el aparato conectado a la red, introduzca la
clavija directamente en él. Enchufe el aparato apagado a la
toma de corriente y enciéndalo (si la batería está muy baja,
espere aproximadamente 1 minuto).
¡IMPORTANTE! Utilice exclusivamente el adaptador
suministrado con el aparato
UTILIZACIÓN DE LA GUÍA DE CORTE
IMPORTANTE: Coloque siempre la guía de corte ANTES
de encender el aparato y apague siempre el aparato para
colocarla.
- Para retirar la guía de corte, regule previamente la altura de
corte por encima de la posición 18 y, con el motor apagado,
tire de la guía hacia arriba para extraerla (Fig. 1).
- Para colocar la guía de corte, introduzca la guía de corte en el
cabezal del aparato y gire la rueda de ajuste para posicionar
correctamente la guía y para seleccionar la altura de corte
deseada (Fig. 2).
ENCENDIDO Y UTILIZACIÓN
Para seleccionar la altura de corte del aparato, gire la rueda
de ajuste. Apriete el botón ON/OFF (encendido/apagado).
La altura de corte seleccionada aparecerá en la pantalla LED.
La altura de corte puede cambiarse en cualquier momento.
¡IMPORTANTE! Procure mantener el cabezal de la guía de corte
lo más plano posible sobre la piel. Es decir, la parte superior
de los dientes y los pequeños salientes del peine deberán
estar siempre en contacto con la piel. En caso contrario, la
precisión del corte podría verse alterada (Fig. 3-4).
LAVABLE
El cabezal del aparato se puede limpiar bajo agua corriente,
siempre que el aparato esté desconectado de la corriente.
Asegúrese de que el cabezal esté completamente seco antes
de utilizar el aparato.
Nota. El mango del aparato no ha sido diseñado para ponerlo
en contacto con el agua. No utilice el aparato bajo la ducha
ni en la bañera.
MANTENIMIENTO
Un mantenimiento regular de las cuchillas del aparato
permite conservarlo en un estado de funcionamiento óptimo.
Cuchillas desmontables
Para facilitar la limpieza, las cuchillas del aparato son
desmontables. Compruebe que el aparato está apagado y
retire la guía de corte. Sujete el aparato con las cuchillas hacia
arriba y sáquelas empujándolas por la punta (Fig. 5).
Limpie con cuidado las cuchillas con el cepillo de limpieza
para eliminar los restos de cabello.
Cuchillas autolubricantes
Las cuchillas del aparato llevan un depósito que destila la
cantidad de aceite necesaria para que el aparato funcione
siempre correctamente. Le recomendamos que lo recargue
periódicamente, cuando detecte una disminución del
rendimiento del aparato.
Desmonte las cuchillas tal y como se indica más arriba.
Vierta con cuidado unas gotas de aceite BaByliss en el
depósito (Fig. 6). Vuelva a colocar las cuchillas en el aparato.
El aceite BaByliss está especialmente formulado para el
aparato, no se evapora y no ralentiza la velocidad de las
cuchillas.
Se pueden obtener cuchillas de recambio para sustituirlas
cuando estén gastadas o deterioradas.
E856E
Leia atentamente estes conselhos de segurança antes de utilizar
o aparelho pela primeira vez.
CARACTERÍSTICAS DO PRODUTO
1. Lâminas:
• Lâmina oscilante- W-Tech: CMS (liga de aço inoxidável, crómio
e molibdénio)
• Lâmina xa: aço inoxidável
2. 1 guia de corte único para 18 comprimentos (de 1 a 18 mm, em
incrementos de 1 mm)
3. Interruptor de alimentação
4. Selector rotativo da altura de corte
5. Indicação da altura de corte num visor LED
6. Indicador luminoso da carga
7. Acessórios: adaptador, óleo, escova de limpeza
INFORMAÇÃO IMPORTANTE SOBRE
AS BATERIAS NI-MH DESTE APARELHO
Para alcançar e preservar a maior autonomia possível das
baterias, deixe a bateria carregar durante 16 horas antes da
primeira utilização e aproximadamente de 3 em 3 meses. A
plena autonomia do produto só será alcançada no m de 3 ciclos
completos.
CARREGAR O APARADOR
1. Introduza a cha no aparelho e ligue o adaptador à tomada.
Antes de utilizar o aparelho pela primeira vez, carregue-o
durante 16 horas. Conrme que o interruptor do aparelho está
na posição OFF.
2. Certique-se de que o indicador luminoso de carga está aceso.
3. Uma carga completa permite utilizar o aparelho durante um
mínimo de 45 minutos.
4. A duração das cargas subsequentes é igualmente de 16 horas.
UTILIZAÇÃO NA REDE ELÉTRICA
Para utilizar o aparelho na rede elétrica, introduza a ficha
diretamente no aparelho. Ligue o aparelho desligado à rede
elétrica e ponha-o na posição ON (se a bateria estiver muito
fraca, aguarde cerca de 1 minuto).
IMPORTANTE! Utilize exclusivamente o adaptador fornecido
com o aparelho
UTILIZAÇÃO DO GUIA DE CORTE
IMPORTANTE: Coloque sempre o guia de corte ANTES de ligar
o aparelho e desligue-o sempre para colocar o guia de corte na
devida posição.
- Para retirar o guia de corte, ajuste previamente a altura de corte
para além da posição 18 e, com o motor desligado, puxe o guia
para cima para o remover (Fig. 1).
- Para colocar o guia de corte na devida posição, exerça pressão
no mesmo sobre a cabeça do aparelho e depois acione a roda
de ajuste para o posicionar corretamente e para selecionar a
altura de corte pretendida (Fig. 2).
COLOCAÇÃO EM FUNCIONAMENTO E UTILIZAÇÃO
Para selecionar a altura de corte do aparelho, rode a roda de
ajuste. Acionar o interruptor de alimentação. A altura de corte
selecionada é exibida no visor LED.
Pode, a qualquer momento, alterar outra altura de corte.
IMPORTANTE! Mantenha a cabeça do guia de corte junto à pele.
Ou seja, as pontas dos dentes e as pequenas saliências do pente
devem estar sempre em contacto com a pele. Caso contrário, a
precisão de corte pode ser afetada (Fig. 3 - 4).
LAVAVEL
É possível lavar a cabeça do aparelho em água corrente, desde
que o aparelho esteja desligado e não esteja ligado à corrente.
Certique-se de que a cabeça do aparelho está completamente
seca antes de a utilizar.
N.B. O corpo do aparelho não foi desenvolvido para entrar em
contacto com a água. Não utilize o aparelho no duche nem no
banho.
MANUTENÇÃO
Uma manutenção regular das lâminas permitirá manter o
aparelho em condições de funcionamento ideais.
Lâminas desmontáveis
Para facilitar a limpeza, as lâminas do aparelho são desmontáveis.
Certique-se de que o aparelho está desligado e retire o guia
de corte. Segure o aparelho com as lâminas viradas para cima e
desencaixe-as exercendo pressão nas pontas das lâminas (Fig.
5).
Escove cuidadosamente as lâminas com a escova de limpeza
para eliminar os pelos.
Lâminas autolubricantes
As lâminas do aparelho estão equipadas com um reservatório
que doseia a quantidade de óleo necessária para o bom
funcionamento do aparelho, utilização após utilização. No
entanto, recomenda-se que o reservatório seja enchido
regularmente, sempre que seja constatada uma diminuição no
desempenho do aparelho.
Desmonte as lâminas conforme indicado acima.
Coloque cuidadosamente algumas gotas de óleo BaByliss
no reservatório (Fig. 6). Depois volte a colocar as lâminas no
aparelho.
Formulado especialmente para este aparelho, o óleo BaByliss
não evapora nem torna as lâminas mais lentas.
Quando as lâminas estiveram gastas ou danicadas, é possível
adquirir lâminas de substituição.
E856E
Læs sikkerhedsforanstaltningerne omhyggeligt inden
apparatet tages i brug.
PRODUKTETS EGENSKABER
1. Skær:
• Bevægeligt blad - W-Tech: CMS (legering krom-molybdæn-
rustfrit stål)
• Fast blad: rustfrit stål
2. 1 unik afstandskam til 18 længder (fra 1 til 18 mm, med 1
mm afstand)
3. ON/OFF-knap
4. Indstillingshjul for klippehøjden
5. Visning af klippehøjden på LED-display
6. Ladelampe
7. Tilbehør: adapter, olie, rensebørste
VIGTIGE INFORMATIONER OM
NI-MH-BATTERIERNE TIL DETTE APPARAT
Oplad batterierne i 16 timer før første anvendelse for at opnå
størst muligt udbytte af batterierne og efterfølgende ca. hver
tredje måned. Apparatet vil først være fuldt opladet efter 3
fulde opladningscyklusser.
OPLADNING AF KLIPPEREN
1. Sæt stikket i apparatet og tilslut adapteren til stikkontakten.
Inden apparatet anvendes første gang, skal det oplades
i 16 timer. Kontrollér, at apparatets afbryder er stillet på
positionen OFF.
2. Tjek, at kontrollyset er tændt.
3. Når apparatet er fuldt opladet, kan det mindst anvendes
i 45 minutter.
4. De efterfølgende opladninger skal ligeledes vare 16 timer.
ANVENDELSE MED LEDNING
Hvis apparatet skal anvendes med netstrøm, sættes stikket
direkte i apparatet. Sæt stikket på den afbrudte hårklipper
i stikkontakten, og sæt den på ON (Hvis batteriet er meget
svagt, skal du vente ca. i 1 minut).
VIGTIGT! Anvend kun den adapter, der leveres sammen med
ANVENDELSE AF AFSTANDSKAMMEN
VIGTIGT: Påsæt altid afstandskammen, FØR du tænder for
apparatet, og sluk altid for apparatet, når afstandskammen
påsættes.
- For at fjerne afstandskammen skal du forinden indstille
klippehøjden over position 18 og med motoren slukket,
trække kammen opefter for at erne den (Fig. 1).
- For at sætte afstandskammen på skal du trykke på
afstandskammen oven på apparatets hoved og derefter
aktivere indstillingshjulet for korrekt placering af
afstandskammen og for at vælge den ønskede klippehøjde
(Fig. 2).
IBRUGTAGNING OG ANVENDELSE
Apparatets klippelængde justeres ved at dreje
indstillingshjulet. Tryk på ON/OFF-knappen. Den valgte
klippehøjde vises på LED-displayet.
Du kan til enhver tid ændre klippehøjden.
VIGTIGT! Sørg for at holde afstandskammens hoved adt ind
mod huden. Sagt med andre ord skal det øverste af tænderne
og afstandskammens små vinkler altid være i kontakt med
huden. Sker det ikke, kan klipningens præcision ændres (Fig.
3-4).
VASKBAR
Apparatets hoved kan vaskes under rindende vand, forudsat
at der er slukket for apparatet og stikket taget ud af kontakten.
Sørg for, at apparatets hoved er helt tørt, før det anvendes.
N.B. Apparatets greb er ikke beregnet til at komme i kontakt
med vand. Apparatet må ikke anvendes under bruseren eller
i badekar.
VEDLIGEHOLDELSE
En optimal ydeevne opnås ved regelmæssig vedligeholdelse
af apparatets skær.
Aftagelige skær
For at lette rengøringen kan apparatets skær afmonteres.
Sørg for, at apparatet er slukket og ern afstandskammen.
Hold apparatet med skærene opefter og frigør dem ved at
trykke på det øverste af skærene (Fig. 5).
Børst hårene væk fra skærene ved hjælp af rensebørsten.
Selvsmørende skær
Apparatets skær er forsynet med en pudebeholder, der
udskiller den mængde olie, der er nødvendig for apparatets
korrekte funktion, hver gang det anvendes. Det anbefales
imidlertid, at beholderen efterfyldes regelmæssigt, så snart
det konstateres, at apparatet har en lavere ydeevne.
Afmontér skærene som anført ovenfor.
Kom et par dråber BaByliss-olie på puden (Fig. 6). Sæt derefter
skærene på plads på apparatet.
BaByliss-olie er specialfremstillet til apparatet. Den
fordamper ikke og hæmmer ikke skærene.
Det er muligt at få nye skær, hvis de eksisterende er slidte eller
beskadigede.
Fig. 5 Fig. 6
Fig. 3 Fig. 4
1
2
Fig. 1 Fig. 2
Made in China
BABYLISS SARL
99 avenue Aristide Briand
92120 Montrouge
France
www.babyliss.com


Присоединиться к беседе по данному изделию
Здесь вы можете поделиться тем, что думаете о BaByliss E856E Триммер для бороды. Если у вас есть вопросы, сначала внимательно прочтите инструкцию. Запросить руководство можно с помощью контактной формы.